Project Summary
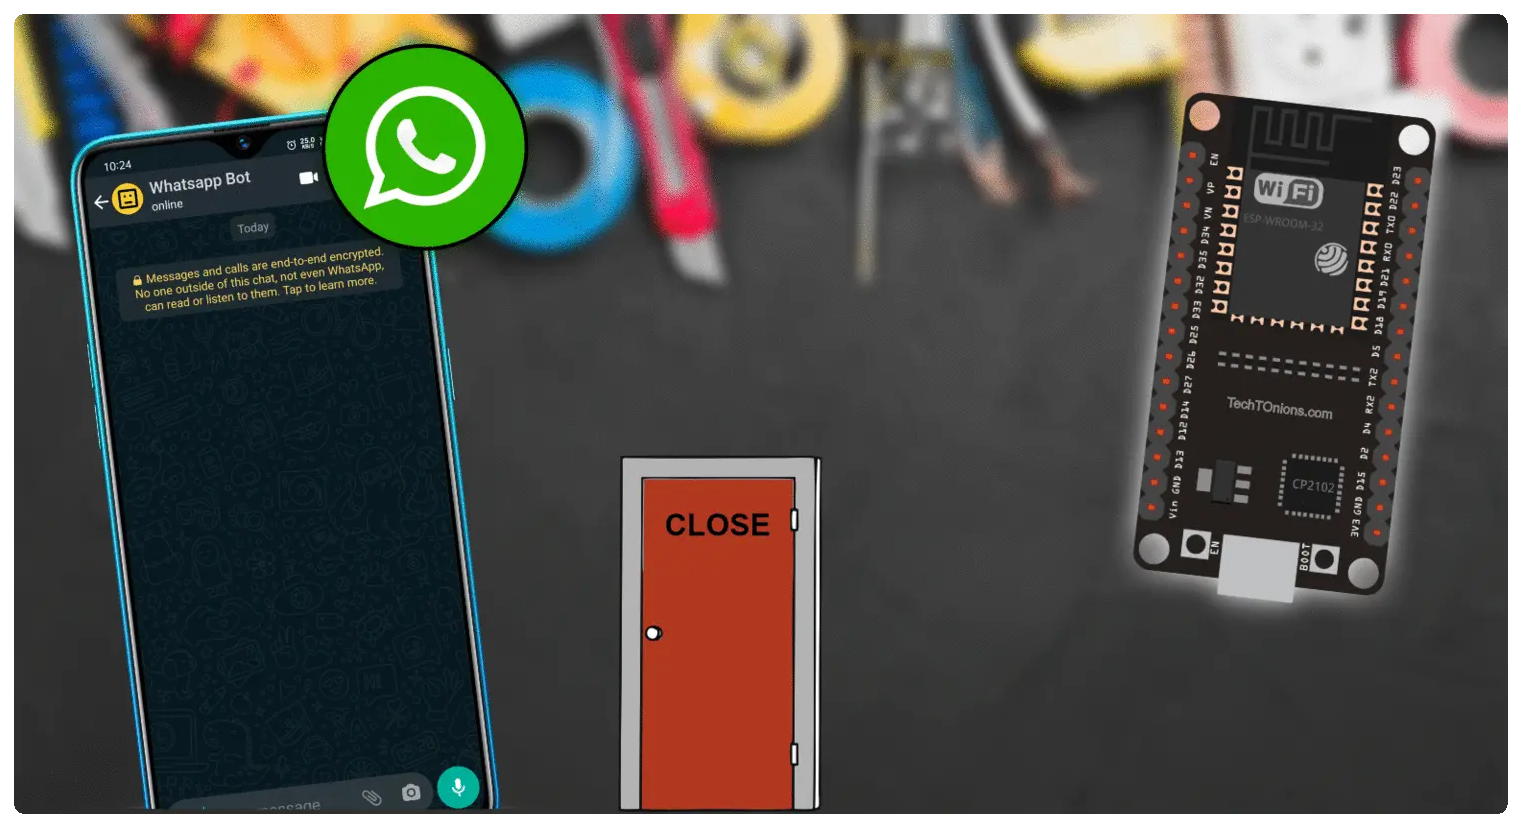
This tutorial will cover how to use WhatsApp bot API to send notifications to Whatsapp using ESP32.
Additionally, we will build an interesting ESP32 based security system project, which will give you alerts directly on your Whatsapp messenger.
We will integrate a readily available 433Mhz RF wireless door security sensor with ESP32.

The ESP32 side will have a generic 433Mhz receiver attached for detecting the triggers from the door sensor wirelessly.
Once ESP32 gets a trigger from the attached sensors, it will send an alert to your Whatsapp messager so that you can take appropriate action.
Here is the project breakdown:
- You’ll create WhatsApp bot API for our ESP32 project.
- Sending Hello message to WhatsApp from ESP32.
- Reading the unique address from the wireless door sensor with ESP32.
- Combining both to build our small security system.
You can interface WhatsApp bot API to your custom ESP32 IoT-based projects.
WhatsApp itself needs no introduction as most of the readers would already have their account on WhatsApp. Still, if in case you don’t know about you can check WhatsApp’s official site.
Watch the Video Tutorial
This tutorial is available in video format (watch below) and written format (continue reading this page).
Setting Up A WhatsApp bot
If you are not using WhatsApp, you first need to download it from Google Play or the app store.
Skip if you have are already using WhatsApp.

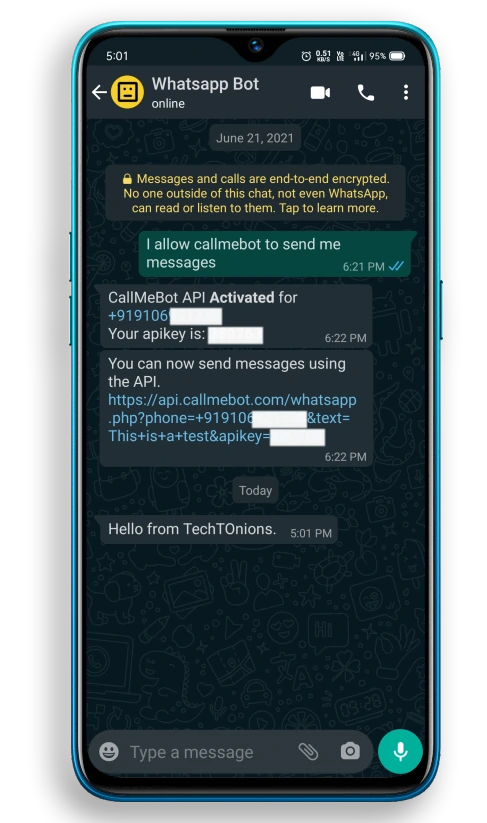
The bot that we will use in this project is known as Callmebot. Steps to add bot to your WhatsApp are as followed-
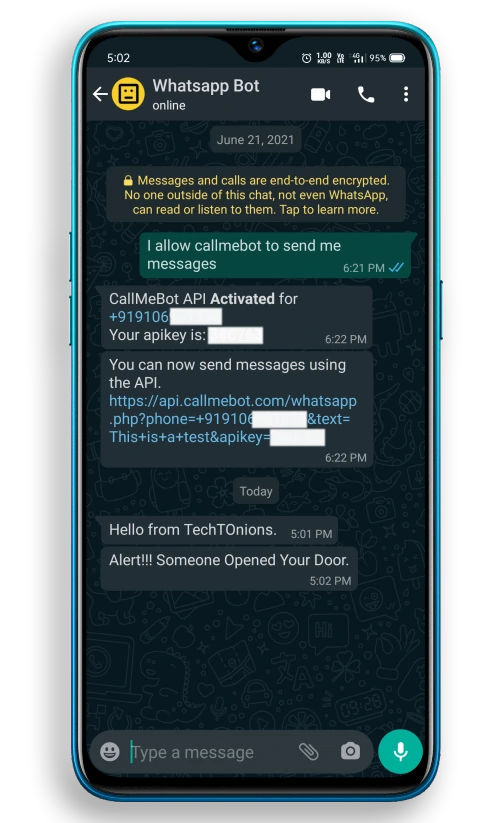
- Add this exact phone number +34 698 28 89 73 into your Phone Contacts. (you can name it as you like). Therefore we have saved this number as “WhatsApp Bot.”

- From your WhatsApp messenger, you have to send this exact message “I allow callmebot to send me messages” to the same bot number you saved in step 1.

- The bot will immediately reply with your API key. Copy that API key. We will use that key in our ESP32 code.
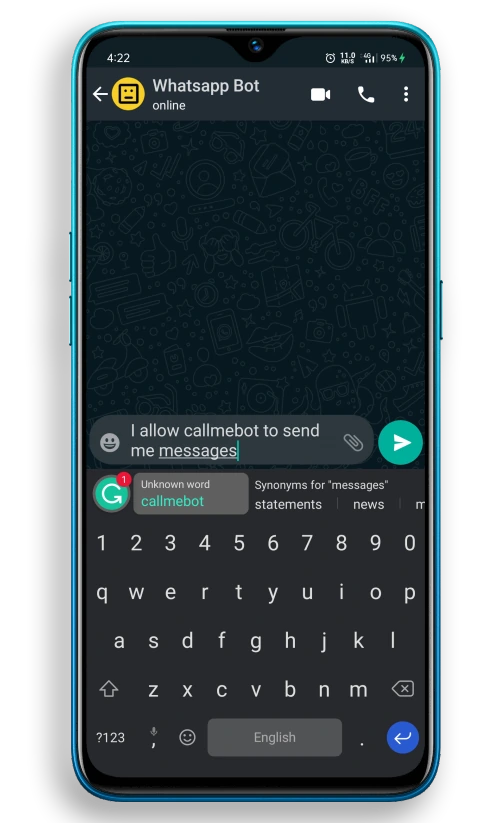
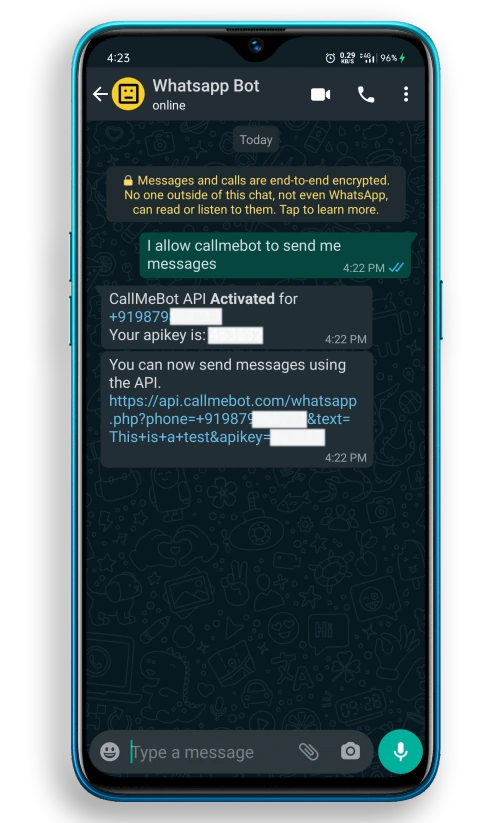
After these three simple steps completion out WhatsApp Bot is ready to interact with our ESP32, it’s that simple.
Preparing Arduino IDE
We will use Arduino IDE for programming our ESP32 board.
If you are not familiar with Arduino IDE, then check our guide
❑ Getting started with Arduino IDE
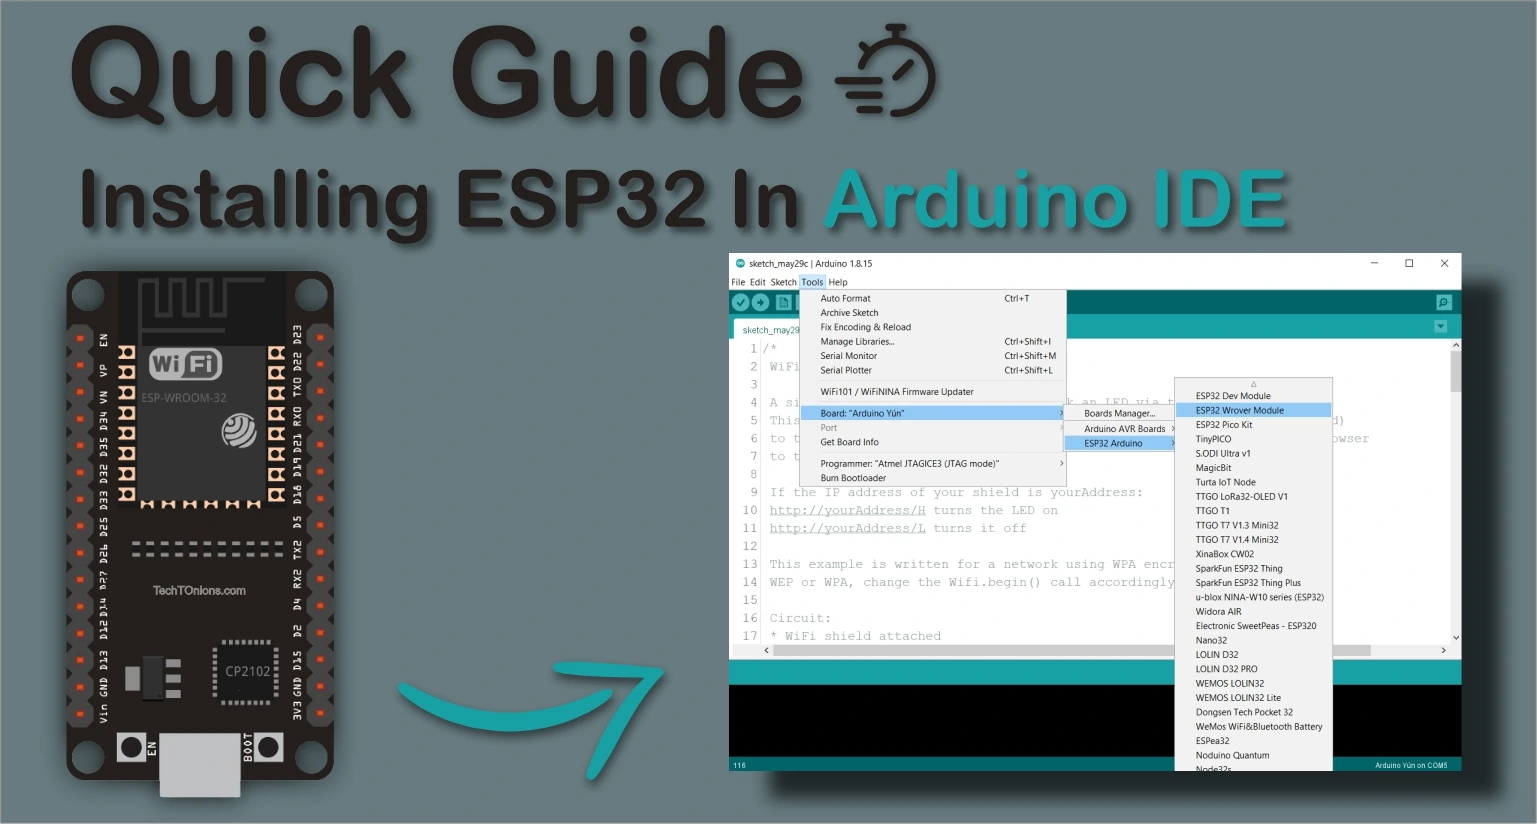
For programming ESP32 using Arduino IDE, you need to add the ESP32 board package to Arduino IDE. Follow our guide.
❑ Installing ESP32 in Arduino IDE
Skip the above steps if you have already done it before.
Additionally, we will use RCSwitch.h library from Suat. This library will help us to read data from the 433Mhz RF receiver. For installing the library, follow these steps.
- Click here to download the latest release of EasyButton.h.
- Go inside Sketch > Include Library > Add .Zip Library.
- Browse the downloaded zip file from step 1.
For more details, you can check out RCSwitch.h library Github Repository.
Parts Required
For this project, you will require the following parts.
- ESP32 board or ESP8266
- 433Mhz RF receiver.
- 433Mhz Wireless door sensor.
Understanding WhatsApp message sending API
Below is the API format to send a text message to WhatsApp messenger. Therefore we can use the HTTPS post method to send a text message to WhatsApp using ESP32.
https://api.callmebot.com/whatsapp.php?phone=[phone_numbe&text=[message]&apikey=[your_apikey]
[phone_number]: Your Phone number, including the country code. Ex. +91 756 712 123
[apiKey ]: Your API key that you received in Setting up a WhatsApp bot step 3.
[message]: Text message you want to send ( all space ”need to be converter to ‘+’)
Example:
https://api.callmebot.com/whatsapp.php?phone=+91756712123&text=Hello+from+ESP32&apikey=598890
Calling the above URL in any browser search bar, you will get “Hello from ESP32” as a message in your WhatsApp messenger if your phone number and API key are correct.
Sending Message to WhatsApp with ESP32
This example will send a message once on startup using WhatsApp bot API. Therefore you will receive one message on your WhatsApp messenger when ESP32 powers ON or ESP32 reset.
Following changes are required to use this code with your WhatsApp messenger-
- Add your Wi-Fi credentials to the ssid and password variable.
- Add your API key to you to apiKey variable. (Same API key that you received by bot)
- Add your registered WhatsApp mobile number with country code to the phone_number variable.
/*
  Date: 25-06-21
  Code written by: Dharmik
  ESP32 sending a message to WhatsApp messenger
  Find more on www.TechTOnions.com
*/

#include <WiFi.h>         //Including wifi.h library it will take care of all wifi related task
#include <HTTPClient.h>   //Including HTTPClient.h library to use all api

const char* ssid = "Replace me with your SSID";             //Add your WiFi ssid
const char* password =  "Replace me with your PASSWORD";    //Add your WiFi password

String apiKey = "222222";              //Add your Token number that bot has sent you on WhatsApp messenger
String phone_number = "+917561123123"; //Add your WhatsApp app registered phone number (same number that bot send you in url)

String url;                            //url String will be used to store the final generated URL

void setup()
{
  Serial.begin(115200);

  WiFi.begin(ssid, password);              // Try to connect with the given SSID and PSS
  Serial.println("Connecting to WiFi");
  while (WiFi.status() != WL_CONNECTED) {  // Wait until WiFi is connected
    delay(500);
    Serial.print(".");
  }
  Serial.println();
  Serial.println("Connected to the WiFi network"); // Print wifi connect message

  // use message_to_whatsapp function to send your own message
  message_to_whatsapp("Hello from TechTOnions.");  // you send your own message just change "hello from TechTOnions" to your message.
}

void loop()
{
  //loop will do nothing for this example
}

void  message_to_whatsapp(String message)       // user define function to send meassage to WhatsApp app
{
  //adding all number, your api key, your message into one complete url
  url = "https://api.callmebot.com/whatsapp.php?phone=" + phone_number + "&apikey=" + apiKey + "&text=" + urlencode(message);

  postData(); // calling postData to run the above-generated url once so that you will receive a message.
}

void postData()     //userDefine function used to call api(POST data)
{
  int httpCode;     // variable used to get the responce http code after calling api
  HTTPClient http;  // Declare object of class HTTPClient
  http.begin(url);  // begin the HTTPClient object with generated url
  httpCode = http.POST(url); // Finaly Post the URL with this function and it will store the http code
  if (httpCode == 200)      // Check if the responce http code is 200
  {
    Serial.println("Sent ok."); // print message sent ok message
  }
  else                      // if response HTTP code is not 200 it means there is some error.
  {
    Serial.println("Error."); // print error message.
  }
  http.end();          // After calling API end the HTTP client object.
}

String urlencode(String str)  // Function used for encoding the url
{
    String encodedString="";
    char c;
    char code0;
    char code1;
    char code2;
    for (int i =0; i < str.length(); i++){
      c=str.charAt(i);
      if (c == ' '){
        encodedString+= '+';
      } else if (isalnum(c)){
        encodedString+=c;
      } else{
        code1=(c & 0xf)+'0';
        if ((c & 0xf) >9){
            code1=(c & 0xf) - 10 + 'A';
        }
        c=(c>>4)&0xf;
        code0=c+'0';
        if (c > 9){
            code0=c - 10 + 'A';
        }
        code2='\0';
        encodedString+='%';
        encodedString+=code0;
        encodedString+=code1;
        //encodedString+=code2;
      }
      yield();
    }
    return encodedString;
}
You will receive a “Hello from TechTOnions.” message in your WhatsApp messenger. Once uploading is completed, and ESP32 gets a proper Internet connection. Additionally, you will see sent ok message printed on the serial monitor.

How code works
The first step will be to include a required library for the example.
- WiFi.h library will take care of all wifi-related tasks like connecting to your Wi-Fi.
- HTTPClient.h library is used to post the API with HTTP requests.
#include <WiFi.h>         //Including wifi.h library it will take care of all wifi related task
#include <HTTPClient.h>   //Including HTTPClient.h library to use all api
Network Credentials
Insert your Wi-Fi network credentials. So that ESP32 can connect to your Wi-Fi network for an Internet connection.
const char* ssid = "Replace me with your SSID";             //Add your WiFi ssid
const char* password =  "Replace me with your PASSWORD";    //Add your WiFi password
WhatsApp Bot Credentials
Insert the API key that you received in Setting up a WhatsApp bot step 3. Additionally, add your Phone number with the country code that your WhatsApp is registered.
String apiKey = "222222";              //Add your Token number that bot has sent you on WhatsApp messenger
String phone_number = "+917561123123"; //Add your WhatsApp app registered phone number (same number that bot send you in url)
setup()
First, we will initialize the serial communication so we can see data in the Serial monitor.
Serial.begin(115200);
Init the Wi-Fi
Initialize the Wi-Fi So that it can connect to your Wi-Fi network.
Note: If your Wi-Fi credentials are wrong, ESP will be stuck in the infinite while loop.
WiFi.begin(ssid, password);              // Try to connect with the given SSID and PSS
  Serial.println("Connecting to WiFi");
  while (WiFi.status() != WL_CONNECTED) {  // Wait until WiFi is connected
    delay(500);
    Serial.print(".");
  }
  Serial.println();
  Serial.println("Connected to the WiFi network"); // Print wifi connect message
Finally, we will send a message to WhatsApp by calling our user-defined function named message_to_whatsapp. You can change the message that you want to send.
It will send “hello from TechTOnions.” if you do not modify the existing message.
message_to_whatsapp(String message)
message_to_whatsapp is our user-defined function that will send messages to WhatsApp messenger.
Inside this function, it will generate the final url String used for HTTP GET request. The final url will consist of an API url with your phone number, API key, and your message in encoded form.
To encode the message, we will pass the message to the urlencode function.
We are finally calling the postData function to send the message.
void  message_to_whatsapp(String message)       // user define function to send meassage to WhatsApp app
{
  //adding all number, your api key, your message into one complete url
  url = "https://api.callmebot.com/whatsapp.php?phone=" + phone_number + "&apikey=" + apiKey + "&text=" + urlencode(message);

  postData(); // calling postData to run the above-generated url once so that you will receive a message.
}
postData()
postData is another user-defined function used to send the URL using the HTTP GET method.
Initialize the new http object with HTTPClient. And begin the new http object with the final url build.
  HTTPClient http;  // Declare object of class HTTPClient
  http.begin(url);  // begin the HTTPClient object with generated url
Post the url by calling this POST function and save the HTTP response code in the httpCode variable.
httpCode = http.POST(url); // Finaly Post the URL with this function and it will store the http code
Now we will check the httpCode that we received, and if it is 200, POST was successful. Therefore printing “Sent ok.” in Serial monitor. If not 200, then printing “Error.” as POST is not successful.
Finally, we will end the http object by calling the end function.
  if (httpCode == 200)      // Check if the responce http code is 200
  {
    Serial.println("Sent ok."); // print message sent ok message
  }
  else                      // if response HTTP code is not 200 it means there is some error.
  {
    Serial.println("Error."); // print error message.
  }
  http.end();          // After calling API end the HTTP client object.
urlencode(String str)
This function encodes the standard URL because it is necessary to encode sending messages or URL when using HTTP GET request.
  String urlencode(String str)  // Function used for encoding the url
{
    String encodedString="";
    char c;
    char code0;
    char code1;
    char code2;
    for (int i =0; i < str.length(); i++){
      c=str.charAt(i);
      if (c == ' '){
        encodedString+= '+';
      } else if (isalnum(c)){
        encodedString+=c;
      } else{
        code1=(c & 0xf)+'0';
        if ((c & 0xf) >9){
            code1=(c & 0xf) - 10 + 'A';
        }
        c=(c>>4)&0xf;
        code0=c+'0';
        if (c > 9){
            code0=c - 10 + 'A';
        }
        code2='\0';
        encodedString+='%';
        encodedString+=code0;
        encodedString+=code1;
        //encodedString+=code2;
      }
      yield();
    }
    return encodedString;
}
For example,
If you want to send “Hello World“, it should be encoded as “Hello+World“.
And if you want to send the URL “https://www.techtonions.com/ “, then the encoded URL will be like “https%3A%2F%2Fwww.techtonions.com%2F “.
Note:- Calling the message_to_whatsapp function inside the loop without delay can crash the bot, so have some delay if you do so.
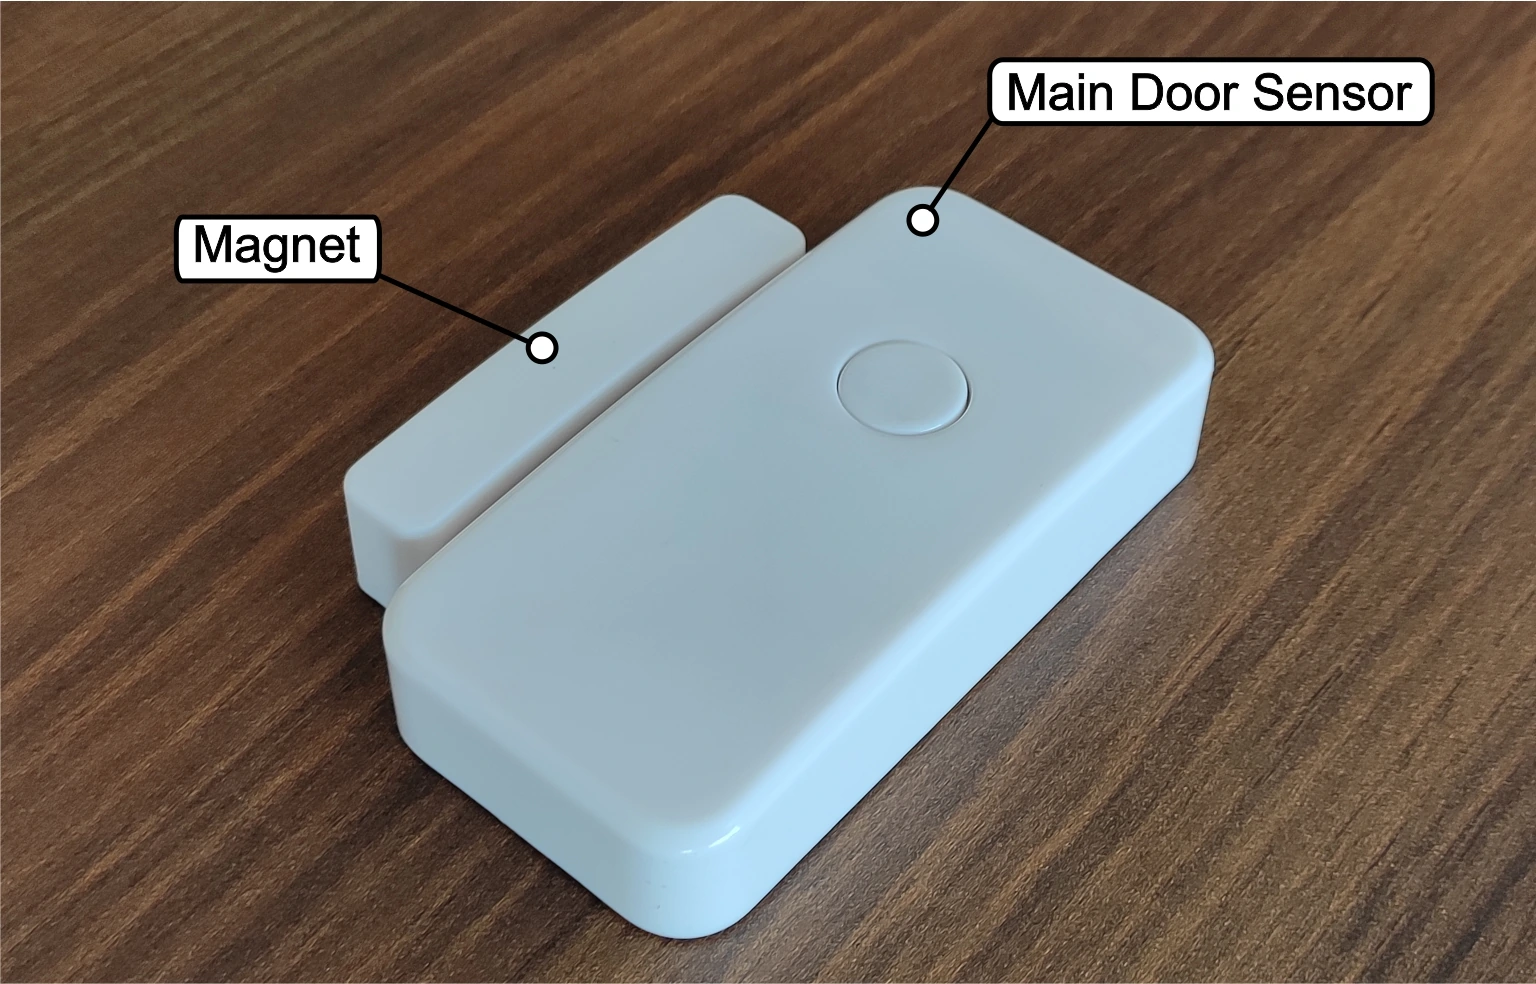
RF Door Sensor
Wireless door sensors are straightforward to use and also are easy to install. The door sensor has two main things one is the magnet, and another is the main unit with a reed switch triggered circuit.
Reed switch is a type of switch which changes its state in the presence of a magnetic field.
The circuit inside this sensor is built to send RF data every time the magnet is moved away from the reed switch.
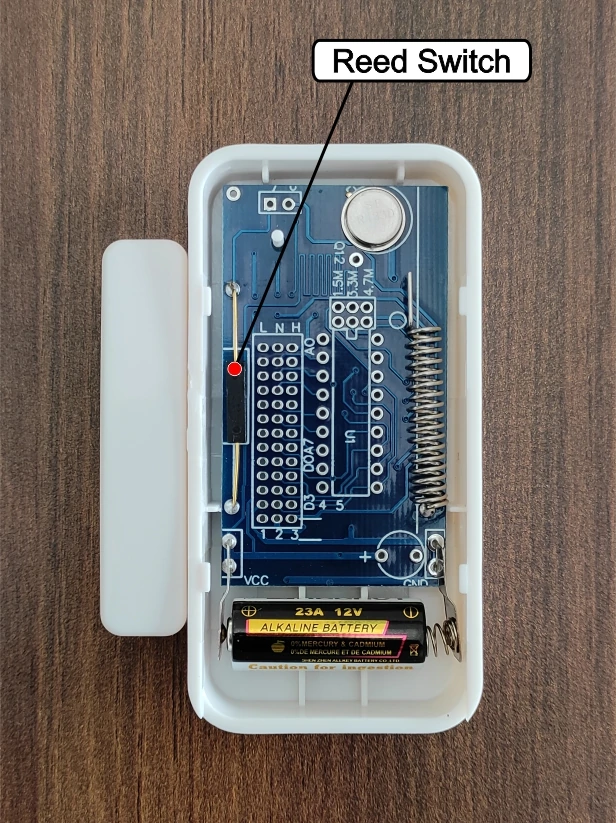
In our door sensor, there is also one button provided for triggering the sensor. But if it is not provided, you can also trigger the sensor by placing the magnet on the reed switch side and then moving it away.
The magnet and the main unit will be installed on the different sides of the door’s opening such that when your door opens magnet moves away from the main unit.

Circuit Diagram
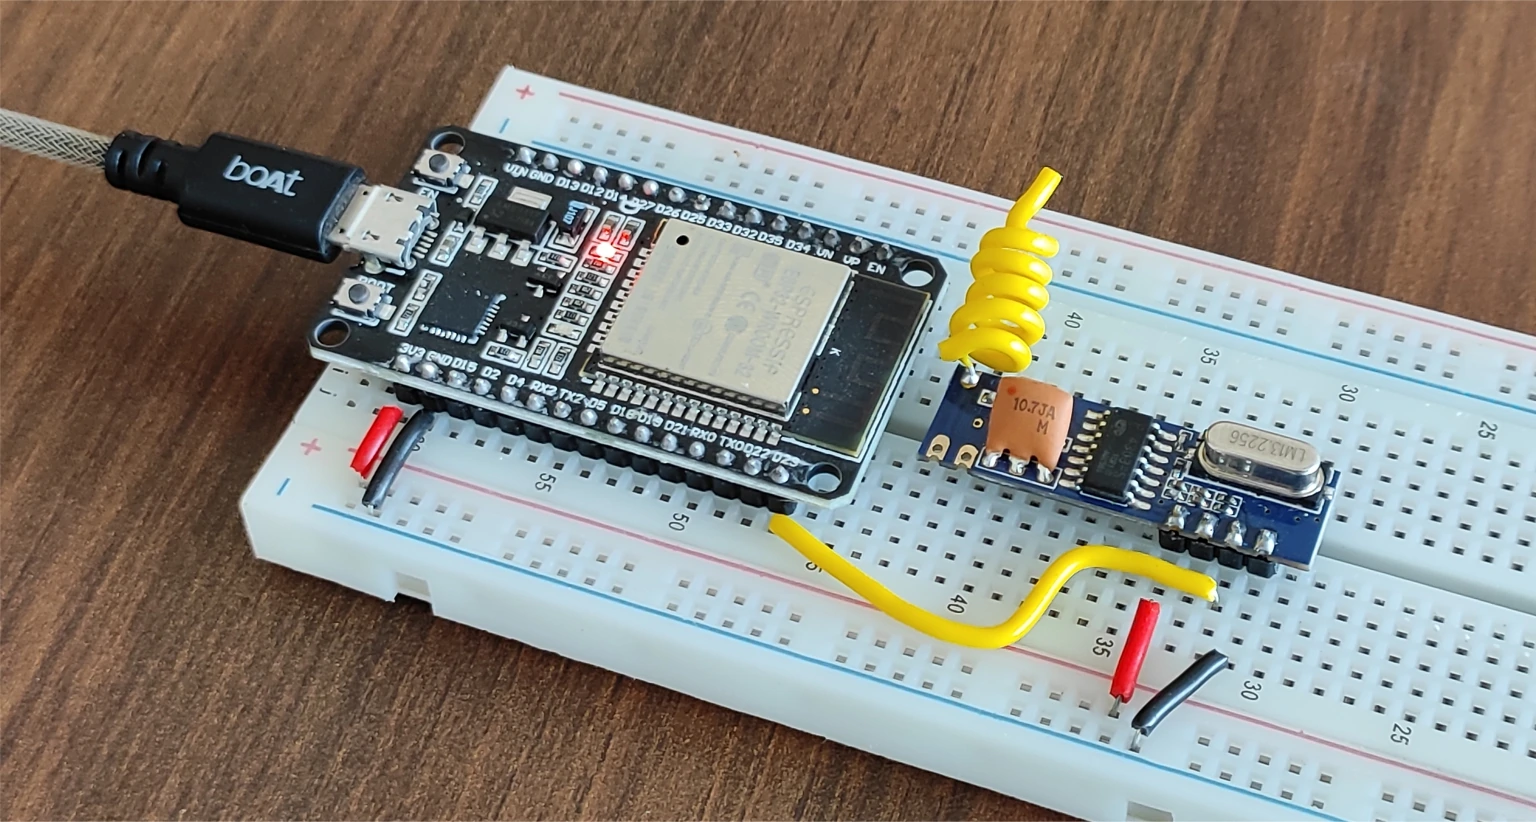
Below is the circuit diagram in which we have connected a 433MHz RF receiver with an ESP32 board.
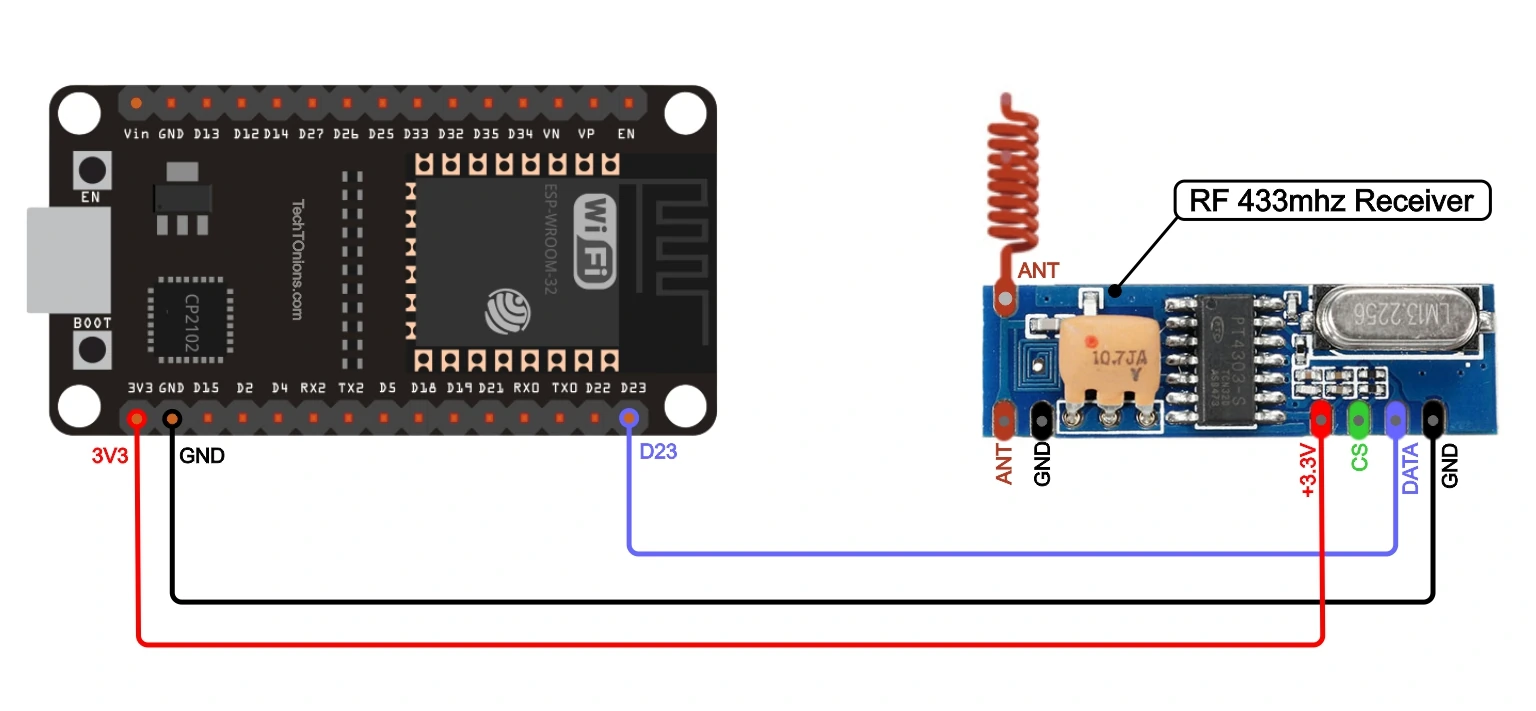
The data pin of the RF receiver is connected with a GPIO23. You can use any input GPIO pin of the ESP32 for this project.
It is a very simple and easy-to-build circuit; only three connections require with the receiver.
Reading Unique Address from RF Sensor
All RF-based sensors send unique data as this kind of sensor uses an RF encoder IC for encoding 24-bit packets.
The RC-Switch library supports the following encoder IC data.
- SC5262 / SC5272
- HX2262 / HX2272
- PT2262 / PT2272
- EV1527 / RT1527 / FP1527 / HS1527
- Intertechno outlets
- HT6P20X
The library is capable of reading both 315 and 433MHz RF signals.
For this project, we are using a 433MHz door sensor based on EV1527 encoder IC. You can buy different wireless sensors that are compatible with the library.
Note:- Different countries have different law’s on the usage of various RF frequencies, which may be 315MHz or 433MHz. Therefore we suggest checking the allowed frequency band for your country.
First, we need to upload the ReceiveDemo_Simple example code of the library.
The below is the example code that you need to upload in ESP32 for reading the unique address of the wireless sensor.
/*
  Simple example for receiving
  https://github.com/sui77/rc-switch/
*/

#include <RCSwitch.h>

RCSwitch mySwitch = RCSwitch();

void setup() {
  Serial.begin(9600);
  mySwitch.enableReceive(23);  // Receiver on interrupt 0 => that is pin #2
}

void loop() {
  if (mySwitch.available()) {

    Serial.print("Received ");
    Serial.print( mySwitch.getReceivedValue() );
    Serial.print(" / ");
    Serial.print( mySwitch.getReceivedBitlength() );
    Serial.print("bit ");
    Serial.print("Protocol: ");
    Serial.println( mySwitch.getReceivedProtocol() );
    mySwitch.resetAvailable();
  }
}
We are using GPIO23 as a data input pin. Therefore defining the enable function of the library as following. If you are using another pin, then you can edit the following line in the above code.
mySwitch.enableReceive(23);
Once uploading is finished, open the serial monitor in Arduino IDE.
Select the appropriate baud rate (9600) as per the code.
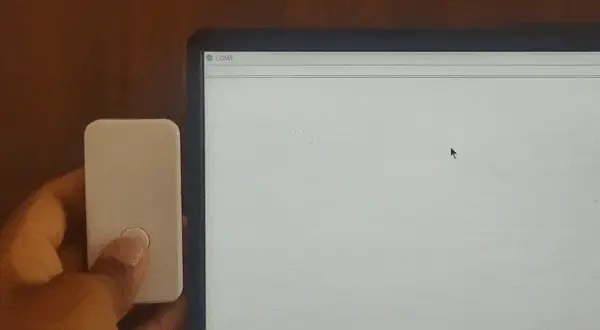
Now trigger the RF sensor that you are using. As soon as you trigger the sensor, you will see a red flashing light on the sensor that shows that it is sending RF data.
Simultaneously you will see 24-bit unique data will be printed on the serial monitor whenever a sensor is triggered. In our sensor, the unique code is 16285605, as you see in the image.
Copy this unique address as we will need to add that in our code.
WhatsApp Alert When Door Opens
Now let’s combine everything discussed above to get a WhatsApp message alert with ESP32 whenever someone opens the door.
We use wireless RF door sensors for this project, but you can use the same logic with similar RF-based wireless sensors like motion, fire, smoke sensors, etc.
Aditnaly, you can try using multiple sensors if you require.
Following changes are required to use this sketch-
- Add your Wi-Fi credentials to the ssid and password variable.
- Add your API key to you to apiKey variable. (Same API key that you received by bot)
- Add your registered WhatsApp app mobile number with country code to the phone_number variable.
- Add your sensor’s unique address to the sensor_address variable.
- Change the GPIO number in RF_data_pin if you are not using GPIO23 as an RF data pin.
/*
  Date: 25-06-21
  Code written by: Dharmik
  ESP32 sending a message to WhatsApp messenger
  Find more on www.TechTOnions.com
*/

#include <WiFi.h>         //Including wifi.h library it will take care of all wifi related task
#include <HTTPClient.h>   //Including HTTPClient.h library to use all api
#include <RCSwitch.h>     //Including RCSwitch.h library to read RF data

RCSwitch mySwitch = RCSwitch();
#define RF_data_pin 23

const char* ssid = "Replace me with your SSID";             //Add your WiFi ssid
const char* password =  "Replace me with your PASSWORD";    //Add your WiFi password

String apiKey = "222222";              //Add your Token number that bot has sent you on WhatsApp messenger
String phone_number = "+917561123123"; //Add your WhatsApp app registered phone number (same number that bot send you in url)
long sensor_address = 16285605;        //Any 433Mhz wirless sensor unique address
String url;                            //url String will be used to store the final generated URL

void setup()
{
  Serial.begin(9600);
  mySwitch.enableReceive(RF_data_pin);

  WiFi.begin(ssid, password);              // Try to connect with the given SSID and PSS
  Serial.println("Connecting to WiFi");
  while (WiFi.status() != WL_CONNECTED) {  // Wait until WiFi is connected
    delay(500);
    Serial.print(".");
  }
  Serial.println();
}

void loop()
{
  if (mySwitch.available()) {
    if(sensor_address == mySwitch.getReceivedValue())   // compare the sensor address
    {
      message_to_whatsapp("Alert!!! Someone Opened Your Door.");  // Sending alert message to WhatsApp
      delay(3000);
    }
    mySwitch.resetAvailable();  // Reset the data received
  }
}

void  message_to_whatsapp(String message)       // user define function to send meassage to whatsapp app
{
  //adding all number, your api key, your message into one complete url
  url = "https://api.callmebot.com/whatsapp.php?phone=" + phone_number + "&apikey=" + apiKey + "&text=" + urlencode(message);

  postData(); // calling postData to run the above-generated url once so that you will receive a message.
}

void postData()     //userDefine function used to call api(POST data)
{
  int httpCode;     // variable used to get the responce http code after calling api
  HTTPClient http;  // Declare object of class HTTPClient
  http.begin(url);  // begin the HTTPClient object with generated url
  httpCode = http.POST(url); // Finaly Post the URL with this function and it will store the http code
  if (httpCode == 200)      // Check if the responce http code is 200
  {
    Serial.println("Sent ok."); // print message sent ok message
  }
  else                      // if response HTTP code is not 200 it means there is some error.
  {
    Serial.println("Error."); // print error message.
  }
  http.end();          // After calling API end the HTTP client object.
}

String urlencode(String str)  // Function used for encoding the url
{
  String encodedString = "";
  char c;
  char code0;
  char code1;
  char code2;
  for (int i = 0; i < str.length(); i++) {
    c = str.charAt(i);
    if (c == ' ') {
      encodedString += '+';
    } else if (isalnum(c)) {
      encodedString += c;
    } else {
      code1 = (c & 0xf) + '0';
      if ((c & 0xf) > 9) {
        code1 = (c & 0xf) - 10 + 'A';
      }
      c = (c >> 4) & 0xf;
      code0 = c + '0';
      if (c > 9) {
        code0 = c - 10 + 'A';
      }
      code2 = '\0';
      encodedString += '%';
      encodedString += code0;
      encodedString += code1;
      //encodedString+=code2;
    }
    yield();
  }
  return encodedString;
}
How Code Works
We will declare all the required libraries for the code. As discussed above, we will be using RCSwitch.h library to read RF data.
#include <WiFi.h>         //Including wifi.h library it will take care of all wifi related task
#include <HTTPClient.h>   //Including HTTPClient.h library to use all api
#include <RCSwitch.h>     //Including RCSwitch.h library to read RF data
Generating mySwitch as a new object for the RCswitch library. And defining the RF data input GPIO pin as RF_data_pin.
RCSwitch mySwitch = RCSwitch();
#define RF_data_pin 23
Now adding Wi-Fi credentials, your WhatsApp BOT API key, phone number & RF sensor unique address.
const char* ssid = "Replace me with your SSID";             //Add your WiFi ssid
const char* password =  "Replace me with your PASSWORD";    //Add your WiFi password

String apiKey = "222222";              //Add your Token number that bot has sent you on WhatsApp messenger
String phone_number = "+917561123123"; //Add your WhatsApp app registered phone number (same number that bot send you in url)
long sensor_address = 16285605;        //Any 433Mhz wirless sensor unique address
setup()
Inside the setup function, we will initialize the serial communication with a baud rate of 9600.
You can change the baud rate as per your need by using the following function.
Serial.begin(9600);
Now, enabling receiving on RF data pin for class mySwitch. Now it will start capturing the RF data.
mySwitch.enableReceive(RF_data_pin);
Init the Wi-Fi
Initialize the Wi-Fi So that it can connect to your Wi-Fi network.
Note:- If your Wi-Fi credentials are wrong, ESP will be stuck in the infinite while loop.
 WiFi.begin(ssid, password);              // Try to connect with the given SSID and PSS
  Serial.println("Connecting to WiFi");
  while (WiFi.status() != WL_CONNECTED) {  // Wait until WiFi is connected
    delay(500);
    Serial.print(".");
  }
  Serial.println();
loop()
Inside the loop function, we will continuously check that if any RF data is available. To check this, we will use the following if condition.
if (mySwitch.available())
When RF data is available, the above condition will be satisfied, and now we need to compare whether the received RF data matches our RF sensor data. We can retrieve the received RF data with the getReceivedValue() function.
If received data matches our predefined sensor_address variable, it means our sensor is triggered, and someone just opened the door.
if(sensor_address == mySwitch.getReceivedValue()) // compare the sensor address
Once we know that our sensor is triggered, we will call our user-defined function message_to_whatsapp to send an alert message to your WhatsApp messenger. How this function works is discussed above in this tutorial.
For this project, we are sending an alert message as Alert!!! Someone Opened Your Door. You can change the message string as per your need.
message_to_whatsapp("Alert!!! Someone Opened Your Door."); // Sending alert message to WhatsApp
After each data received either from our sensor or any different sensor, we need to reset the received data so that available RF data condition do not satisfy again.
  if (mySwitch.available()) {
    if(sensor_address == mySwitch.getReceivedValue())   // compare the sensor address
    {
      message_to_whatsapp("Alert!!! Someone Opened Your Door.");  // Sending alert message to WhatsApp
      delay(3000);
    }
    mySwitch.resetAvailable();  // Reset the data received
  }
All remaining function we used for this example has discussed before.
Wrapping Up
This tutorial demonstrates how we can send messages to a WhatsApp messenger using third-party APIs. Also, by following the tutorial, you can easily integrate WhatsApp with your ESP32 IoT projects. Also, we learned how we could build a small security system with ESP32 and RF receivers.
More projects that you may like reading.
❑ Sending Messages and Images to Signal App from ESP32.
Share your creative ideas based on this tutorial in the comment section below, and if you learned something, consider subscribing to our weekly newsletter.


how to make alerts from ultrasonic sensor readings?
We will make a tutorial on this topic very soon 🔜
download
Vo pode deixar o link para downalod ds biblioteca httpclient.h
Obrigado
Hello
If I don’t want to use a RF, I will like to receive the message after the pin 23 is active or change state, how will be the code?
Thanks
You can use the digitalRead function of Arduino IDE for checking the status of any particular pin and using if condition you can check it it is high then do a certain thing like, in this case, send a message.
Also if you are using a switch then don’t forget to use pullup resistors either external or internal.
Thank you have a great day.
My IOT have the sim800l to get in internet through GPRS, can I sent with this type of connection text messages to WhatsApp like explained?
Thanks
Hello Sato,
We are using an API to send WhatsApp message. Therefore it can be used by different platform. You can definitely send message through your GSM modem but you need to modify the code as modem works on AT commands there will be an AT command for HTTP request.
Happy coding.
Could you please specify which httpclient library was used? There are some libraries available and I try one of them but it doesn’t work.
I’ve just got it, I don’t need to add any particular library, just including HTTPClient as shown in your article!
Yes, you are correct Djan, no need to add any library for HTTPClient as it comes with the ESP32 Arduino package.
How do I send temperature reading from a DHT11 sensor when a set threshold limit is crossed , instead of any binary status message to WhatsApp.
Can you please share the code for temperature monitoring.
hi, is the bot still operationnal?
Hello Jl,
I checked callmebot website it seems operational still you can contact them for more info.
Hello Dharmik,
If I want to use a mic sensor (sound sensor), how can I do that? Thank you!
Compilation error: ‘url’ was not declared in this scope.Please help
Please ignore ‘Compilation error: ‘url’ was not declared in this scope.Please help‘
If you can please send a link to download ‘HTTPClient.h’
Please, I’d like to know if this code would work with the Arduino uno wifi Rev. 2 board. I’ve been trying to get it to work but has not been possible. I’ve installed all relevant httpclient libraries but it keeps getting stuck at HTTPClient http; line of the code. Can this challenge be overcome. Thanks.
Hello Paul,
Thank you for reaching out and sharing your experience. I understand you’re trying to adapt the code for use with the Arduino Uno WiFi Rev. 2 board.
While the code provided is specifically tailored for the ESP32 platform, it might require some modifications to work on the Arduino Uno WiFi Rev. 2 board due to differences in hardware and libraries.
To overcome this challenge, you can try the following steps:
1. Ensure that the HTTP client library you installed is compatible with the Arduino Uno WiFi Rev. 2 board. Double-check that you have the correct version and that it supports the board’s architecture.
2. If the code is still getting stuck at the HTTPClient http; line, it’s likely that there’s an issue with the library or the way it’s being used.
3. Searching forums or discussion boards specific to the Arduino Uno WiFi Rev. 2 could provide valuable insights or solutions.
Feel free to share any updates or additional information, and we’ll do our best to assist you further.
Best regards,
After I added the WiFi and HTTPClient libraries the serial monitor stopped working, do you know what might have caused it?