Project Summary
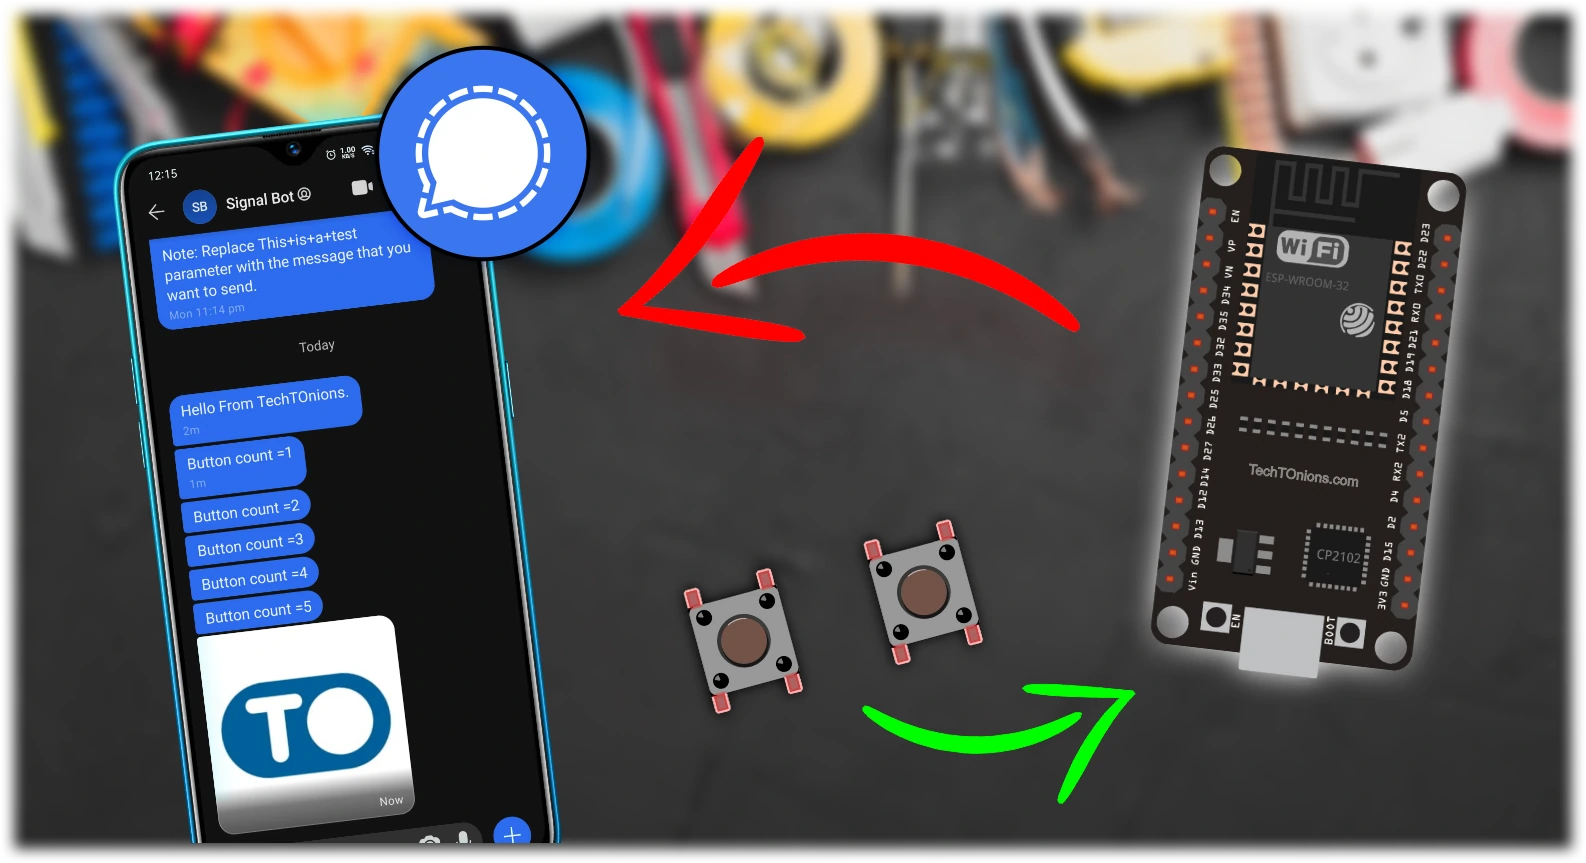
This tutorial will cover how to use Signal bot API to send notifications and images from ESP32 to your signal account. At the end of this tutorial, we will use two buttons connected to ESP32.
The first button will send a message showing the total Button press count to your signal app. Another button press will send an image to your Signal app.
Here is the project breakdown:
- You’ll create Signal Bot for our ESP32 project.
- Sending the first message to your Signal Bot.
- Send the Image to your Signal App.
- Combining everything with two buttons.
It’s a simple project using API for interacting with the Signal app. You can use it in your IoT or any Home automation project based on ESP.
Watch the Video Tutorial
Introduction to Signal app
The Signal is a cross-platform centralized encrypted messaging service. It uses the internet to send a message such as an image, voice, video, etc. It is similar to a different messaging app like WhatsApp, but it focuses more on user privacy to enhance the overall user experience. Signal software allows us to use a bot to interact with them.
A bot is third-party software that runs on the signal app. You can interact with the bot, and the bot will interact with the signal app using a different bot API; it will act as a middle person. We can control our bot by sensing HTTPS requests to the bot API.
ESP32 will monitor the button press, and based on that, it will interact with the bot API, and it will send a message or an image to your Signal account.
Setting up a Signal bot
The first step will be to download the Signal app from google play or the app store. Skip if you have are already using a signal app.
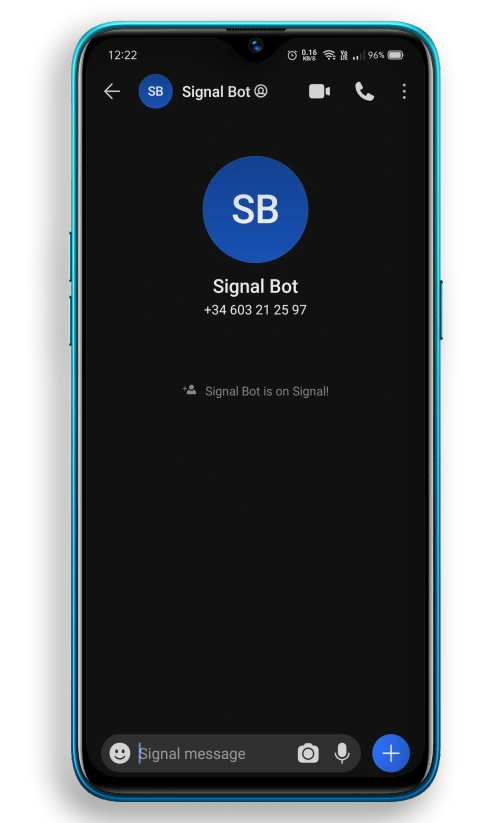
The bot that we will use in this project is known as Callmebot. Steps to add bot to your Signal app are as followed-
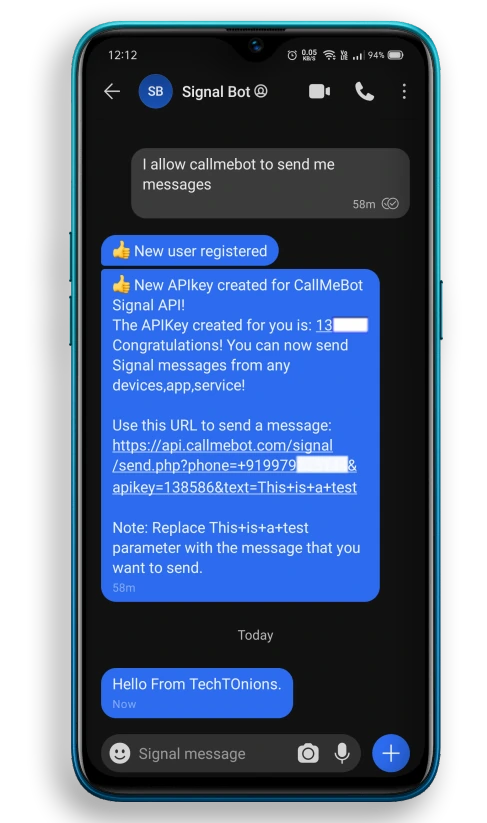
- Add this exact phone number +34 603 21 25 97 into your Phone Contacts. (you can name it as you like). Therefore we have saved this number as “Signal Bot.”

- From the Signal app, you have to send this exact message “I allow callmebot to send me messages” to the same bot number you saved in step 1.
- The bot will immediately reply with your API key. Copy that API key. We will use that key in our ESP32 code.
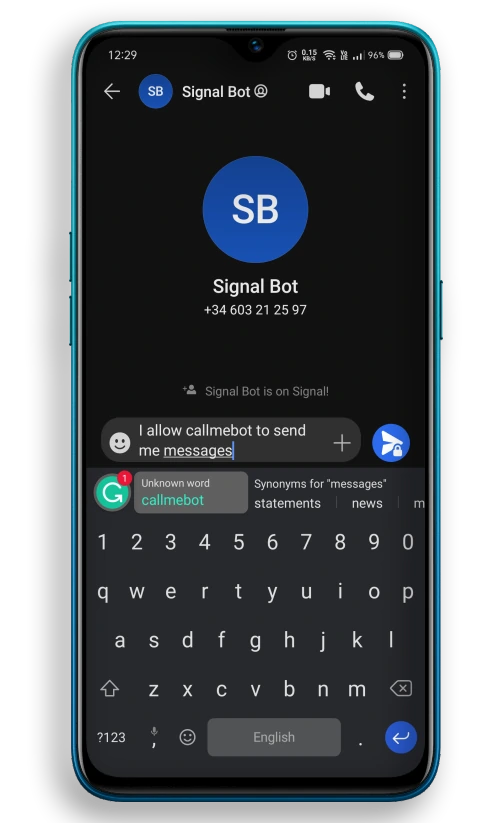

After these three simple steps completion out Signal Bot is ready to interact with our ESP32, it’s that simple.
Preparing Arduino IDE
To program ESP32 using Arduino IDE, we have to install the ESP32 board to Arduino IDE first. Follow our guide on.
❑ Installing ESP32 in Arduino IDE
If you are not familiar with Arduino IDE then check our guide on-
❑ Getting Familiar With Arduino IDE
We will require an EasyButton.h library from evert-arias for the final example. This library takes care of button debouncing. For installing the library, follow these steps.
- Click here to download the latest release of EasyButton.h.
- Go inside Sketch > Include Library > Add .Zip Library.
- Browse the downloaded zip file from step 1.
For more details, you can check out EasyButton.h library Github Repository.
Parts Required
For this project, you will require the following parts.
- ESP32 board or ESP8266
Additional requirement for a final example
- Breadboard
- 2x button
- jumper or hookup wires.
Understanding Signal message sending API
Below is the API format to send a text message to the Signal app. Therefore we can use the HTTPS post method to send a text message to the Signal app using ESP32.
https://api.callmebot.com/signal/send.php?phone=[phone_number]&apikey=[apiKey ]&text=[message]
[phone_number]: Your Phone number, including the country code. Ex. +91 756 712 123
[apiKey ]: Your API key that you received in Setting up a Signal bot step 3.
[message]: Text message you want to send ( all space ‘ ‘ need to be converter to ‘+’)
Example:
https://api.callmebot.com/signal/send.php?phone=+91756712123&apikey=598890&text=Hello+from+ESP32
Calling the above URL in any browser search bar, you will get “Hello from ESP32” as a message in the Signal app if your phone number and API key are correct.
Sending Message to Signal App with ESP32
The following code will send your message once on startup to the Signal bot using its API. Therefore you will receive one message to your Signal app when ESP32 powers ON or ESP32 reset.
Following changes are required to use this code with your Signal app-
- Add your Wi-Fi credentials to the ssid and password variable.
- Add your API key to you to apiKey variable. (Same API key that you received by bot)
- Add your registered Signal app mobile number with country code to the phone_number variable.
/*
  Date: 07-05-21
  Code written by: Dharmik
  ESP32 sending a message to Signal messenger
  Find more on www.TechTOnions.com
*/

#include <WiFi.h>         //Including wifi.h library it will take care of all wifi related task
#include <HTTPClient.h>   //Including HTTPClient.h library to use all api

const char* ssid = "Replace me with your SSID";             //Add your WiFi ssid
const char* password =  "Replace me with your PASSWORD";    //Add your WiFi password

String apiKey = "222222";              //Add your Token number that bot has sent you on signal messenger
String phone_number = "+917561123123"; //Add your signal app registered phone number (same number that bot send you in url)

String url;                            //url String will be used to store the final generated URL

void setup()
{
  Serial.begin(115200);

  WiFi.begin(ssid, password);              // Try to connect with the given SSID and PSS
  Serial.println("Connecting to WiFi");
  while (WiFi.status() != WL_CONNECTED) {  // Wait until WiFi is connected
    delay(500);
    Serial.print(".");
  }
  Serial.println();
  Serial.println("Connected to the WiFi network"); // Print wifi connect message

  // use message_to_signal function to send your own message
  message_to_signal("Hello from TechTOnions.");  // you send your own message just change "hello from TechTOnions" to your message.
}

void loop()
{
  //loop will do nothing for this example
}

void  message_to_signal(String message)       // user define function to send meassage to Signal app
{
  //adding all number, your api key, your message into one complete url
  url = "https://api.callmebot.com/signal/send.php?phone=" + phone_number + "&apikey=" + apiKey + "&text=" + urlencode(message);

  postData(); // calling postData to run the above-generated url once so that you will receive a message.
}

void postData()     //userDefine function used to call api(POST data)
{
  int httpCode;     // variable used to get the responce http code after calling api
  HTTPClient http;  // Declare object of class HTTPClient
  http.begin(url);  // begin the HTTPClient object with generated url
  httpCode = http.POST(url); // Finaly Post the URL with this function and it will store the http code
  if (httpCode == 200)      // Check if the responce http code is 200
  {
    Serial.println("Sent ok."); // print message sent ok message
  }
  else                      // if response HTTP code is not 200 it means there is some error.
  {
    Serial.println("Error."); // print error message.
  }
  http.end();          // After calling API end the HTTP client object.
}

String urlencode(String str)  // Function used for encoding the url
{
    String encodedString="";
    char c;
    char code0;
    char code1;
    char code2;
    for (int i =0; i < str.length(); i++){
      c=str.charAt(i);
      if (c == ' '){
        encodedString+= '+';
      } else if (isalnum(c)){
        encodedString+=c;
      } else{
        code1=(c & 0xf)+'0';
        if ((c & 0xf) >9){
            code1=(c & 0xf) - 10 + 'A';
        }
        c=(c>>4)&0xf;
        code0=c+'0';
        if (c > 9){
            code0=c - 10 + 'A';
        }
        code2='\0';
        encodedString+='%';
        encodedString+=code0;
        encodedString+=code1;
        //encodedString+=code2;
      }
      yield();
    }
    return encodedString;
}
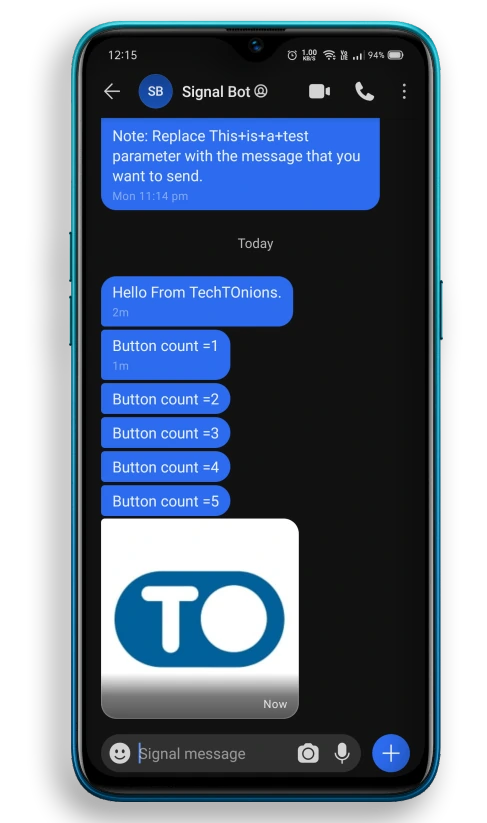
You will see this message in your Signal app “Hello from TechTOnions.” once uploading is completed and ESP32 gets a proper Internet connection. Additionally, you will see sent ok message printed on the serial monitor.

How code works
The first step will be to include a required library for the example.
- WiFi.h library will take care of all wifi-related tasks like connecting to your Wi-Fi.
- HTTPClient.h library used to post the API with HTTP requests.
#include <WiFi.h>         //Including wifi.h library it will take care of all wifi related task
#include <HTTPClient.h>   //Including HTTPClient.h library to use all api
Network Credentials
Insert your Wi-Fi network credentials. So that ESP32 can connect to your Wi-Fi network for Internet connection.
const char* ssid = "Replace me with your SSID";             //Add your WiFi ssid
const char* password =  "Replace me with your PASSWORD";    //Add your WiFi password
Signal Bot Credentials
Insert the API key that you received in Setting up a Signal bot step 3. Additionally, add your Phone number with the country code that your signal app is registered.
String apiKey = "222222";              //Add your Token number that bot has sent you on signal messenger
String phone_number = "+917561123123"; //Add your signal app registered phone number (same number that bot send you in URL)
setup()
First, we will initialize the serial communication so we can see data in the Serial monitor.
Serial.begin(115200);
Init the Wi-Fi
Initialize the Wi-Fi So that it can connect to your Wi-Fi network.
Note: If your Wi-Fi credentials are wrong, then ESP will be stuck in the infinite while loop.
WiFi.begin(ssid, password);              // Try to connect with the given SSID and PSS
  Serial.println("Connecting to WiFi");
  while (WiFi.status() != WL_CONNECTED) {  // Wait until WiFi is connected
    delay(500);
    Serial.print(".");
  }
  Serial.println();
  Serial.println("Connected to the WiFi network"); // Print wifi connect message
Finally, we will send a message to the Signal app by calling our user-defined function named message_to_signal. You can change the message that you want to send.
It will send “hello from TechTOnions.” if you do not modify the existing message.
message_to_signal (String message)
message_to_signal is our user-defined function that will send messages to Signal App.
Inside this function, it will generate the final url String used for HTTP GET request. The final url will consist of an API url with your phone number, API key, and your message in encoded form.
To encode the message, we will pass the message to the urlencode function.
We are finally calling the postData function to send the message.
void  message_to_signal(String message)       // user define function to send meassage to Signal app
{
  //adding all number, your api key, your message into one complete url
  url = "https://api.callmebot.com/signal/send.php?phone=" + phone_number + "&apikey=" + apiKey + "&text=" + urlencode(message);

  postData(); // calling postData to run the above-generated url once so that you will receive a message.
}
postData()
postData is another user-defined function used to send the URL using the HTTP GET method.
Initialize the new http object with HTTPClient. And begin the new http object with the final url build.
  HTTPClient http;  // Declare object of class HTTPClient
  http.begin(url);  // begin the HTTPClient object with generated url
Post the url by calling this POST function and save the HTTP response code in the httpCode variable.
httpCode = http.POST(url); // Finaly Post the URL with this function and it will store the http code
Now we will check the httpCode that we received, and if it is 200, POST was successful. Therefore printing “Sent ok.” in Serial monitor. If not 200, then printing “Error.” as POST is not successful.
Finally, we will end the http object by calling the end function.
  if (httpCode == 200)      // Check if the responce http code is 200
  {
    Serial.println("Sent ok."); // print message sent ok message
  }
  else                      // if response HTTP code is not 200 it means there is some error.
  {
    Serial.println("Error."); // print error message.
  }
  http.end();          // After calling API end the HTTP client object.
urlencode(String str)
This function is used to encode the standard URL because it is necessary to encode sending messages or URL when using HTTP GET request.
  String urlencode(String str)  // Function used for encoding the url
{
    String encodedString="";
    char c;
    char code0;
    char code1;
    char code2;
    for (int i =0; i < str.length(); i++){
      c=str.charAt(i);
      if (c == ' '){
        encodedString+= '+';
      } else if (isalnum(c)){
        encodedString+=c;
      } else{
        code1=(c & 0xf)+'0';
        if ((c & 0xf) >9){
            code1=(c & 0xf) - 10 + 'A';
        }
        c=(c>>4)&0xf;
        code0=c+'0';
        if (c > 9){
            code0=c - 10 + 'A';
        }
        code2='\0';
        encodedString+='%';
        encodedString+=code0;
        encodedString+=code1;
        //encodedString+=code2;
      }
      yield();
    }
    return encodedString;
}
For example,
If you want to send “Hello World“, it should be encoded as “Hello+World“.
And if you want to send the URL “https://www.techtonions.com/“, then the encoded URL will be like “https%3A%2F%2Fwww.techtonions.com%2F“.
loop()
For this example, the loop() function will be empty. You can add your code in the loop function. You can also send multiple messages by calling the message_to_signal again inside the loop.
Note:- Calling the message_to_signal function inside the loop without delay can crash the bot, so have some delay if you do so.
Understanding Signal Image sending API
Image sending API is similar to message sending API. Hence you can send any Image to the Signal app by HTTP get method by ESP32.
https://api.callmebot.com/signal/send.php?phone=[phone_number]&apikey=[apiKey ]&image=[image_url]
[phone_number]: Your Phone number, including the country code. Ex. +91 756 712 123
[apiKey ]: Your API key that you received in Setting up a Signal bot step 3.
[image_url]: put any image encoded URL you like here (Only works for .jpg .gif .png)
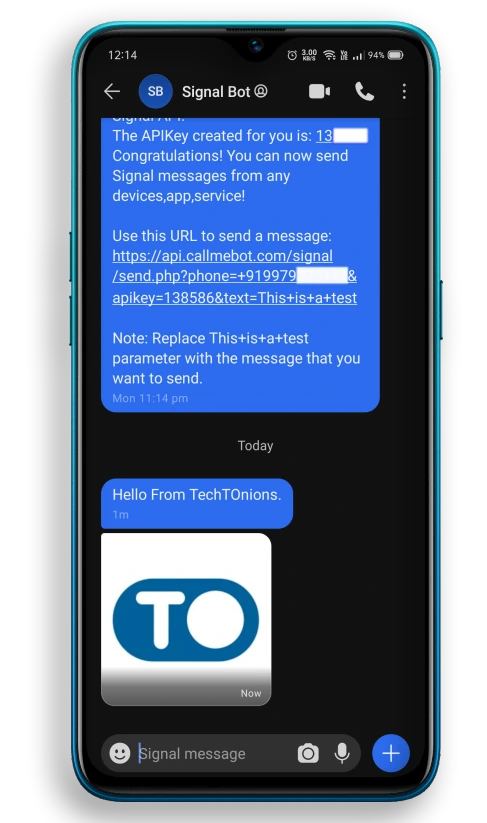
Sending Image to Signal App with ESP32
In this example, we will send the Image to the Signal app from ESP32. For this example, we are sending the TechTOnions logo. Therefore you will receive our logo to your Signal app when ESP32 powers ON or ESP32 reset.
Following changes are required to use this code with your Signal app-
- Add your Wi-Fi credentials to the ssid and password variable.
- Add your API key to you to apiKey variable. (Same API key that you received by bot)
- Add your registered Signal app mobile number with country code to the phone_number variable.
/*
  Date: 07-05-21
  Code written by: Dharmik
  ESP32 sending image to Signal messenger
  Find more on www.TechTOnions.com
*/

#include <WiFi.h>        //Including wifi.h library it will take care of all wifi related task
#include <HTTPClient.h>  //Including HTTPClient.h library to use all api

const char* ssid =      "Replace me with your SSID";        //Add your WiFi ssid
const char* password =  "Replace me with your PASSWORD";    //Add your WiFi password

String apiKey = "222222";              //Add your Token number that bot has sent you on signal messenger
String phone_number = "+917561123123"; //Add your signal app registered phone number with country code (the same number that bot send you in url)
String url;                            //url String will be used to store the final generated URL


void setup() {

  Serial.begin(115200);
  WiFi.begin(ssid, password);             // Try to connect with the given SSID and PSS
  Serial.println("Connecting to WiFi");
  while (WiFi.status() != WL_CONNECTED) { // Wait until WiFi is connected
    delay(500);
    Serial.print(".");
  }
  Serial.println();
  Serial.println("Connected to the WiFi network");  // Print wifi connect message

  //image_to_signal function will send your image to Signal app
  //Just you have to add your image url
  //it only works for .jpg .gif .png    // not working with .webp image format
  image_to_signal("https://www.techtonions.com/wp-content/uploads/2021/05/New-Profile-picture-logo-big-250x250-1.jpg");
}

void loop()
{
  //loop will do nothing for this example
}


void image_to_signal(String img_url)  //user define function to send image to Signal App
{
  //adding all number, your api key, your image url into one complete url
  url = "https://api.callmebot.com/signal/send.php?phone="+ phone_number + "&apikey=" + apiKey + "&image=" + urlencode(img_url);
  postData(); // caling postData to run the above generated url once so that you will receive image.
}


void postData()     //userDefine function used to call api(POST data)
{
  int httpCode;     // variable used to get the responce http code after calling api
  HTTPClient http;  // Declare object of class HTTPClient
  http.begin(url);  // begin the HTTPClient object with generated url
  httpCode = http.POST(url); // Finaly Post the URL with this function and it will store the http code
  if (httpCode == 200)      // Check if the responce http code is 200
  {
    Serial.println("Sent ok."); // print message sent ok message
  }
  else                      // if response HTTP code is not 200 it means there is some error.
  {
    Serial.println("Error."); // print error message.
  }
  http.end();         // After calling API end the HTTP client object.
}

String urlencode(String str)  // Function used for encoding the url
{
    String encodedString="";
    char c;
    char code0;
    char code1;
    char code2;
    for (int i =0; i < str.length(); i++){
      c=str.charAt(i);
      if (c == ' '){
        encodedString+= '+';
      } else if (isalnum(c)){
        encodedString+=c;
      } else{
        code1=(c & 0xf)+'0';
        if ((c & 0xf) >9){
            code1=(c & 0xf) - 10 + 'A';
        }
        c=(c>>4)&0xf;
        code0=c+'0';
        if (c > 9){
            code0=c - 10 + 'A';
        }
        code2='\0';
        encodedString+='%';
        encodedString+=code0;
        encodedString+=code1;
        //encodedString+=code2;
      }
      yield();
    }
    return encodedString;
}
How code works
The code is all similar to the message sending code. We will require the same library for this code also.
You’ll need to add your Wi-Fi credentials, API key, and Phone number as described in the message send method.
#include <WiFi.h>        //Including wifi.h library it will take care of all wifi related task
#include <HTTPClient.h>  //Including HTTPClient.h library to use all api

const char* ssid =      "Replace me with your SSID";        //Add your WiFi ssid
const char* password =  "Replace me with your PASSWORD";    //Add your WiFi password

String apiKey = "222222";              //Add your Token number that bot has sent you on signal messenger
String phone_number = "+917561123123"; //Add your signal app registered phone number with country code (the same number that bot send you in url)
setup()
Inside setup function serial begin and Wi-Fi init logic will be same, but we will not use the message_to_signal function; instead, we will use another user-defined function for the Image sending name as image_to_signal.
You need to send an image URL with this function, and it will send your Image to the Signal app.
  //image_to_signal function will send your image to Signal app
  //Just you have to add your image url
  //it only works for .jpg .gif .png    // not working with .webp image format
  image_to_signal("https://www.techtonions.com/wp-content/uploads/2021/05/New-Profile-picture-logo-big-250x250-1.jpg");
image_to_signal(String img_url)
image_to_signal is our user-defined function that will send any image to Signal App whenever called.
Inside this function, it will encode the image URL by using the urlencode function used in the previous example. After that, we will generate the final URL, which will contain your phone number, API key, and encoded image URL.
Finally, calling the postData function to send the message.
void image_to_signal(String img_url)  //user define function to send image to Signal App
{
  //adding all number, your api key, your image url into one complete url
  url = "https://api.callmebot.com/signal/send.php?phone="+ phone_number + "&apikey=" + apiKey + "&image=" + urlencode(img_url);
  postData(); // caling postData to run the above generated url once so that you will receive image.
}
For this example, the loop() function will be empty. You can add your code in the loop function. You can also send multiple images by calling the image_to_signal again inside the loop.
Note:- Calling the image_to_signal function inside the loop without delay can crash the bot, so have some delay if you do so.
Signal message and Image on a button press
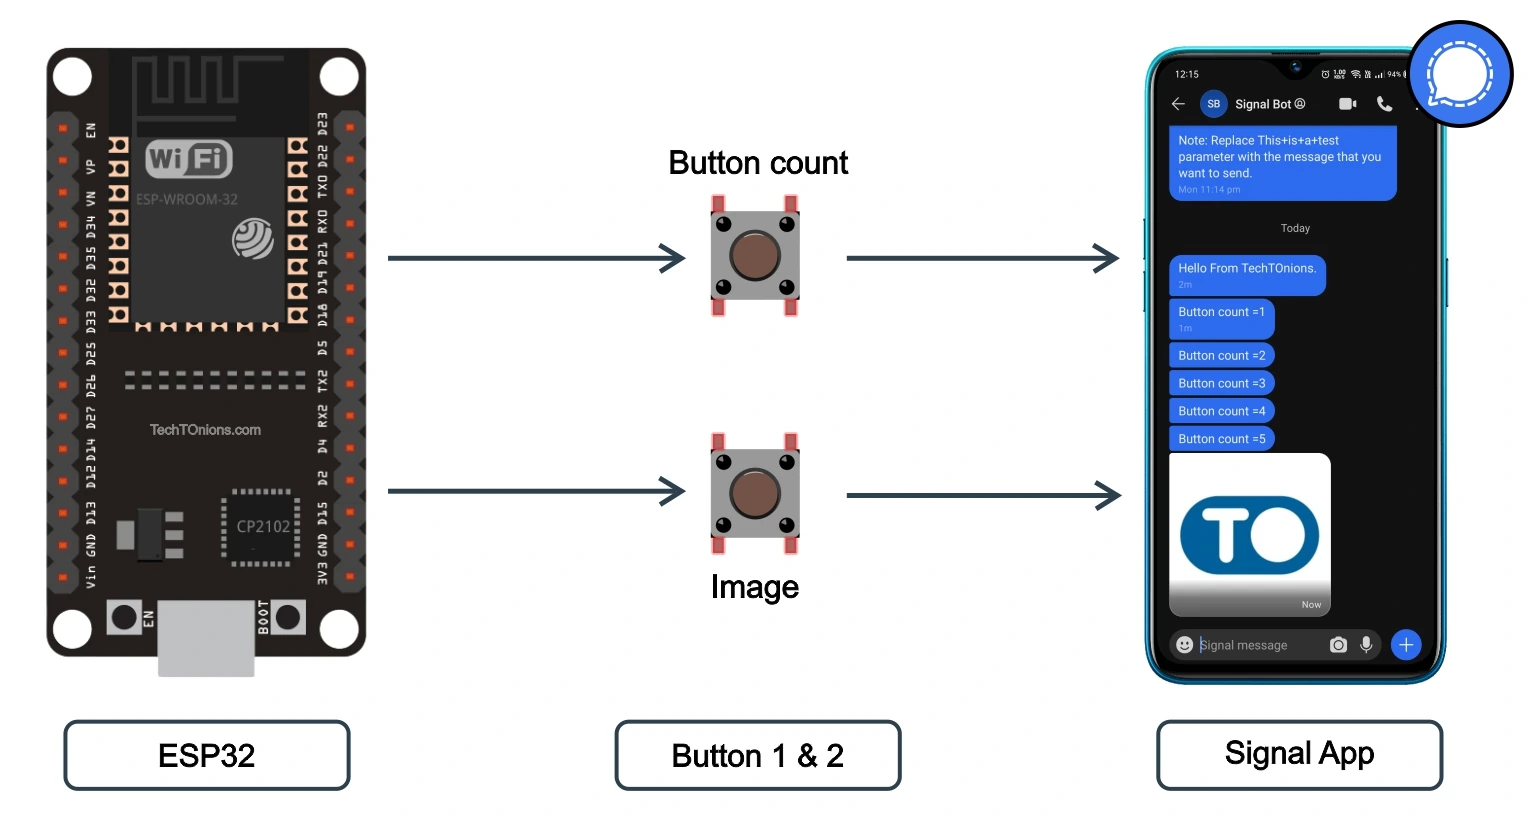
For this project, we will use two buttons connected with ESP32 GPIOs. We will use the above-mentioned message and Image sending functions in this example with a button interface.
We will send a message with the total number of button count when button1 is pressed. And we will send our TO logo as an image when button2 is pressed.
This example demonstrates how you can integrate the user-defined functions into your IoT projects.
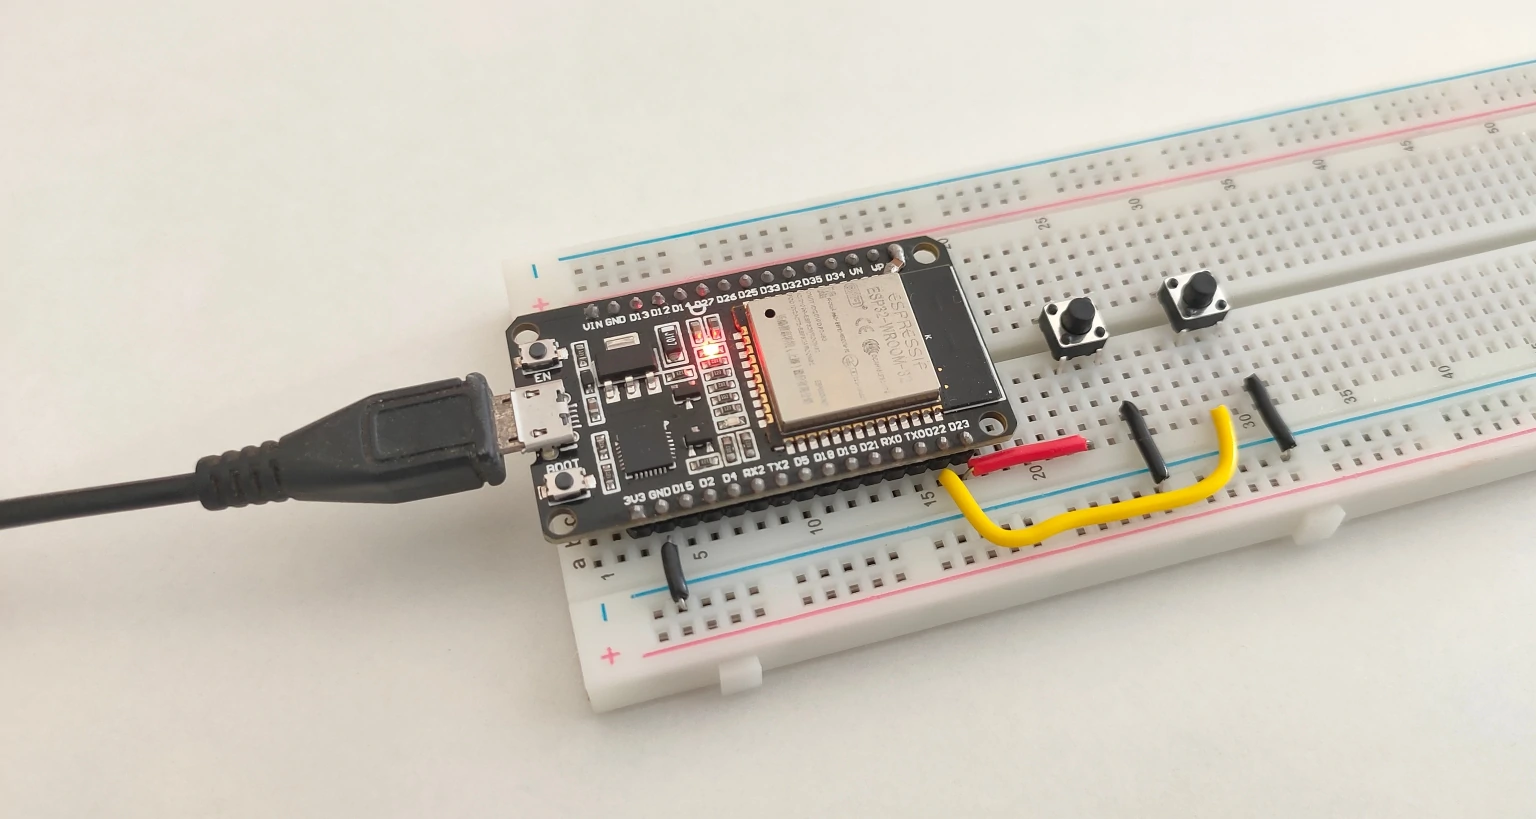
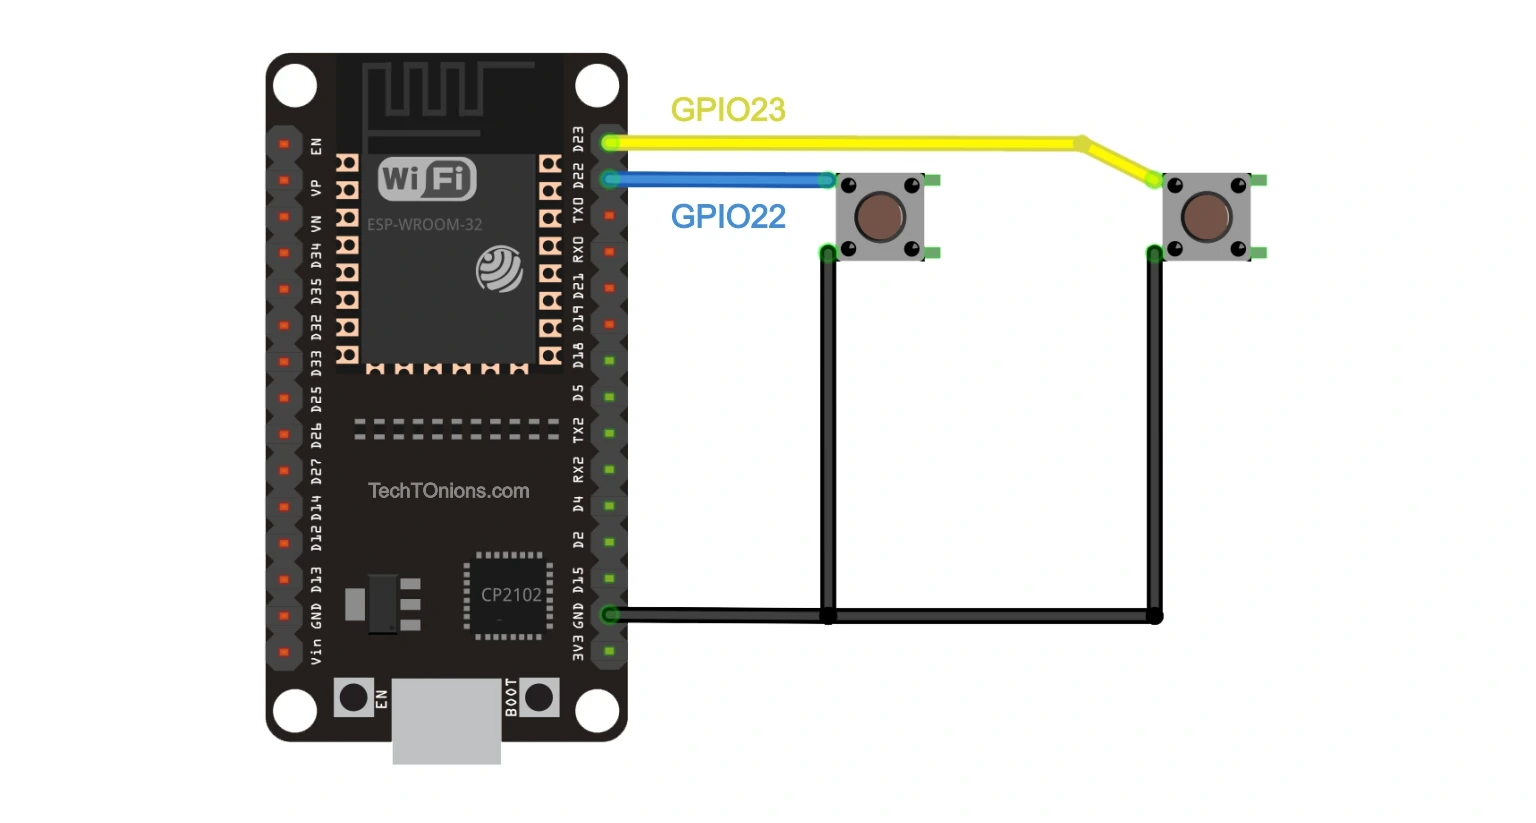
Circuit Diagram
Here is the simple schematic used for this project. It has two buttons tied to an ESP32 GPIOs. Button1 with GPIO23 and Button2 with GPIO22. We will use internal pullups for both switches.
ESP32 to Signal message and Image on a button press – Sketch
The following code will communicate to the Signal bot hence sending messages and images with buttons. If you understand this concept of using this function, you can easily integrate this code with your ESP32 IoT or Home automation projects i.e.
You can use a Door sensor switch with a Reed switch instead of buttons to get notified whenever a door is open/closed. Or maybe Pir sensor motion detection-based alerts.
Following changes are required to use this sketch with your Signal app-
- Add your Wi-Fi credentials to the ssid and password variable.
- Add your API key to you to apiKey variable. (Same API key that you received by bot)
- Add your registered Signal app mobile number with country code to the phone_number variable.
- If you use different Button pins, then change btn1 and btn2 accordingly.
/*
  Date: 07-05-21
  Code written by: Dharmik
  ESP32 sending a message & image to Signal messenger on button press.
  Find more on www.TechTOnions.com
*/

#include <WiFi.h>         //Including wifi.h library it will take care of all wifi related task
#include <HTTPClient.h>   //Including HTTPClient.h library to use all api
#include <EasyButton.h>   //Including EasyButton.h library for handling debouncing on button input
#define btn1 23           //define button 1 pin
#define btn2 22           //define button 2 pin
int button_count;          //it will store total number of button press count

const char* ssid = "Replace me with your SSID";            //Add your WiFi ssid
const char* password = "Replace me with your PASSWORD";    //Add your WiFi password

String apiKey = "222222";              //Add your Token number that bot has sent you on signal messenger
String phone_number = "+917561123123"; //Add your signal app registered phone number (same number that bot send you in url)

String url;                            //url String will be used to store the final generated URL


EasyButton button1(btn1);  // Button1 object for btn1
EasyButton button2(btn2);  // Button2 object for btn2

String send_message;

void setup() {

  button1.begin();  // Initialize the button1
  button2.begin();  // Initialize the button2

  // Add the callback function to be called when the button1 is pressed.
  button1.onPressed(onButton1Pressed);
  // Add the callback function to be called when the button2 is pressed.
  button2.onPressed(onButton2Pressed);

  Serial.begin(115200);

  WiFi.begin(ssid, password);              // Try to connect with the given SSID and PSS
  Serial.println("Connecting to WiFi");
  while (WiFi.status() != WL_CONNECTED) {  // Wait until WiFi is connected
    delay(500);
    Serial.print(".");
  }
  Serial.println();
  Serial.println("Connected to the WiFi network"); // Print wifi connect message

}

void loop()
{
  // Continuously read the status of the buttons
  button1.read();
  button2.read();
}

// Callback function to be called when button1 is pressed
void onButton1Pressed()
{
  button_count++;
  send_message = "Button count = " + String(button_count);
  Serial.println("button1 pressed sending");
  Serial.println(send_message);
  message_to_signal(send_message); // Send send_message to Signal app
}

// Callback function to be called when button2 is pressed
void onButton2Pressed()
{
  Serial.println("Button2 pressed send image");
  image_to_signal("https://www.techtonions.com/wp-content/uploads/2021/05/New-Profile-picture-logo-big-250x250-1.jpg");
}

void image_to_signal(String img_url)  //user define function to send image to Signal App
{
  //adding all number, your api key, your image url into one complete url
  url = "https://api.callmebot.com/signal/send.php?phone="+ phone_number + "&apikey=" + apiKey + "&image=" + urlencode(img_url);
  postData(); // caling postData to run the above generated url once so that you will receive image.
}

void  message_to_signal(String message)       // user define function to send meassage to Signal app
{
  //adding all number, your api key, your message into one complete url
  url = "https://api.callmebot.com/signal/send.php?phone=" + phone_number + "&apikey=" + apiKey + "&text=" + urlencode(message);

  postData(); // calling postData to run the above-generated url once so that you will receive a message.
}

void postData()     //userDefine function used to call api(POST data)
{
  int httpCode;     // variable used to get the responce http code after calling api
  HTTPClient http;  // Declare object of class HTTPClient
  http.begin(url);  // begin the HTTPClient object with generated url
  httpCode = http.POST(url); // Finaly Post the URL with this function and it will store the http code
  if (httpCode == 200)      // Check if the responce http code is 200
  {
    Serial.println("Sent ok."); // print message sent ok message
  }
  else                      // if response HTTP code is not 200 it means there is some error.
  {
    Serial.println("Error."); // print error message.
  }
  http.end();         // After calling API end the HTTP client object.
}

String urlencode(String str)  // Function used for encoding the url
{
    String encodedString="";
    char c;
    char code0;
    char code1;
    char code2;
    for (int i =0; i < str.length(); i++){
      c=str.charAt(i);
      if (c == ' '){
        encodedString+= '+';
      } else if (isalnum(c)){
        encodedString+=c;
      } else{
        code1=(c & 0xf)+'0';
        if ((c & 0xf) >9){
            code1=(c & 0xf) - 10 + 'A';
        }
        c=(c>>4)&0xf;
        code0=c+'0';
        if (c > 9){
            code0=c - 10 + 'A';
        }
        code2='\0';
        encodedString+='%';
        encodedString+=code0;
        encodedString+=code1;
        //encodedString+=code2;
      }
      yield();
    }
    return encodedString;
}
How Code Works
We will Install all necessary libraries for the code required. Now we will also use EasyButton.h library for easy debouncing of button used.
#include <WiFi.h>         //Including wifi.h library it will take care of all wifi related task
#include <HTTPClient.h>   //Including HTTPClient.h library to use all api
#include <EasyButton.h>   //Including EasyButton.h library for handling debouncing on button input
We are defining button pins as btn1 and btn2. Additionally, we need the button_count variable to store total button counts.
#define btn1 23           //define button 1 pin
#define btn2 22           //define button 2 pin
int button_count;          //it will store total number of button press count
Now we require Wi-Fi credentials, your Signal API key, and phone number.
const char* ssid = "Replace me with your SSID";            //Add your WiFi ssid
const char* password = "Replace me with your PASSWORD";    //Add your WiFi password

String apiKey = "222222";              //Add your Token number that bot has sent you on signal messenger
String phone_number = "+917561123123"; //Add your signal app registered phone number (same number that bot send you in url)
We will generate button1 and button2 as a new object for EasyButton.
EasyButton button1(btn1);  // Button1 object for btn1
EasyButton button2(btn2);  // Button2 object for btn2
setup()
Inside Setup function now we will begin our two-button object. By default, the library will set it as Input with internal pullups.
  button1.begin();  // Initialize the button1
  button2.begin();  // Initialize the button2
Assigning callback function onButton1Pressed to button1 and onButton2Pressed to button2. It means that now whenever EasyButton detects one button press event, it will trigger this callback function.
  // Add the callback function to be called when the button1 is pressed.
  button1.onPressed(onButton1Pressed);
  // Add the callback function to be called when the button2 is pressed.
  button2.onPressed(onButton2Pressed);
Now initialize the serial communication with a baud rate of 115200, so we can see data in the Serial monitor.
Serial.begin(115200);
Init the Wi-Fi
Initialize the Wi-Fi So that it can connect to your Wi-Fi network.
  WiFi.begin(ssid, password);              // Try to connect with the given SSID and PSS
  Serial.println("Connecting to WiFi");
  while (WiFi.status() != WL_CONNECTED) {  // Wait until WiFi is connected
    delay(500);
    Serial.print(".");
  }
  Serial.println();
  Serial.println("Connected to the WiFi network"); // Print wifi connect message
Note:- If your Wi-Fi credentials are wrong, then ESP will be stuck in the infinite while loop.
loop()
Inside the loop, we have to call the read() function of the EasyButton library. It will continuously monitor both buttons. And on a button press, it will trigger the callback function we defined in the setup function.
  // Continuously read the status of the buttons
  button1.read();
  button2.read();
onButton1Pressed()
Inside this callback function, we will increment the button_count variable, and we will send a button count message to the Signal app using the message_to_signal function that we explored before.
void onButton1Pressed()
{
  button_count++;
  send_message = "Button count = " + String(button_count);
  Serial.println("button1 pressed sending");
  Serial.println(send_message);
  message_to_signal(send_message); // Send send_message to Signal app
}
onButton2Pressed()
Inside this callback function, we will send an image to the Signal app using the image_to_signal function that we explore before.
void onButton2Pressed()
{
  Serial.println("Button2 pressed send image");
  image_to_signal("https://www.techtonions.com/wp-content/uploads/2021/05/New-Profile-picture-logo-big-250x250-1.jpg");
}
All remaining function we used for this example has discussed before.
Conclusion
The tutorial shows how easily you can use any third-party API with an ESP32 for interacting with the Signal app. Explore more and write in the comment section about your Signal IOT project using this method.
More projects that you may like reading.
❑ Get alerts on WhatsApp with ESP32 when a door opens.
Consider subscribing to our weekly newsletters for weekly updates on new IoT projects based on ESP32.


Another awesome tutorial – very clearly written and an interesting application. Thanks for writing this!
In fact, this tutorial is very helpful.
Thank you.
God Bless
Thank you akingbade.
Hi, it is a good idea and it is well explained.
In reverse way, do you know if is it possible to send data from Signal to ESP32?
Hello Oliv44,
We are looking for the same and hopefully, we will be publishing such a project update soon.
Thank you for reading and your suggestion.
how to add another number to the program. could u help
Hello Mohan Kumar,
If you understand the code working properly, the main function that is handling to send the SMS is
Inside this function, we are generating a unique URL based on our phone number and API key.
Therefore if you just modify the same function and pass API and phone number along with the message string. So that it can generate different URLs with different API and phone numbers.
the new function will look something like this.
and inside that function, the new URL should look something like this.
Hopefully, you got my point. Let us know whats the outcome.
Happy Coding.
This is part of what I did, but now I get two messages to two numbers?! Halfway there:)
Back to the drawing board.
void message_to_signal_1(String message)
void message_to_signal_2(String message)
I was going to ask this question too.
why am i getting error? i’m using my number and api key on my own but still get error on serial monitor.. plus don’t even get message from signal bot.. i’m using ESP32 DEVKIT V1 DOIT
Hello RazorCartalyst, can you share what exact error you are getting?
Thank you.
Thanks for posting this tutorial, exactly what I was looking for. 🙂
Hello Glenn, thank you for your comment and we are glad that you liked the project.
Is it possible that the bot stops sending messages after a while? Or has a limit such as only 100 messages for free use?
Hello Kevin,
The bot we are using is callmebot and they are providing it free, so I guess it’s for learning/testing purposes not for any production or heavy usage.
I don’t know whether they have any limits on the messages but I think if they do have it will be limited per day and after some time it should work again.
You can look at their FAQ/support page for more info on it.
https://www.callmebot.com/faq/
https://www.callmebot.com/#need_support
Hi
when trying to upload the code, i get this error message:
Arduino: 1.8.19 (Windows 10), Board: “NodeMCU 1.0 (ESP-12E Module), 80 MHz, Flash, Disabled (new aborts on oom), Disabled, All SSL ciphers (most compatible), 32KB cache + 32KB IRAM (balanced), Use pgm_read macros for IRAM/PROGMEM, 4MB (FS:2MB OTA:~1019KB), 2, v2 Lower Memory, Disabled, None, Only Sketch, 115200”
C:\Users\Lalo\Downloads\Arduino\Wifi\Wifi.ino: In function ‘void setup()’:
Wifi:27:14: error: invalid conversion from ‘const char*’ to ‘char*’ [-fpermissive]
27 | WiFi.begin(ssid, password); // Try to connect with the given SSID and PSS
| ^~~~
| |
| const char*
In file included from C:\Users\Lalo\Downloads\Arduino\Wifi\Wifi.ino:11:
C:\Program Files (x86)\Arduino\libraries\WiFi\src/WiFi.h:79:21: note: initializing argument 1 of ‘int WiFiClass::begin(char*, const char*)’
79 | int begin(char* ssid, const char *passphrase);
| ~~~~~~^~~~
C:\Users\Lalo\Downloads\Arduino\Wifi\Wifi.ino: In function ‘void postData()’:
Wifi:56:3: error: ‘HTTPClient’ was not declared in this scope; did you mean ‘HttpClient’?
56 | HTTPClient http; // Declare object of class HTTPClient
| ^~~~~~~~~~
| HttpClient
Wifi:57:3: error: ‘http’ was not declared in this scope
57 | http.begin(url); // begin the HTTPClient object with generated url
| ^~~~
Multiple libraries were found for “b64.h”
Used: C:\Users\Lalo\Documents\Arduino\libraries\ArduinoHttpClient
Not used: C:\Users\Lalo\Documents\Arduino\libraries\HttpClient-2.2.0
exit status 1
invalid conversion from ‘const char*’ to ‘char*’ [-fpermissive]
This report would have more information with
“Show verbose output during compilation”
option enabled in File -> Preferences.
would appreciate some help 🙂
Hello Lalo,
Based on the error code I think you are using ESP12E for the project right?
We have built and tested our code only on the ESP32 board so you need to modify the code to work with ESP12, It will not work directly.
Thank You for reading.
i really need a help for notification i want unauthorized fingerprint will notify when it scans
#include <SPI.h>

#include <Wire.h>

#include <WiFiClient.h>

#include <ESP8266WiFi.h>

#include <SoftwareSerial.h>

#include <ESP8266WebServer.h>

#include <ESP8266HTTPClient.h>

#include <Adafruit_GFX.h>     //https://github.com/adafruit/Adafruit-GFX-Library

#include <Adafruit_SSD1306.h>   //https://github.com/adafruit/Adafruit_SSD1306

#include <Adafruit_Fingerprint.h> //https://github.com/adafruit/Adafruit-Fingerprint-Sensor-Library

//************************************************************************

//Fingerprint scanner Pins

#define Finger_Rx 14 //D5

#define Finger_Tx 12 //D6

//ralay

#define relay D4

uint8_t Lock_Pin = D4;

// Declaration for SSD1306 display connected using software I2C

#define SCREEN_WIDTH 128 // OLED display width, in pixels

#define SCREEN_HEIGHT 64 // OLED display height, in pixels

#define OLED_RESET   0 // Reset pin # (or -1 if sharing Arduino reset pin)

Adafruit_SSD1306 display(SCREEN_WIDTH, SCREEN_HEIGHT, &Wire, OLED_RESET);

//************************************************************************

SoftwareSerial mySerial(Finger_Rx, Finger_Tx);

Adafruit_Fingerprint finger = Adafruit_Fingerprint(&mySerial);

//************************************************************************

/* Set these to your desired credentials. */

const char *ssid = "Epanto"; //ENTER YOUR WIFI SETTINGS

const char *password = "epanto123";

//************************************************************************

String postData ; // post array that will be send to the website

String link = "http://192.168.150.40/biometricattendance/getdata.php"; //computer IP or the server domain

int FingerID = 0;   // The Fingerprint ID from the scanner

uint8_t id;

//*************************Biometric Icons*********************************

#define Wifi_start_width 54

#define Wifi_start_height 49

const uint8_t PROGMEM Wifi_start_bits[] = {

 0x00,0x00,0x00,0x00,0x00,0x00,0x00

,0x00,0x00,0x00,0x00,0x00,0x00,0x00

,0x00,0x00,0x00,0x00,0x00,0x00,0x00

,0x00,0x00,0x00,0x00,0x00,0x00,0x00

,0x00,0x00,0x00,0x00,0x00,0x00,0x00

,0x00,0x00,0x1f,0xf0,0x00,0x00,0x00

,0x00,0x03,0xff,0xff,0x80,0x00,0x00

,0x00,0x1f,0xf0,0x1f,0xf0,0x00,0x00

,0x00,0x7e,0x00,0x00,0xfc,0x00,0x00

,0x01,0xf0,0x00,0x00,0x1f,0x00,0x00

,0x03,0xc0,0x00,0x00,0x07,0xc0,0x00

,0x0f,0x00,0x00,0x00,0x01,0xe0,0x00

,0x1c,0x00,0x00,0x00,0x00,0x70,0x00

,0x38,0x00,0x07,0xc0,0x00,0x38,0x00

,0x70,0x00,0xff,0xfe,0x00,0x1e,0x00

,0xe0,0x03,0xfc,0x7f,0xc0,0x0e,0x00

,0x00,0x1f,0x80,0x03,0xf0,0x00,0x00

,0x00,0x3c,0x00,0x00,0x78,0x00,0x00

,0x00,0xf0,0x00,0x00,0x1c,0x00,0x00

,0x01,0xe0,0x00,0x00,0x0c,0x00,0x00

,0x03,0x80,0x00,0x00,0x00,0x00,0x00

,0x03,0x00,0x00,0x00,0x00,0x00,0x00

,0x00,0x00,0x3f,0xf8,0x07,0x1e,0x00

,0x00,0x00,0xff,0xfe,0x1f,0xbf,0x80

,0x00,0x03,0xe0,0x04,0x7f,0xff,0xc0

,0x00,0x07,0x80,0x00,0xff,0xff,0xe0

,0x00,0x0e,0x00,0x00,0xff,0xff,0xe0

,0x00,0x0c,0x00,0x00,0x7f,0xff,0xc0

,0x00,0x00,0x00,0x00,0xfe,0x07,0xe0

,0x00,0x00,0x00,0x03,0xf8,0x03,0xf8

,0x00,0x00,0x07,0xe7,0xf9,0xf1,0xfc

,0x00,0x00,0x1f,0xe7,0xf1,0xf9,0xfc

,0x00,0x00,0x1f,0xe7,0xf3,0xf9,0xfc

,0x00,0x00,0x3f,0xe7,0xf3,0xf9,0xfc

,0x00,0x00,0x3f,0xe7,0xf1,0xf1,0xfc

,0x00,0x00,0x3f,0xe3,0xf8,0xe3,0xfc

,0x00,0x00,0x3f,0xf3,0xfc,0x07,0xf8

,0x00,0x00,0x1f,0xf0,0x7f,0x0f,0xc0

,0x00,0x00,0x0f,0xe0,0x7f,0xff,0xe0

,0x00,0x00,0x07,0xc0,0xff,0xff,0xe0

,0x00,0x00,0x00,0x00,0x7f,0xff,0xe0

,0x00,0x00,0x00,0x00,0x3f,0xff,0x80

,0x00,0x00,0x00,0x00,0x1f,0xbf,0x00

,0x00,0x00,0x00,0x00,0x03,0x18,0x00

,0x00,0x00,0x00,0x00,0x00,0x00,0x00

,0x00,0x00,0x00,0x00,0x00,0x00,0x00

,0x00,0x00,0x00,0x00,0x00,0x00,0x00

,0x00,0x00,0x00,0x00,0x00,0x00,0x00

,0x00,0x00,0x00,0x00,0x00,0x00,0x00

};

#define Wifi_connected_width 63

#define Wifi_connected_height 49

const uint8_t PROGMEM Wifi_connected_bits[] = {

 0x00,0x00,0x00,0x00,0x00,0x00,0x00,0x00

,0x00,0x00,0x00,0x00,0x00,0x00,0x00,0x00

,0x00,0x00,0x00,0x00,0x00,0x00,0x00,0x00

,0x00,0x00,0x00,0x00,0x00,0x00,0x00,0x00

,0x00,0x00,0x00,0x00,0x00,0x00,0x00,0x00

,0x00,0x00,0x00,0x00,0x00,0x00,0x00,0x00

,0x00,0x00,0x00,0x00,0x00,0x00,0x00,0x00

,0x00,0x00,0x03,0xff,0xff,0x80,0x00,0x00

,0x00,0x00,0x3f,0xff,0xff,0xf8,0x00,0x00

,0x00,0x01,0xff,0xff,0xff,0xff,0x00,0x00

,0x00,0x0f,0xff,0xff,0xff,0xff,0xe0,0x00

,0x00,0x3f,0xff,0xc0,0x07,0xff,0xf8,0x00

,0x00,0xff,0xf8,0x00,0x00,0x3f,0xfe,0x00

,0x03,0xff,0x80,0x00,0x00,0x03,0xff,0x80

,0x07,0xfe,0x00,0x00,0x00,0x00,0xff,0xc0

,0x1f,0xf8,0x00,0x00,0x00,0x00,0x3f,0xf0

,0x3f,0xe0,0x01,0xff,0xff,0x00,0x0f,0xf8

,0x7f,0x80,0x0f,0xff,0xff,0xe0,0x03,0xfc

,0xff,0x00,0x7f,0xff,0xff,0xfc,0x01,0xfe

,0xfc,0x01,0xff,0xff,0xff,0xff,0x00,0x7e

,0x78,0x07,0xff,0xc0,0x07,0xff,0xc0,0x3c

,0x00,0x0f,0xfc,0x00,0x00,0x7f,0xe0,0x00

,0x00,0x1f,0xf0,0x00,0x00,0x1f,0xf0,0x00

,0x00,0x3f,0xc0,0x00,0x00,0x07,0xf8,0x00

,0x00,0x7f,0x00,0x01,0x00,0x01,0xfc,0x00

,0x00,0x7e,0x00,0x7f,0xfc,0x00,0xfc,0x00

,0x00,0x3c,0x03,0xff,0xff,0x80,0x78,0x00

,0x00,0x00,0x07,0xff,0xff,0xc0,0x00,0x00

,0x00,0x00,0x1f,0xff,0xff,0xf0,0x00,0x00

,0x00,0x00,0x3f,0xf0,0x1f,0xf8,0x00,0x00

,0x00,0x00,0x3f,0x80,0x03,0xf8,0x00,0x00

,0x00,0x00,0x3f,0x00,0x01,0xf8,0x00,0x00

,0x00,0x00,0x1c,0x00,0x00,0x70,0x00,0x00

,0x00,0x00,0x00,0x01,0x00,0x00,0x00,0x00

,0x00,0x00,0x00,0x0f,0xe0,0x00,0x00,0x00

,0x00,0x00,0x00,0x1f,0xf0,0x00,0x00,0x00

,0x00,0x00,0x00,0x3f,0xf8,0x00,0x00,0x00

,0x00,0x00,0x00,0x3f,0xf8,0x00,0x00,0x00

,0x00,0x00,0x00,0x3f,0xf8,0x00,0x00,0x00

,0x00,0x00,0x00,0x3f,0xf8,0x00,0x00,0x00

,0x00,0x00,0x00,0x1f,0xf0,0x00,0x00,0x00

,0x00,0x00,0x00,0x0f,0xe0,0x00,0x00,0x00

,0x00,0x00,0x00,0x00,0x00,0x00,0x00,0x00

,0x00,0x00,0x00,0x00,0x00,0x00,0x00,0x00

,0x00,0x00,0x00,0x00,0x00,0x00,0x00,0x00

,0x00,0x00,0x00,0x00,0x00,0x00,0x00,0x00

,0x00,0x00,0x00,0x00,0x00,0x00,0x00,0x00

,0x00,0x00,0x00,0x00,0x00,0x00,0x00,0x00

,0x00,0x00,0x00,0x00,0x00,0x00,0x00,0x00

};

#define FinPr_start_width 64

#define FinPr_start_height 64

const uint8_t PROGMEM FinPr_start_bits[] = {

 0x00,0x00,0x00,0x1f,0xe0,0x00,0x00,0x00

,0x00,0x00,0x01,0xff,0xfe,0x00,0x00,0x00

,0x00,0x00,0x03,0xff,0xff,0x80,0x00,0x00

,0x00,0x00,0x0f,0xc0,0x0f,0xe0,0x00,0x00

,0x00,0x00,0x1f,0x00,0x01,0xf8,0x00,0x00

,0x00,0x00,0x3c,0x00,0x00,0x7c,0x00,0x00

,0x00,0x00,0x78,0x00,0x00,0x3e,0x00,0x00

,0x00,0x00,0xf0,0x3f,0xf8,0x0f,0x00,0x00

,0x00,0x01,0xe0,0xff,0xfe,0x07,0x80,0x00

,0x00,0x03,0xc3,0xff,0xff,0x03,0x80,0x00

,0x00,0x03,0x87,0xc0,0x07,0xc3,0xc0,0x00

,0x00,0x07,0x0f,0x00,0x03,0xe1,0xc0,0x00

,0x00,0x0f,0x0e,0x00,0x00,0xe0,0xe0,0x00

,0x00,0x0e,0x1c,0x00,0x00,0xf0,0xe0,0x00

,0x00,0x0c,0x3c,0x1f,0xe0,0x70,0xe0,0x00

,0x00,0x00,0x38,0x3f,0xf0,0x38,0x70,0x00

,0x00,0x00,0x78,0x78,0xf8,0x38,0x70,0x00

,0x00,0x00,0x70,0x70,0x3c,0x18,0x70,0x00

,0x00,0x00,0xe0,0xe0,0x1e,0x1c,0x70,0x00

,0x00,0x03,0xe1,0xe0,0x0e,0x1c,0x70,0x00

,0x00,0x0f,0xc1,0xc3,0x0e,0x1c,0x70,0x00

,0x00,0x3f,0x03,0xc3,0x8e,0x1c,0x70,0x00

,0x00,0x3e,0x03,0x87,0x0e,0x1c,0x70,0x00

,0x00,0x30,0x07,0x07,0x0e,0x18,0xe0,0x00

,0x00,0x00,0x0e,0x0e,0x0e,0x38,0xe0,0x00

,0x00,0x00,0x3e,0x1e,0x1e,0x38,0xe0,0x00

,0x00,0x00,0xf8,0x1c,0x1c,0x38,0xe0,0x00

,0x00,0x03,0xf0,0x38,0x3c,0x38,0xe0,0x00

,0x00,0x3f,0xc0,0xf8,0x78,0x38,0xe0,0x00

,0x00,0x7f,0x01,0xf0,0x70,0x38,0xf0,0x00

,0x00,0x78,0x03,0xe0,0xe0,0x38,0x70,0x00

,0x00,0x00,0x0f,0x81,0xe0,0x38,0x7c,0x00

,0x00,0x00,0x3f,0x03,0xc0,0x38,0x3e,0x00

,0x00,0x00,0xfc,0x0f,0x80,0x38,0x1e,0x00

,0x00,0x07,0xf0,0x1f,0x1c,0x1c,0x04,0x00

,0x00,0x3f,0xc0,0x3e,0x3f,0x1e,0x00,0x00

,0x00,0x7f,0x00,0xf8,0x7f,0x0f,0x00,0x00

,0x00,0x38,0x01,0xf0,0xf7,0x07,0xc0,0x00

,0x00,0x00,0x07,0xe1,0xe3,0x83,0xf8,0x00

,0x00,0x00,0x3f,0x87,0xc3,0xc0,0xfc,0x00

,0x00,0x01,0xfe,0x0f,0x81,0xe0,0x3c,0x00

,0x00,0x0f,0xf8,0x1f,0x00,0xf0,0x00,0x00

,0x00,0x1f,0xc0,0x7c,0x00,0x7c,0x00,0x00

,0x00,0x1e,0x01,0xf8,0x00,0x3f,0x00,0x00

,0x00,0x00,0x07,0xe0,0x78,0x0f,0xc0,0x00

,0x00,0x00,0x3f,0x81,0xfe,0x07,0xf0,0x00

,0x00,0x01,0xfe,0x07,0xff,0x01,0xf0,0x00

,0x00,0x07,0xf8,0x0f,0x87,0x80,0x30,0x00

,0x00,0x07,0xc0,0x3f,0x03,0xe0,0x00,0x00

,0x00,0x06,0x00,0xfc,0x01,0xf8,0x00,0x00

,0x00,0x00,0x03,0xf0,0x00,0x7e,0x00,0x00

,0x00,0x00,0x0f,0xc0,0x00,0x3f,0x80,0x00

,0x00,0x00,0x7f,0x00,0xf8,0x0f,0x80,0x00

,0x00,0x00,0xfc,0x03,0xfe,0x01,0x80,0x00

,0x00,0x00,0xf0,0x1f,0xff,0x80,0x00,0x00

,0x00,0x00,0x00,0x7f,0x07,0xe0,0x00,0x00

,0x00,0x00,0x00,0xfc,0x03,0xf8,0x00,0x00

,0x00,0x00,0x03,0xf0,0x00,0x78,0x00,0x00

,0x00,0x00,0x0f,0xc0,0x00,0x18,0x00,0x00

,0x00,0x00,0x0f,0x01,0xf8,0x00,0x00,0x00

,0x00,0x00,0x00,0x07,0xfe,0x00,0x00,0x00

,0x00,0x00,0x00,0x1f,0xfe,0x00,0x00,0x00

,0x00,0x00,0x00,0x1e,0x0e,0x00,0x00,0x00

,0x00,0x00,0x00,0x18,0x00,0x00,0x00,0x00

};

//---------------------------------------------------------------

#define FinPr_valid_width 64

#define FinPr_valid_height 64

const uint8_t PROGMEM FinPr_valid_bits[] = {

 0x00,0x00,0x03,0xfe,0x00,0x00,0x00,0x00

,0x00,0x00,0x1f,0xff,0xe0,0x00,0x00,0x00

,0x00,0x00,0x7f,0xff,0xf8,0x00,0x00,0x00

,0x00,0x00,0xfc,0x00,0xfe,0x00,0x00,0x00

,0x00,0x03,0xe0,0x00,0x1f,0x00,0x00,0x00

,0x00,0x07,0xc0,0x00,0x07,0x80,0x00,0x00

,0x00,0x0f,0x80,0x00,0x03,0xe0,0x00,0x00

,0x00,0x0e,0x03,0xff,0x01,0xe0,0x00,0x00

,0x00,0x1c,0x1f,0xff,0xe0,0xf0,0x00,0x00

,0x00,0x3c,0x3f,0xff,0xf0,0x78,0x00,0x00

,0x00,0x78,0x7c,0x00,0xf8,0x3c,0x00,0x00

,0x00,0x70,0xf0,0x00,0x3c,0x1c,0x00,0x00

,0x00,0xe1,0xe0,0x00,0x1e,0x1c,0x00,0x00

,0x00,0xe1,0xc0,0x00,0x0f,0x0e,0x00,0x00

,0x00,0xc3,0x81,0xfc,0x07,0x0e,0x00,0x00

,0x00,0x03,0x83,0xff,0x07,0x8e,0x00,0x00

,0x00,0x07,0x07,0x8f,0x83,0x87,0x00,0x00

,0x00,0x0f,0x0f,0x03,0xc3,0x87,0x00,0x00

,0x00,0x1e,0x0e,0x01,0xc3,0x87,0x00,0x00

,0x00,0x3c,0x1c,0x00,0xe1,0x87,0x00,0x00

,0x00,0xf8,0x1c,0x30,0xe1,0x87,0x00,0x00

,0x07,0xf0,0x38,0x70,0xe1,0x86,0x00,0x00

,0x07,0xc0,0x78,0x70,0xe3,0x8e,0x00,0x00

,0x02,0x00,0xf0,0xf0,0xe3,0x8e,0x00,0x00

,0x00,0x01,0xe0,0xe0,0xe3,0x8e,0x00,0x00

,0x00,0x03,0xc1,0xe1,0xc3,0x8e,0x00,0x00

,0x00,0x0f,0x83,0xc3,0xc3,0x8e,0x00,0x00

,0x00,0x7f,0x07,0x83,0x83,0x0e,0x00,0x00

,0x07,0xfc,0x0f,0x07,0x83,0x0e,0x00,0x00

,0x07,0xf0,0x1e,0x0f,0x03,0x0e,0x00,0x00

,0x07,0x80,0x7c,0x1e,0x03,0x07,0x00,0x00

,0x00,0x00,0xf8,0x3c,0x03,0x87,0x80,0x00

,0x00,0x03,0xf0,0x78,0x03,0x83,0xc0,0x00

,0x00,0x1f,0xc0,0xf0,0x02,0x00,0x00,0x00

,0x00,0xff,0x01,0xe1,0xc0,0x0c,0x00,0x00

,0x07,0xfc,0x03,0xc3,0xe1,0xff,0xc0,0x00

,0x07,0xe0,0x0f,0x87,0xc7,0xff,0xf0,0x00

,0x07,0x00,0x3f,0x0f,0x0f,0xff,0xfc,0x00

,0x00,0x00,0x7c,0x3e,0x3f,0xff,0xfe,0x00

,0x00,0x03,0xf8,0x7c,0x3f,0xff,0xff,0x00

,0x00,0x1f,0xe0,0xf0,0x7f,0xff,0xff,0x80

,0x00,0xff,0x83,0xe0,0xff,0xff,0xff,0x80

,0x01,0xfc,0x07,0xc1,0xff,0xff,0xe3,0xc0

,0x01,0xe0,0x1f,0x01,0xff,0xff,0xc3,0xc0

,0x00,0x00,0xfe,0x01,0xff,0xff,0x87,0xe0

,0x00,0x03,0xf8,0x13,0xff,0xff,0x0f,0xe0

,0x00,0x1f,0xe0,0x73,0xff,0xfe,0x1f,0xe0

,0x00,0x7f,0x81,0xf3,0xff,0xfc,0x1f,0xe0

,0x00,0xfc,0x03,0xe3,0xef,0xf8,0x3f,0xe0

,0x00,0x60,0x0f,0xc3,0xc7,0xf0,0x7f,0xe0

,0x00,0x00,0x3f,0x03,0xc3,0xe0,0xff,0xe0

,0x00,0x00,0xfc,0x03,0xc1,0xc1,0xff,0xe0

,0x00,0x07,0xf0,0x13,0xe0,0x83,0xff,0xe0

,0x00,0x0f,0xc0,0x7b,0xf8,0x07,0xff,0xe0

,0x00,0x0f,0x01,0xf9,0xfc,0x0f,0xff,0xc0

,0x00,0x00,0x07,0xf1,0xfe,0x1f,0xff,0xc0

,0x00,0x00,0x1f,0xc0,0xff,0x3f,0xff,0x80

,0x00,0x00,0x7e,0x00,0xff,0xff,0xff,0x80

,0x00,0x00,0xfc,0x00,0x7f,0xff,0xff,0x00

,0x00,0x00,0xf0,0x1f,0x3f,0xff,0xfe,0x00

,0x00,0x00,0x00,0x7f,0x1f,0xff,0xfc,0x00

,0x00,0x00,0x01,0xff,0x8f,0xff,0xf8,0x00

,0x00,0x00,0x03,0xe0,0xe3,0xff,0xe0,0x00

,0x00,0x00,0x01,0x80,0x00,0x7f,0x00,0x00

};

//---------------------------------------------------------------

#define FinPr_invalid_width 64

#define FinPr_invalid_height 64

const uint8_t PROGMEM FinPr_invalid_bits[] = {

 0x00,0x00,0x03,0xfe,0x00,0x00,0x00,0x00

,0x00,0x00,0x1f,0xff,0xe0,0x00,0x00,0x00

,0x00,0x00,0x7f,0xff,0xf8,0x00,0x00,0x00

,0x00,0x00,0xfc,0x00,0xfe,0x00,0x00,0x00

,0x00,0x03,0xe0,0x00,0x1f,0x00,0x00,0x00

,0x00,0x07,0xc0,0x00,0x07,0x80,0x00,0x00

,0x00,0x0f,0x80,0x00,0x03,0xe0,0x00,0x00

,0x00,0x0e,0x03,0xff,0x01,0xe0,0x00,0x00

,0x00,0x1c,0x1f,0xff,0xe0,0xf0,0x00,0x00

,0x00,0x3c,0x3f,0xff,0xf0,0x78,0x00,0x00

,0x00,0x78,0x7c,0x00,0xf8,0x3c,0x00,0x00

,0x00,0x70,0xf0,0x00,0x3c,0x1c,0x00,0x00

,0x00,0xe1,0xe0,0x00,0x1e,0x1c,0x00,0x00

,0x00,0xe1,0xc0,0x00,0x0f,0x0e,0x00,0x00

,0x00,0xc3,0x81,0xfc,0x07,0x0e,0x00,0x00

,0x00,0x03,0x83,0xff,0x07,0x8e,0x00,0x00

,0x00,0x07,0x07,0x8f,0x83,0x87,0x00,0x00

,0x00,0x0f,0x0f,0x03,0xc3,0x87,0x00,0x00

,0x00,0x1e,0x0e,0x01,0xc3,0x87,0x00,0x00

,0x00,0x3c,0x1c,0x00,0xe1,0x87,0x00,0x00

,0x00,0xf8,0x1c,0x30,0xe1,0x87,0x00,0x00

,0x07,0xf0,0x38,0x70,0xe1,0x86,0x00,0x00

,0x07,0xc0,0x78,0x70,0xe3,0x8e,0x00,0x00

,0x02,0x00,0xf0,0xf0,0xe3,0x8e,0x00,0x00

,0x00,0x01,0xe0,0xe0,0xe3,0x8e,0x00,0x00

,0x00,0x03,0xc1,0xe1,0xc3,0x8e,0x00,0x00

,0x00,0x0f,0x83,0xc3,0xc3,0x8e,0x00,0x00

,0x00,0x7f,0x07,0x83,0x83,0x0e,0x00,0x00

,0x07,0xfc,0x0f,0x07,0x83,0x0e,0x00,0x00

,0x07,0xf0,0x1e,0x0f,0x03,0x0e,0x00,0x00

,0x07,0x80,0x7c,0x1e,0x03,0x07,0x00,0x00

,0x00,0x00,0xf8,0x3c,0x03,0x87,0x80,0x00

,0x00,0x03,0xf0,0x78,0x03,0x83,0xc0,0x00

,0x00,0x1f,0xc0,0xf0,0x02,0x00,0x00,0x00

,0x00,0xff,0x01,0xe1,0xc0,0x00,0x00,0x00

,0x07,0xfc,0x03,0xc3,0xe1,0xff,0xc0,0x00

,0x07,0xe0,0x0f,0x87,0xc7,0xff,0xf0,0x00

,0x07,0x00,0x3f,0x0f,0x0f,0xff,0xf8,0x00

,0x00,0x00,0x7c,0x3e,0x1f,0xff,0xfe,0x00

,0x00,0x03,0xf8,0x7c,0x3f,0xff,0xff,0x00

,0x00,0x1f,0xe0,0xf0,0x7f,0xff,0xff,0x00

,0x00,0xff,0x83,0xe0,0xfe,0xff,0xbf,0x80

,0x01,0xfc,0x07,0xc0,0xfc,0x7f,0x1f,0xc0

,0x01,0xe0,0x1f,0x01,0xf8,0x3e,0x0f,0xc0

,0x00,0x00,0xfe,0x01,0xf8,0x1c,0x07,0xe0

,0x00,0x03,0xf8,0x13,0xf8,0x00,0x0f,0xe0

,0x00,0x1f,0xe0,0x73,0xfc,0x00,0x1f,0xe0

,0x00,0x7f,0x81,0xf3,0xfe,0x00,0x3f,0xe0

,0x00,0xfc,0x03,0xe3,0xff,0x00,0x7f,0xe0

,0x00,0x60,0x0f,0xc3,0xff,0x80,0xff,0xe0

,0x00,0x00,0x3f,0x03,0xff,0x00,0x7f,0xe0

,0x00,0x00,0xfc,0x03,0xfe,0x00,0x3f,0xe0

,0x00,0x07,0xf0,0x13,0xfc,0x00,0x1f,0xe0

,0x00,0x0f,0xc0,0x79,0xf8,0x08,0x0f,0xe0

,0x00,0x0f,0x01,0xf9,0xf8,0x1c,0x0f,0xc0

,0x00,0x00,0x07,0xf1,0xfc,0x3e,0x1f,0xc0

,0x00,0x00,0x1f,0xc0,0xfe,0x7f,0x3f,0x80

,0x00,0x00,0x7e,0x00,0xff,0xff,0xff,0x80

,0x00,0x00,0xfc,0x00,0x7f,0xff,0xff,0x00

,0x00,0x00,0xf0,0x1f,0x3f,0xff,0xfe,0x00

,0x00,0x00,0x00,0x7f,0x1f,0xff,0xfc,0x00

,0x00,0x00,0x01,0xff,0x8f,0xff,0xf8,0x00

,0x00,0x00,0x03,0xe0,0xe3,0xff,0xe0,0x00

,0x00,0x00,0x01,0x80,0x00,0x7f,0x00,0x00

};

//---------------------------------------------------------------

#define FinPr_failed_width 64

#define FinPr_failed_height 64

const uint8_t PROGMEM FinPr_failed_bits[] = {

0x00,0x00,0x3f,0xe0,0x00,0x00,0x00,0x00

,0x00,0x01,0xff,0xfe,0x00,0x00,0x00,0x00

,0x00,0x0f,0xc0,0x1f,0x80,0x00,0x00,0x00

,0x00,0x1e,0x00,0x03,0xc0,0x00,0x00,0x00

,0x00,0x78,0x00,0x00,0xf0,0x00,0x00,0x00

,0x00,0xe0,0x00,0x00,0x38,0x00,0x00,0x00

,0x01,0xc0,0x00,0x00,0x1c,0x00,0x00,0x00

,0x03,0x80,0x00,0x00,0x0e,0x00,0x00,0x00

,0x07,0x00,0x7f,0xe0,0x07,0x00,0x00,0x00

,0x06,0x01,0xff,0xf8,0x03,0x00,0x00,0x00

,0x0c,0x03,0xc0,0x3c,0x03,0x80,0x00,0x00

,0x1c,0x0f,0x00,0x0e,0x01,0x80,0x00,0x00

,0x18,0x0c,0x00,0x03,0x00,0xc0,0x00,0x00

,0x18,0x18,0x00,0x01,0x80,0xc0,0x00,0x00

,0x30,0x38,0x00,0x01,0xc0,0xe0,0x00,0x00

,0x30,0x30,0x0f,0x00,0xc0,0x60,0x00,0x00

,0x30,0x30,0x3f,0xc0,0xe0,0x60,0x00,0x00

,0x70,0x60,0x78,0xe0,0x60,0x60,0x00,0x00

,0x60,0x60,0x60,0x60,0x60,0x70,0x00,0x00

,0x60,0x60,0x60,0x60,0x60,0x30,0x00,0x00

,0x60,0x60,0x60,0x60,0x30,0x30,0x00,0x00

,0x60,0x60,0x60,0x30,0x30,0x20,0x00,0x00

,0x60,0x60,0x60,0x30,0x30,0x01,0xe0,0x00

,0x60,0x60,0x60,0x30,0x30,0x0f,0xfc,0x00

,0x60,0x60,0x60,0x30,0x30,0x3f,0xff,0x00

,0x60,0x60,0x60,0x30,0x18,0x78,0x03,0x80

,0x60,0x60,0x60,0x30,0x1c,0x60,0x01,0x80

,0x60,0x60,0x30,0x38,0x0c,0xc0,0x00,0xc0

,0x00,0x60,0x30,0x18,0x00,0xc0,0x00,0xc0

,0x00,0x60,0x30,0x18,0x00,0xc0,0x00,0xc0

,0x00,0xe0,0x30,0x0c,0x01,0xc0,0x00,0xe0

,0x00,0xc0,0x18,0x0e,0x01,0xc0,0x00,0xe0

,0x60,0xc0,0x18,0x07,0x01,0xc0,0x00,0xe0

,0x01,0xc0,0x1c,0x03,0x81,0xc0,0x00,0xe0

,0x01,0x80,0x0c,0x01,0xc1,0xc0,0x00,0xe0

,0x03,0x80,0x0e,0x00,0xf1,0xc0,0x00,0xe0

,0x0f,0x00,0x06,0x00,0x01,0xc0,0x00,0xe0

,0x3e,0x01,0x03,0x00,0x01,0xc0,0x00,0xe0

,0x30,0x03,0x83,0x80,0x1f,0xff,0xff,0xfe

,0x00,0x03,0x81,0xc0,0x3f,0xff,0xff,0xff

,0x00,0x07,0xc0,0xe0,0x30,0x00,0x00,0x03

,0x00,0x0e,0xc0,0x78,0x30,0x00,0x00,0x03

,0x00,0x3c,0x60,0x1e,0x30,0x00,0x00,0x03

,0x00,0x78,0x70,0x0f,0x30,0x00,0x00,0x03

,0x03,0xe0,0x38,0x03,0x30,0x00,0x00,0x03

,0x07,0x80,0x1c,0x00,0x30,0x00,0x00,0x03

,0xc0,0x00,0x0f,0x00,0x30,0x00,0x00,0x03

,0xc0,0x00,0x03,0x80,0x30,0x01,0xe0,0x03

,0x00,0x18,0x01,0xe0,0x30,0x03,0xf0,0x03

,0x00,0x18,0x00,0x7c,0x30,0x07,0x38,0x03

,0x00,0x0c,0x00,0x1f,0x30,0x06,0x18,0x03

,0x18,0x0e,0x00,0x07,0x30,0x06,0x18,0x03

,0x0c,0x07,0x80,0x00,0x30,0x07,0x38,0x03

,0x0e,0x03,0xc0,0x00,0x30,0x03,0x30,0x03

,0x07,0x00,0xf0,0x00,0x30,0x03,0x30,0x03

,0x03,0x00,0x7e,0x00,0x30,0x03,0x30,0x03

,0x01,0x80,0x1f,0xc0,0x30,0x03,0x30,0x03

,0x01,0xc0,0x03,0xe1,0x30,0x07,0xf8,0x03

,0x00,0xf0,0x00,0x01,0x30,0x03,0xf0,0x03

,0x00,0x38,0x00,0x00,0x30,0x00,0x00,0x03

,0x00,0x1e,0x00,0x00,0x30,0x00,0x00,0x03

,0x00,0x07,0xc0,0x00,0x30,0x00,0x00,0x03

,0x00,0x01,0xff,0x80,0x3f,0xff,0xff,0xff

,0x00,0x00,0x3f,0x80,0x1f,0xff,0xff,0xfe

};

//---------------------------------------------------------------

#define FinPr_scan_width 64

#define FinPr_scan_height 64

const uint8_t PROGMEM FinPr_scan_bits[] = {

 0x00,0x00,0x00,0x00,0x00,0x00,0x00,0x00

,0x00,0x00,0x00,0x00,0x00,0x00,0x00,0x00

,0x00,0x00,0x00,0x00,0x00,0x00,0x00,0x00

,0x00,0x00,0x00,0x00,0x00,0x00,0x00,0x00

,0x00,0x00,0x00,0x00,0x00,0x00,0x00,0x00

,0x00,0x00,0x00,0x1f,0xf8,0x00,0x00,0x00

,0x00,0x00,0x00,0x7f,0xff,0x00,0x00,0x00

,0x00,0x00,0x01,0xfc,0x7f,0xc0,0x00,0x00

,0x00,0x00,0x03,0xc0,0x03,0xe0,0x00,0x00

,0x00,0x00,0x07,0x80,0x00,0xf0,0x00,0x00

,0x00,0x00,0x0e,0x00,0x00,0x3c,0x00,0x00

,0x00,0x00,0x1c,0x1f,0xfc,0x1c,0x00,0x00

,0x00,0x00,0x38,0x7f,0xfe,0x0e,0x00,0x00

,0x00,0x00,0x78,0xf8,0x0f,0x87,0x00,0x00

,0x00,0x00,0x71,0xe0,0x03,0xc7,0x00,0x00

,0x00,0x00,0xe3,0x80,0x01,0xc3,0x80,0x00

,0x00,0x00,0xc3,0x83,0xc0,0xe3,0x80,0x00

,0x00,0x00,0xc7,0x0f,0xf0,0x71,0x80,0x00

,0x00,0x00,0x06,0x1f,0xf8,0x71,0xc0,0x00

,0x00,0x00,0x0e,0x1c,0x3c,0x31,0xc0,0x00

,0x00,0x00,0x1c,0x38,0x1c,0x31,0xc0,0x00

,0x00,0x00,0x38,0x70,0x0e,0x39,0xc0,0x00

,0x00,0x01,0xf0,0x71,0x8e,0x39,0xc0,0x00

,0x00,0x03,0xe0,0xe1,0x86,0x31,0xc0,0x00

,0x00,0x03,0x81,0xe3,0x8e,0x31,0x80,0x00

,0x00,0x00,0x03,0xc3,0x8e,0x33,0x80,0x00

,0x00,0x00,0x07,0x87,0x0c,0x73,0x80,0x00

,0x00,0x00,0x1f,0x0e,0x1c,0x73,0x80,0x00

,0x7f,0xff,0xff,0xff,0xff,0xff,0xff,0xfe

,0xff,0xff,0xff,0xff,0xff,0xff,0xff,0xff

,0xff,0xff,0xff,0xff,0xff,0xff,0xff,0xff

,0x7f,0xff,0xff,0xff,0xff,0xff,0xff,0xfe

,0x00,0x00,0x00,0x00,0x00,0x00,0x00,0x00

,0x00,0x00,0x00,0x00,0x00,0x00,0x00,0x00

,0x00,0x00,0x00,0x00,0x00,0x00,0x00,0x00

,0x00,0x03,0xf0,0x1e,0x3e,0x1c,0x00,0x00

,0x00,0x03,0x80,0x7c,0x77,0x0f,0x00,0x00

,0x00,0x00,0x01,0xf0,0xe3,0x07,0xc0,0x00

,0x00,0x00,0x07,0xe3,0xc3,0x81,0xf0,0x00

,0x00,0x00,0x3f,0x87,0x81,0xc0,0x60,0x00

,0x00,0x01,0xfc,0x1f,0x00,0xf0,0x00,0x00

,0x00,0x01,0xe0,0x3c,0x00,0x7c,0x00,0x00

,0x00,0x00,0x00,0xf8,0x78,0x1f,0x00,0x00

,0x00,0x00,0x07,0xe0,0xfc,0x0f,0xc0,0x00

,0x00,0x00,0x3f,0x83,0xef,0x03,0xc0,0x00

,0x00,0x00,0xfc,0x0f,0x87,0x80,0x00,0x00

,0x00,0x00,0x70,0x1f,0x03,0xe0,0x00,0x00

,0x00,0x00,0x00,0x7c,0x00,0xf8,0x00,0x00

,0x00,0x00,0x01,0xf0,0x00,0x3e,0x00,0x00

,0x00,0x00,0x0f,0xc0,0xf8,0x0f,0x00,0x00

,0x00,0x00,0x1f,0x03,0xfe,0x02,0x00,0x00

,0x00,0x00,0x0c,0x0f,0x8f,0x80,0x00,0x00

,0x00,0x00,0x00,0x3f,0x03,0xe0,0x00,0x00

,0x00,0x00,0x00,0xf8,0x00,0xf0,0x00,0x00

,0x00,0x00,0x01,0xe0,0x00,0x30,0x00,0x00

,0x00,0x00,0x01,0xc0,0xf8,0x00,0x00,0x00

,0x00,0x00,0x00,0x07,0xfe,0x00,0x00,0x00

,0x00,0x00,0x00,0x0f,0x8e,0x00,0x00,0x00

,0x00,0x00,0x00,0x06,0x00,0x00,0x00,0x00

,0x00,0x00,0x00,0x00,0x00,0x00,0x00,0x00

,0x00,0x00,0x00,0x00,0x00,0x00,0x00,0x00

,0x00,0x00,0x00,0x00,0x00,0x00,0x00,0x00

,0x00,0x00,0x00,0x00,0x00,0x00,0x00,0x00

,0x00,0x00,0x00,0x00,0x00,0x00,0x00,0x00

};

//************************************************************************

void setup() {


 Serial.begin(115200);

 pinMode(relay, OUTPUT);

 digitalWrite(relay, LOW);

 //-----------initiate OLED display-------------


 // SSD1306_SWITCHCAPVCC = generate display voltage from 3.3V internally

 if(!display.begin(SSD1306_SWITCHCAPVCC, 0x3C)) { // Address 0x3D for 128x64

  Serial.println(F("SSD1306 allocation failed"));

  for(;;); // Don't proceed, loop forever

 }

 // Show initial display buffer contents on the screen --

 // the library initializes this with an Adafruit splash screen.

 // you can delet these three lines if you don't want to get the Adfruit logo appear

 display.display();

 delay(2000); // Pause for 2 seconds

 display.clearDisplay();


 //---------------------------------------------


 connectToWiFi();


 //---------------------------------------------


  //---------------------------------------------


 // set the data rate for the sensor serial port

 finger.begin(57600);

 Serial.println("\n\nAdafruit finger detect test");


 if (finger.verifyPassword()) {

  Serial.println("Found fingerprint sensor!");

  display.clearDisplay();

  display.drawBitmap( 34, 0, FinPr_valid_bits, FinPr_valid_width, FinPr_valid_height, WHITE);

  display.display();

 } else {

  Serial.println("Did not find fingerprint sensor :(");

  display.clearDisplay();

  display.drawBitmap( 32, 0, FinPr_failed_bits, FinPr_failed_width, FinPr_failed_height, WHITE);

  display.display();

  while (1) { delay(1); }

 }

 //---------------------------------------------


 finger.getTemplateCount();

 Serial.print("Sensor contains "); Serial.print(finger.templateCount); Serial.println(" templates");

 Serial.println("Waiting for valid finger...");


 //------------*test the connection*------------


 //SendFingerprintID( FingerID );


}

//************************************************************************

void loop() {


 //check if there's a connection to WiFi or not

 if(WiFi.status() != WL_CONNECTED){

  connectToWiFi();

 }

 //---------------------------------------------

 //If there no fingerprint has been scanned return -1 or -2 if there an error or 0 if there nothing, The ID start form 1 to 127

 FingerID = getFingerprintID(); // Get the Fingerprint ID from the Scanner

 delay(50);      //don't need to run this at full speed.


 //---------------------------------------------


 DisplayFingerprintID();


 //---------------------------------------------


 ChecktoAddID();


 //---------------------------------------------


 ChecktoDeleteID();


 //---------------------------------------------

}

//************Display the fingerprint ID state on the OLED*************

void DisplayFingerprintID(){

 //Fingerprint has been detected

 if (FingerID > 0){

  display.clearDisplay();

  display.drawBitmap( 34, 0, FinPr_valid_bits, FinPr_valid_width, FinPr_valid_height, WHITE);

  display.display();


  SendFingerprintID( FingerID ); // Send the Fingerprint ID to the website.

 }


 //---------------------------------------------

 //No finger detected

 else if (FingerID == 0){

  display.clearDisplay();

  display.drawBitmap( 32, 0, FinPr_start_bits, FinPr_start_width, FinPr_start_height, WHITE);

  display.display();


 }

 //---------------------------------------------

 //Didn't find a match

 else if (FingerID == -1){

  display.clearDisplay();

  display.drawBitmap( 34, 0, FinPr_invalid_bits, FinPr_invalid_width, FinPr_invalid_height, WHITE);

  display.display();


 }

 //---------------------------------------------

 //Didn't find the scanner or there an error

 else if (FingerID == -2){

  display.clearDisplay();

  display.drawBitmap( 32, 0, FinPr_failed_bits, FinPr_failed_width, FinPr_failed_height, WHITE);

  display.display();


 }

}

//************send the fingerprint ID to the website*************

void SendFingerprintID( int finger ){

WiFiClient client;

 HTTPClient http;  //Declare object of class HTTPClient

 //Post Data

 postData = "FingerID=" + String(finger); // Add the Fingerprint ID to the Post array in order to send it

 // Post methode


 http.begin(client, "http://192.168.150.40/biometricattendance/getdata.php"); //initiate HTTP request, put your Website URL or Your Computer IP

 http.addHeader("Content-Type", "application/x-www-form-urlencoded");  //Specify content-type header


 int httpCode = http.POST(postData);  //Send the request

 String payload = http.getString();  //Get the response payload


 Serial.println(httpCode);  //Print HTTP return code

 Serial.println(payload);  //Print request response payload

 Serial.println(postData);  //Post Data

 Serial.println(finger);   //Print fingerprint ID


 if (payload.substring(0, 5) == "login") {

  String user_name = payload.substring(5);

// Serial.println(user_name);


  display.clearDisplay();

  display.setTextSize(2);       // Normal 2:2 pixel scale

  display.setTextColor(WHITE);    // Draw white text

  display.setCursor(15,0);       // Start at top-left corner

  display.print(F("Welcome"));

  display.setCursor(0,20);

  display.print(user_name);

  display.display();

  digitalWrite(relay, HIGH);

  delay(6000);

  digitalWrite(relay, LOW);

 }

 else if (payload.substring(0, 6) == "logout") {

  String user_name = payload.substring(6);

// Serial.println(user_name);


  display.clearDisplay();

  display.setTextSize(2);       // Normal 2:2 pixel scale

  display.setTextColor(WHITE);    // Draw white text

  display.setCursor(10,0);       // Start at top-left corner

  display.print(F("Welcome"));

  display.setCursor(0,20);

  display.print(user_name);

  display.display();

  digitalWrite(relay, HIGH);

  delay(6000);

  digitalWrite(relay, LOW);

 }

 delay(1000);


 postData = "";

 http.end(); //Close connection

}

//********************Get the Fingerprint ID******************

int getFingerprintID() {

 uint8_t p = finger.getImage();

 switch (p) {

  case FINGERPRINT_OK:

   //Serial.println("Image taken");

   break;

  case FINGERPRINT_NOFINGER:

   //Serial.println("No finger detected");

   return 0;

  case FINGERPRINT_PACKETRECIEVEERR:

   //Serial.println("Communication error");

   return -2;

  case FINGERPRINT_IMAGEFAIL:

   //Serial.println("Imaging error");

   return -2;

  default:

   //Serial.println("Unknown error");

   return -2;

 }

 // OK success!

 p = finger.image2Tz();

 switch (p) {

  case FINGERPRINT_OK:

   //Serial.println("Image converted");

   break;

  case FINGERPRINT_IMAGEMESS:

   //Serial.println("Image too messy");

   return -1;

  case FINGERPRINT_PACKETRECIEVEERR:

   //Serial.println("Communication error");

   return -2;

  case FINGERPRINT_FEATUREFAIL:

   //Serial.println("Could not find fingerprint features");

   return -2;

  case FINGERPRINT_INVALIDIMAGE:

   //Serial.println("Could not find fingerprint features");

   return -2;

  default:

   //Serial.println("Unknown error");

   return -2;

 }

 // OK converted!

 p = finger.fingerFastSearch();

 if (p == FINGERPRINT_OK) {

  //Serial.println("Found a print match!");

 } else if (p == FINGERPRINT_PACKETRECIEVEERR) {

  //Serial.println("Communication error");

  return -2;

 } else if (p == FINGERPRINT_NOTFOUND) {

  //Serial.println("Did not find a match");

  return -1;

 } else {

  //Serial.println("Unknown error");

  return -2;

 }

 // found a match!

 //Serial.print("Found ID #"); Serial.print(finger.fingerID);

 //Serial.print(" with confidence of "); Serial.println(finger.confidence);


 return finger.fingerID;

}

//******************Check if there a Fingerprint ID to delete******************

void ChecktoDeleteID(){

WiFiClient client;

 HTTPClient http;  //Declare object of class HTTPClient

 //Post Data

 postData = "DeleteID=check"; // Add the Fingerprint ID to the Post array in order to send it

 // Post methode


 http.begin (client,"http://192.168.150.40/biometricattendance/getdata.php"); //initiate HTTP request, put your Website URL or Your Computer IP

 http.addHeader("Content-Type", "application/x-www-form-urlencoded");  //Specify content-type header


 int httpCode = http.POST(postData);  //Send the request

 String payload = http.getString();  //Get the response payload


 if (payload.substring(0, 6) == "del-id") {

  String del_id = payload.substring(6);

  Serial.println(del_id);

  deleteFingerprint( del_id.toInt() );

 }


 http.end(); //Close connection

}

//******************Delete Finpgerprint ID*****************

uint8_t deleteFingerprint( int id) {

 uint8_t p = -1;


 p = finger.deleteModel(id);


 if (p == FINGERPRINT_OK) {

  //Serial.println("Deleted!");

  display.clearDisplay();

  display.setTextSize(2);       // Normal 2:2 pixel scale

  display.setTextColor(WHITE);    // Draw white text

  display.setCursor(0,0);       // Start at top-left corner

  display.print(F("Deleted!\n"));

  display.display();

 } else if (p == FINGERPRINT_PACKETRECIEVEERR) {

  //Serial.println("Communication error");

  display.clearDisplay();

  display.setTextSize(1);       // Normal 1:1 pixel scale

  display.setTextColor(WHITE);    // Draw white text

  display.setCursor(0,0);       // Start at top-left corner

  display.print(F("Communication error!\n"));

  display.display();

  return p;

 } else if (p == FINGERPRINT_BADLOCATION) {

  //Serial.println("Could not delete in that location");

  display.clearDisplay();

  display.setTextSize(1);       // Normal 1:1 pixel scale

  display.setTextColor(WHITE);    // Draw white text

  display.setCursor(0,0);       // Start at top-left corner

  display.print(F("Could not delete in that location!\n"));

  display.display();

  return p;

 } else if (p == FINGERPRINT_FLASHERR) {

  //Serial.println("Error writing to flash");

  display.clearDisplay();

  display.setTextSize(1);       // Normal 1:1 pixel scale

  display.setTextColor(WHITE);    // Draw white text

  display.setCursor(0,0);       // Start at top-left corner

  display.print(F("Error writing to flash!\n"));

  display.display();

  return p;

 } else {

  //Serial.print("Unknown error: 0x"); Serial.println(p, HEX);

  display.clearDisplay();

  display.setTextSize(2);       // Normal 2:2 pixel scale

  display.setTextColor(WHITE);    // Draw white text

  display.setCursor(0,0);       // Start at top-left corner

  display.print(F("Unknown error:\n"));

  display.display();

  return p;

 }

}

//******************Check if there a Fingerprint ID to add******************

void ChecktoAddID(){

WiFiClient client;

 HTTPClient http;  //Declare object of class HTTPClient

 //Post Data

 postData = "Get_Fingerid=get_id"; // Add the Fingerprint ID to the Post array in order to send it

 // Post methode


 http.begin (client,"http://192.168.150.40/biometricattendance/getdata.php"); //initiate HTTP request, put your Website URL or Your Computer IP

 http.addHeader("Content-Type", "application/x-www-form-urlencoded");  //Specify content-type header


 int httpCode = http.POST(postData);  //Send the request

 String payload = http.getString();  //Get the response payload


 if (payload.substring(0, 6) == "add-id") {

  String add_id = payload.substring(6);

  Serial.println(add_id);

  id = add_id.toInt();

  getFingerprintEnroll();

 }

 http.end(); //Close connection

}

//******************Enroll a Finpgerprint ID*****************

uint8_t getFingerprintEnroll() {


 int p = -1;

 display.clearDisplay();

 display.drawBitmap( 34, 0, FinPr_scan_bits, FinPr_scan_width, FinPr_scan_height, WHITE);

 display.display();

 while (p != FINGERPRINT_OK) {

  p = finger.getImage();

  switch (p) {

  case FINGERPRINT_OK:

   //Serial.println("Image taken");

   display.clearDisplay();

   display.drawBitmap( 34, 0, FinPr_valid_bits, FinPr_valid_width, FinPr_valid_height, WHITE);

   display.display();

   break;

  case FINGERPRINT_NOFINGER:

   //Serial.println(".");

   display.setTextSize(1);       // Normal 2:2 pixel scale

   display.setTextColor(WHITE);    // Draw white text

   display.setCursor(0,0);       // Start at top-left corner

   display.print(F("scanning"));

   display.display();

   break;

  case FINGERPRINT_PACKETRECIEVEERR:

   display.clearDisplay();

   display.drawBitmap( 34, 0, FinPr_invalid_bits, FinPr_invalid_width, FinPr_invalid_height, WHITE);

   display.display();

   break;

  case FINGERPRINT_IMAGEFAIL:

   Serial.println("Imaging error");

   break;

  default:

   Serial.println("Unknown error");

   break;

  }

 }


 // OK success!


 p = finger.image2Tz(1);

 switch (p) {

  case FINGERPRINT_OK:

   display.clearDisplay();

   display.drawBitmap( 34, 0, FinPr_valid_bits, FinPr_valid_width, FinPr_valid_height, WHITE);

   display.display();

   break;

  case FINGERPRINT_IMAGEMESS:

   display.clearDisplay();

   display.drawBitmap( 34, 0, FinPr_invalid_bits, FinPr_invalid_width, FinPr_invalid_height, WHITE);

   display.display();

   return p;

  case FINGERPRINT_PACKETRECIEVEERR:

   Serial.println("Communication error");

   return p;

  case FINGERPRINT_FEATUREFAIL:

   Serial.println("Could not find fingerprint features");

   return p;

  case FINGERPRINT_INVALIDIMAGE:

   Serial.println("Could not find fingerprint features");

   return p;

  default:

   Serial.println("Unknown error");

   return p;

 }

 display.clearDisplay();

 display.setTextSize(2);       // Normal 2:2 pixel scale

 display.setTextColor(WHITE);    // Draw white text

 display.setCursor(0,0);       // Start at top-left corner

 display.print(F("Remove"));

 display.setCursor(0,20);

 display.print(F("finger"));

 display.display();

 //Serial.println("Remove finger");

 delay(2000);

 p = 0;

 while (p != FINGERPRINT_NOFINGER) {

  p = finger.getImage();

 }

 Serial.print("ID "); Serial.println(id);

 p = -1;

 display.clearDisplay();

 display.drawBitmap( 34, 0, FinPr_scan_bits, FinPr_scan_width, FinPr_scan_height, WHITE);

 display.display();

 while (p != FINGERPRINT_OK) {

  p = finger.getImage();

  switch (p) {

  case FINGERPRINT_OK:

   //Serial.println("Image taken");

   display.clearDisplay();

   display.drawBitmap( 34, 0, FinPr_valid_bits, FinPr_valid_width, FinPr_valid_height, WHITE);

   display.display();

   break;

  case FINGERPRINT_NOFINGER:

   //Serial.println(".");

   display.setTextSize(1);       // Normal 2:2 pixel scale

   display.setTextColor(WHITE);    // Draw white text

   display.setCursor(0,0);       // Start at top-left corner

   display.print(F("scanning"));

   display.display();

   break;

  case FINGERPRINT_PACKETRECIEVEERR:

   Serial.println("Communication error");

   break;

  case FINGERPRINT_IMAGEFAIL:

   Serial.println("Imaging error");

   break;

  default:

   Serial.println("Unknown error");

   break;

  }

 }


 // OK success!


 p = finger.image2Tz(2);

 switch (p) {

  case FINGERPRINT_OK:

   //Serial.println("Image converted");

   display.clearDisplay();

   display.drawBitmap( 34, 0, FinPr_valid_bits, FinPr_valid_width, FinPr_valid_height, WHITE);

   display.display();

   break;

  case FINGERPRINT_IMAGEMESS:

   Serial.println("Image too messy");

   return p;

  case FINGERPRINT_PACKETRECIEVEERR:

   Serial.println("Communication error");

   return p;

  case FINGERPRINT_FEATUREFAIL:

   Serial.println("Could not find fingerprint features");

   return p;

  case FINGERPRINT_INVALIDIMAGE:

   Serial.println("Could not find fingerprint features");

   return p;

  default:

   Serial.println("Unknown error");

   return p;

 }


 // OK converted!

 Serial.print("Creating model for #"); Serial.println(id);


 p = finger.createModel();

 if (p == FINGERPRINT_OK) {

  //Serial.println("Prints matched!");

  display.clearDisplay();

  display.drawBitmap( 34, 0, FinPr_valid_bits, FinPr_valid_width, FinPr_valid_height, WHITE);

  display.display();

 } else if (p == FINGERPRINT_PACKETRECIEVEERR) {

  Serial.println("Communication error");

  return p;

 } else if (p == FINGERPRINT_ENROLLMISMATCH) {

  Serial.println("Fingerprints did not match");

  return p;

 } else {

  Serial.println("Unknown error");

  return p;

 }


 Serial.print("ID "); Serial.println(id);

 p = finger.storeModel(id);

 if (p == FINGERPRINT_OK) {

  //Serial.println("Stored!");

  display.clearDisplay();

  display.drawBitmap( 34, 0, FinPr_valid_bits, FinPr_valid_width, FinPr_valid_height, WHITE);

  display.display();

  confirmAdding();

 } else if (p == FINGERPRINT_PACKETRECIEVEERR) {

  Serial.println("Communication error");

  return p;

 } else if (p == FINGERPRINT_BADLOCATION) {

  Serial.println("Could not store in that location");

  return p;

 } else if (p == FINGERPRINT_FLASHERR) {

  Serial.println("Error writing to flash");

  return p;

 } else {

  Serial.println("Unknown error");

  return p;

 }

}

//******************Check if there a Fingerprint ID to add******************

void confirmAdding(){

WiFiClient client;

 HTTPClient http;  //Declare object of class HTTPClient

 //Post Data

 postData = "confirm_id=" + String(id); // Add the Fingerprint ID to the Post array in order to send it

 // Post methode


 http.begin (client, "http://192.168.150.40/biometricattendance/getdata.php"); //initiate HTTP request, put your Website URL or Your Computer IP

 http.addHeader("Content-Type", "application/x-www-form-urlencoded");  //Specify content-type header


 int httpCode = http.POST(postData);  //Send the request

 String payload = http.getString();  //Get the response payload


 display.clearDisplay();

 display.setTextSize(1.5);       // Normal 1:1 pixel scale

 display.setTextColor(WHITE);    // Draw white text

 display.setCursor(0,0);       // Start at top-left corner

 display.print(payload);

 display.display();

 delay(1000);

 Serial.println(payload);


 http.end(); //Close connection

}

//********************connect to the WiFi******************

void connectToWiFi(){

  WiFi.mode(WIFI_OFF);    //Prevents reconnection issue (taking too long to connect)

  delay(1000);

  WiFi.mode(WIFI_STA);

  Serial.print("Connecting to ");

  Serial.println(ssid);

  WiFi.begin(ssid, password);


  display.clearDisplay();

  display.setTextSize(1);       // Normal 1:1 pixel scale

  display.setTextColor(WHITE);    // Draw white text

  display.setCursor(0, 0);       // Start at top-left corner

  display.print(F("Connecting to \n"));

  display.setCursor(0, 50);

  display.setTextSize(2);

  display.print(ssid);

  display.drawBitmap( 73, 10, Wifi_start_bits, Wifi_start_width, Wifi_start_height, WHITE);

  display.display();


  while (WiFi.status() != WL_CONNECTED) {

   delay(500);

   Serial.print(".");

  }

  Serial.println("");

  Serial.println("Connected");


  display.clearDisplay();

  display.setTextSize(2);       // Normal 1:1 pixel scale

  display.setTextColor(WHITE);    // Draw white text

  display.setCursor(8, 0);       // Start at top-left corner

  display.print(F("Connected \n"));

  display.drawBitmap( 33, 15, Wifi_connected_bits, Wifi_connected_width, Wifi_connected_height, WHITE);

  display.display();


  Serial.print("IP address: ");

  Serial.println(WiFi.localIP()); //IP address assigned to your ESP


}