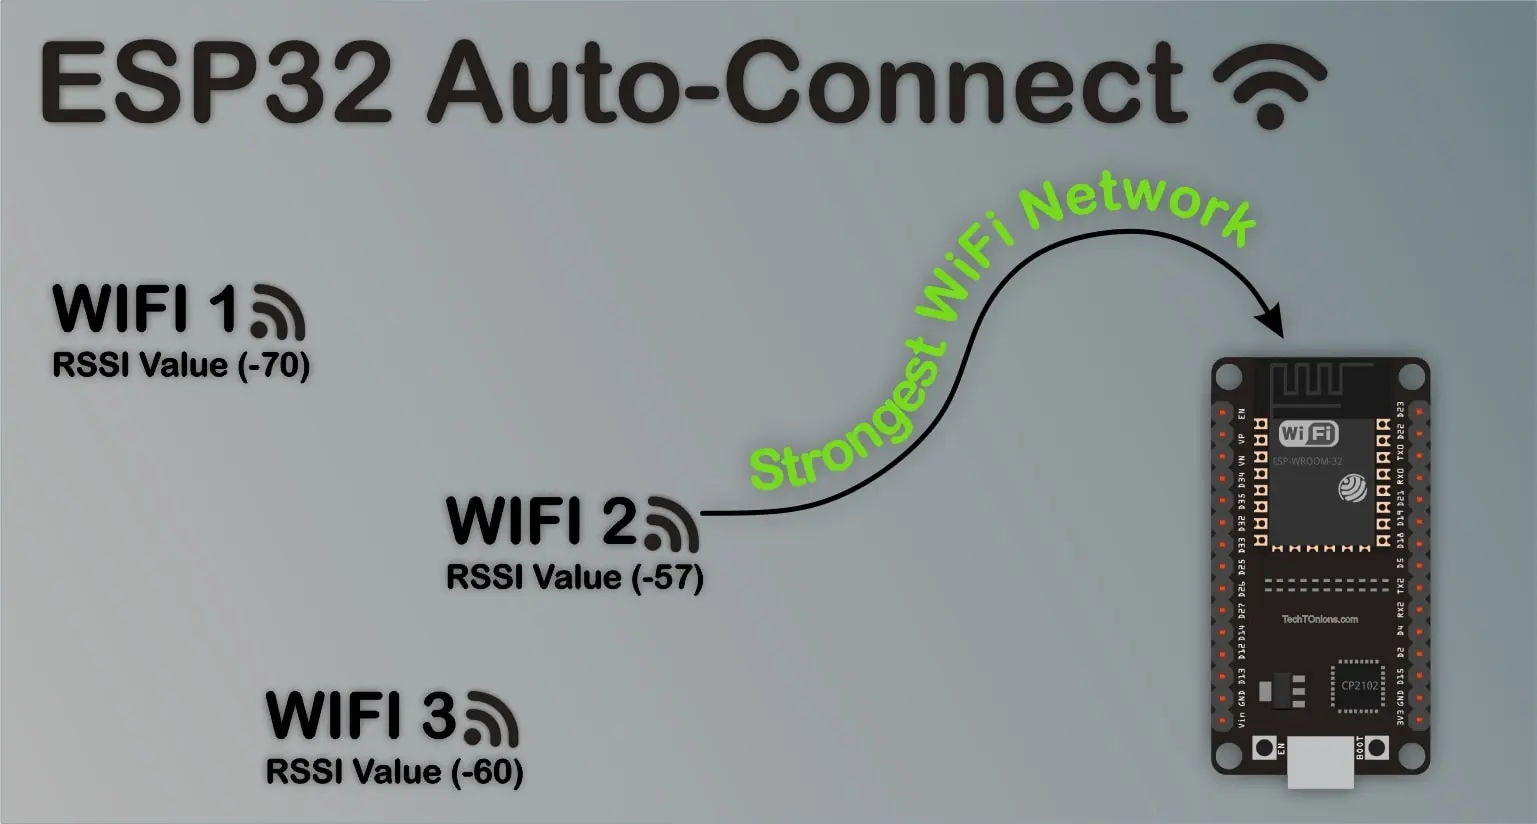
Do you know we can store multiple WiFi credentials in ESP32?
Not just storing ESP32 can automatically connect to the strongest WiFi network among them.
Project Overview
IoT is all about internet connectivity, and until now, we only depended on one WiFi credential stored in our ESP32. But depending on a single WiFi network is not sufficient for reliable operation.
In this guide, we will discuss how we can store multiple WiFi credentials in our ESP32 code. And among all the WiFi networks, ESP32 will automatically connect to the best network.
This way, we can ensure the best internet connectivity to our ESP32 based IoT projects.
Parts Needed
For this tutorial, we will use the following parts:
- ESP32 Development Board
- Breadboard
Prerequisites
We will be using Arduino IDE for programming ESP32. If you are not familiar with Arduino IDE, then check out our guide on
❑ Getting started with Arduino IDE
Additionally, we will need to install the ESP32 board package to Arduino IDE, follow our guide on
❑ Installing ESP32 in Arduino IDE
You can skip both steps if you have done it before.
Auto-Connecting To Best WiFi network
We will use prebuild espressif library WiFiMulti to store multiple WiFi networks and choose the best network among them.
Following changes are required to use this code:
- Add your all SSID names in ssid0, ssid1….. and so on.
- Add your passwords in pass0, pass1….. and so on.
If you do not want to fix the WiFi credentials into your code, then check out our tutorial on
❑ ESP32 Using Wi-Fi SmartConfig
Here is the code:
/*
  Date: 24-09-21
  Code written by: Dharmik
  This sketch trys to Connect to the best WiFi network based on a given list
  Find more on www.TechTOnions.com
*/

#include <WiFi.h>
#include <WiFiMulti.h>

WiFiMulti wifiMulti;

#define WiFi_timeout 10000  // 10sec Wifi connection timeout

const char* ssid0 = "TechTOnions";
const char* pass0 = "Dtirth123";

const char* ssid1 = "aaaaaaa";
const char* pass1 = "12345678";

const char* ssid2 = "Your SSID 2";
const char* pass2 = "Your Password 2";

const char* ssid3 = "Your SSID 3";
const char* pass3 = "Your Password 3";

void setup()
{
  Serial.begin(115200);
  delay(100);

  //Adding all WiFi credential to WiFi multi class
  wifiMulti.addAP(ssid0, pass0);
  wifiMulti.addAP(ssid1, pass1);
  wifiMulti.addAP(ssid2, pass2);
  wifiMulti.addAP(ssid3, pass3);

  Serial.println("Connecting Wifi...");

  //Connecting to the strongest WiFi connection
  if (wifiMulti.run(WiFi_timeout) == WL_CONNECTED)
  {
    Serial.println("");
    Serial.println("WiFi connected");
    Serial.println("IP address: ");
    Serial.println(WiFi.localIP());  //print IP of the connected WiFi network
  }
  else  // if not WiFi not connected
  {
    Serial.println("WiFi not Connected");
  }
}

void loop()
{
  // if WiFi is not connected try again to connect with default timeout of 5sec
  if (wifiMulti.run() != WL_CONNECTED) {
    Serial.println("WiFi not connected!");
    delay(1000);
  }
}
How Code Works
First, we need to initialize the required libraries. We will need WiFi.h and WiFiMulti.h. Both of these libraries are preinstalled with the ESP32 package.
#include <WiFi.h>
#include <WiFiMulti.h>
Now we will initialize wifiMulti as a new WiFiMulti class.
WiFiMulti wifiMulti;
We will define WiFi_timeoutWiFi_timeout; this will set the max timeout for connecting to the WiFi network. We have set it to 10000milli seconds (10sec). You can reduce or increase it if needed.
#define WiFi_timeout 10000 // 10sec Wifi connection timeout
For this guide, we have defined four different WiFi credentials you may have more or less in your case. Therefore we have defined all of them as const char* and named them as ssid0, pass0 until ssid3, pass3. You can use different naming if you like.
const char* ssid0 = "TechTOnions";
const char* pass0 = "Dtirth123";

const char* ssid1 = "aaaaaaa";
const char* pass1 = "12345678";

const char* ssid2 = "Your SSID 2";
const char* pass2 = "Your Password 2";

const char* ssid3 = "Your SSID 3";
const char* pass3 = "Your Password 3";
Note: Any of your SSID and Password lengths should not be greater than 31 and 64.
setup()
First, we will initialize the serial communication so we can see data in the Serial monitor. We have used a baud rate of 115200. And, adding little delay.
  Serial.begin(115200);
  delay(100);
Now, we will use the addAP function from library WiFiMulti to add all the WiFi credentials in the following manner.
  wifiMulti.addAP(ssid0, pass0);
  wifiMulti.addAP(ssid1, pass1);
  wifiMulti.addAP(ssid2, pass2);
  wifiMulti.addAP(ssid3, pass3);
We have four different WiFi credentials; therefore, we need to use this function four times and pass it with varying WiFi credentials. If you have more or less WiFi networks, you can use this function accordingly.
Finally, we need to use the run function with the previous WiFi_timeoutWiFi_timeout defined. This function will take care of choosing the best WiFi network out of all. This function will check all the available networks with strengths and will choose the strongest among them.
  if (wifiMulti.run(WiFi_timeout) == WL_CONNECTED)
  {
    Serial.println("");
    Serial.println("WiFi connected");
    Serial.println("IP address: ");
    Serial.println(WiFi.localIP());  //print IP of the connected WiFi network
  }
  else  // if not WiFi not connected
  {
    Serial.println("WiFi not Connected");
  }
If this function connects to WiFi within the specified timeout, we will print the IP address of the connected WiFi network.
And if not connected to any WiFi, we will serial print “WiFi not connected” in the serial monitor.
loop()
In the loop function, we will only check every time that the WiFi is connected or not. If it is not connected, it will try to connect WiFi with the default timeout of 5sec.
  if (wifiMulti.run() != WL_CONNECTED) {
    Serial.println("WiFi not connected!");
    delay(1000);
  }
That’s all we need to do to enable this cool feature of the ESP32. You can skip the last part of this guide. But, if you want to know what exactly this library is doing, stick around with us.
Let’s Dig Deeper
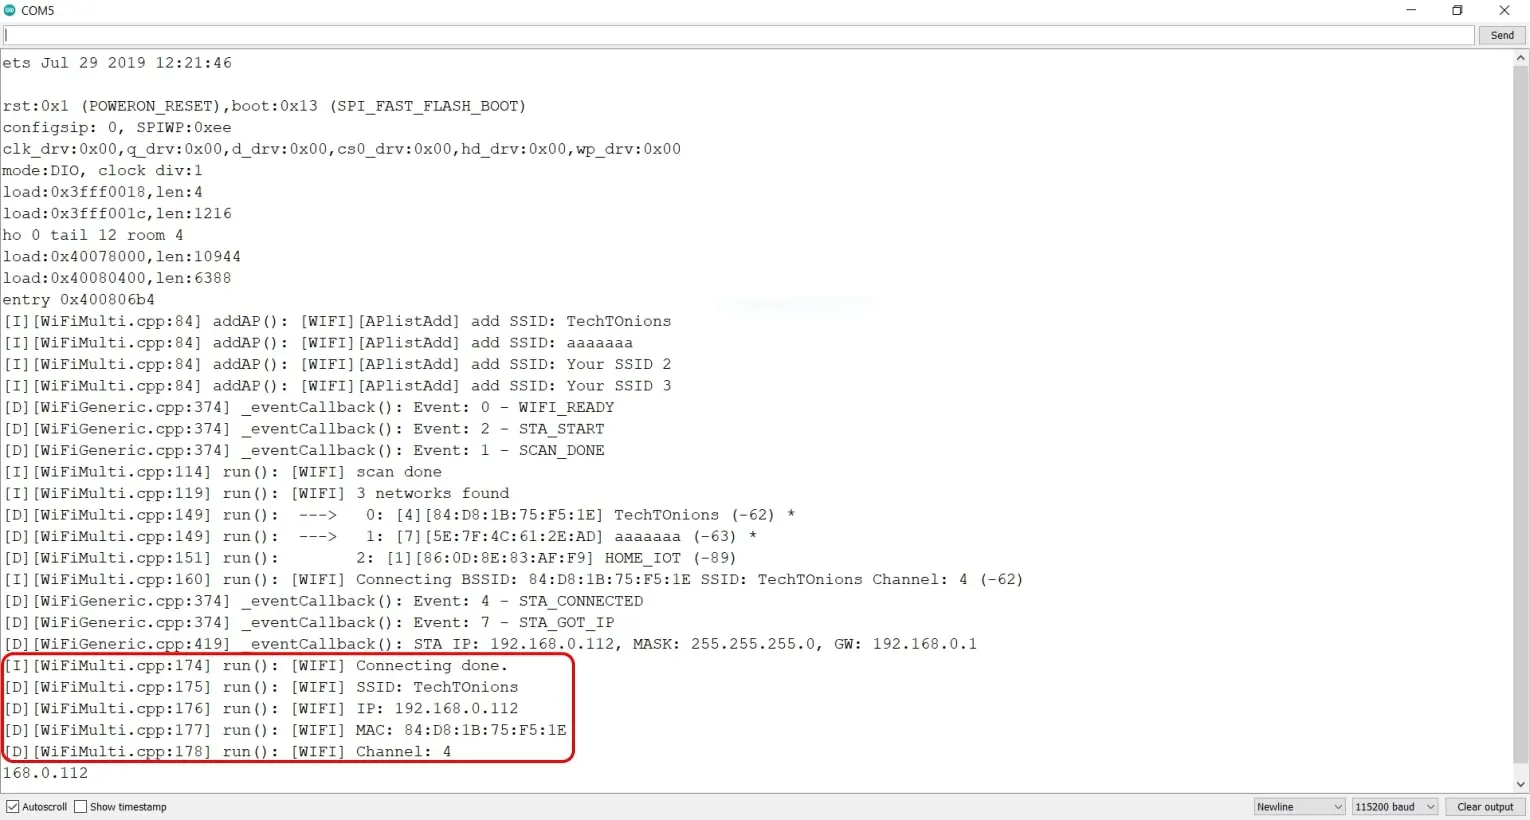
Let us understand what exactly this library is doing in the background. To do so, we will be enabling the verbose output.
To do so, go to Tools > Core Debug Level > Verbose
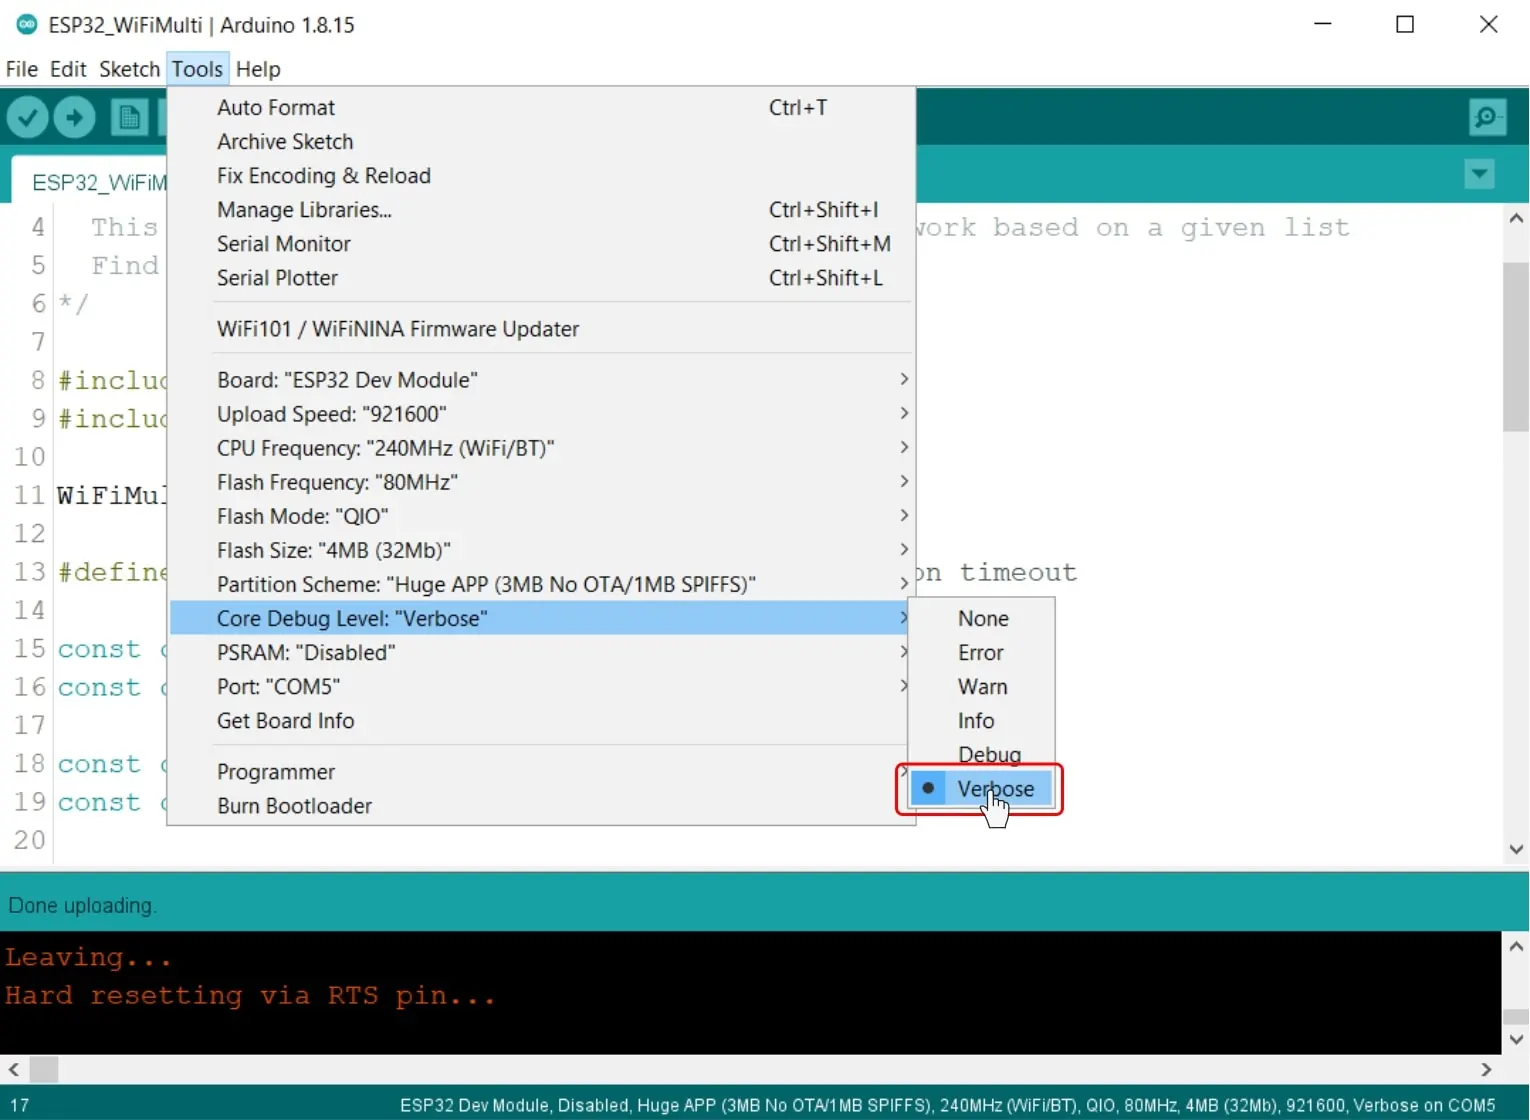
And now upload the code.
This way, the library will print all the additional data in the background to the serial monitor. And you will observe ESP32 will print lots of data in the Serial terminal.
The first thing that we will observe, the library has added all four SSID that we have passed with the addAP function.
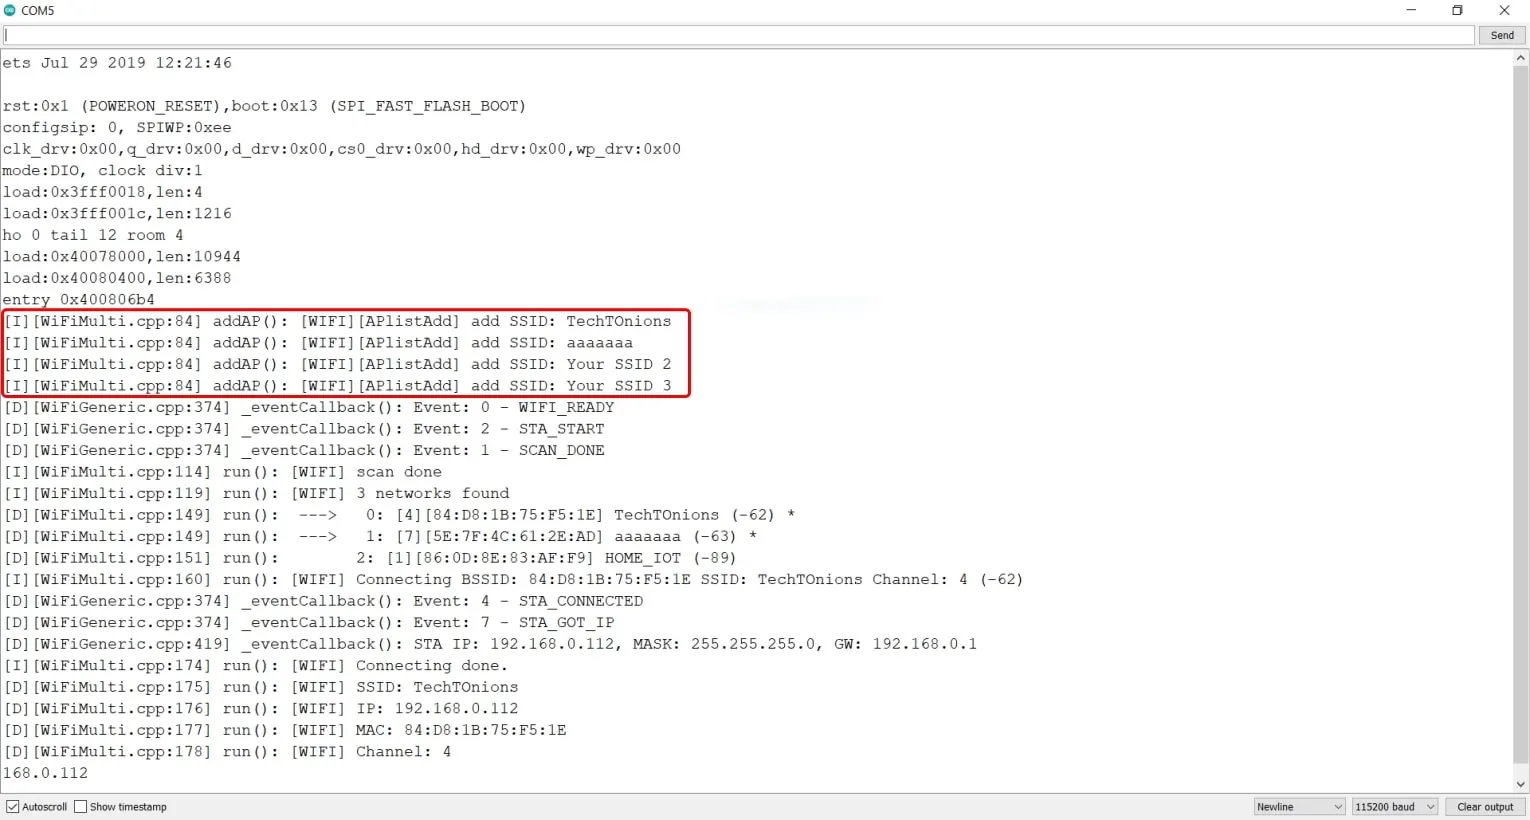
Next, the library has scanned all the available WiFi networks that are in range. And as we can see that three networks are found.
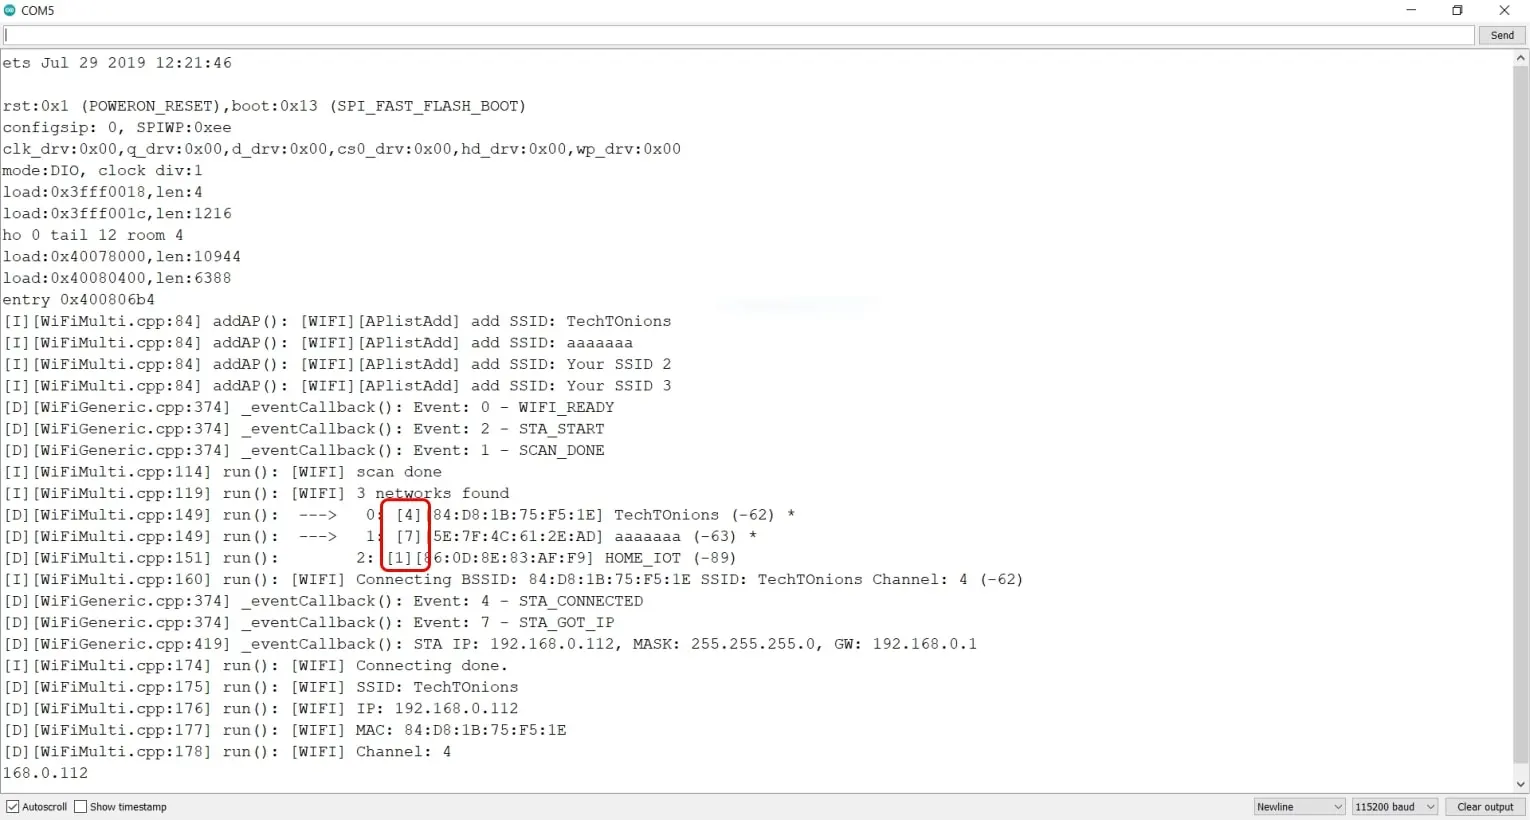
The square brackets represent the WiFi channel of that particular SSID.
We can see the first two SSID are in our code. That’s why they are marked as *.

And in a bracket, it is the RSSI value of all available WiFi networks. We know that the RSSI value closest to 0 has the strongest network strength. In our case, it is the SSID0 named as TechTOnions, which is -62, the strongest among the two available networks.

Therefore it is connected with TechTOnions and will display the IP and MAC address of the WiFi network.
Wrapping Up
In this tutorial, you’ve learned how easily we can store multiple WiFi credentials to our ESP32 project and let ESP32 itself decide which network is best to use. This way, our ESP32 based project will always connect to the most robust available WiFi network based on the RSSI value.
We hope you learned something new today and will try it out. If you like our tutorial and want more such ESP32 based tutorials, consider subscribing to our weekly newsletter.
And don’t forget to leave us a comment after trying out this project with your ESP32.


Outstanding tutorial on ESP-32 wiFi. Thanks!
Thank you, Robert.