Table Of Contents :
- About Pi Pico Board
- Features of Pi Pico Board
- Pi Pico Pinout
- Requirement – Installing Arduino IDE
- Installing Pi Pico Board Package In Arduino IDE
- Preparing Pi Pico Board
- Programming Pi Pico using Arduino IDE
- Wrapping Up
About Pi Pico Board
Raspberry Pi Pico board is the first microcontroller-based board from the Raspberry Pi foundation. The microcontroller used on this board is named RP2040.
Following reasons that RP2040 has attracted us:
- High-Performance with Low cost.
- As always, the Raspberry Pi foundation did a great job in the documentation of RP2040.
- Microphython and C/C++ support.
- Large Raspberry Pi community.
Features of Pi Pico Board
Let’s have a look at few features of the Pi Pico board that can be a game-changer.
- Works on dual-core ARM Cortex M0+ processor.
- Flexible clock running up to 133 MHz.
- 264kB on-chip SRAM in six independent banks
- Support for up to 16MB of off-chip Flash memory via dedicated QSPI bus.
- On-chip programmable LDO to generate core voltage
- On-chip temperature sensor.
- 2 on-chip PLLs to generate USB and core clocks
- 30 GPIO pins, 4 of which can be used as analog inputs.
- Peripherals-
- 2 UARTs
- 2 SPI controllers
- 2 I2C controllers
- 16 PWM channels
- USB 1.1 controller and PHY, with host and device support
- 8 PIO state machines
Pi Pico Pinout
Here is the Pi Pico microcontroller pinout.
Note: As per the RP2040 datasheet, it is not a 5v tolerable. Therefore all RP2040 GPIOs are 3.3v logic level.
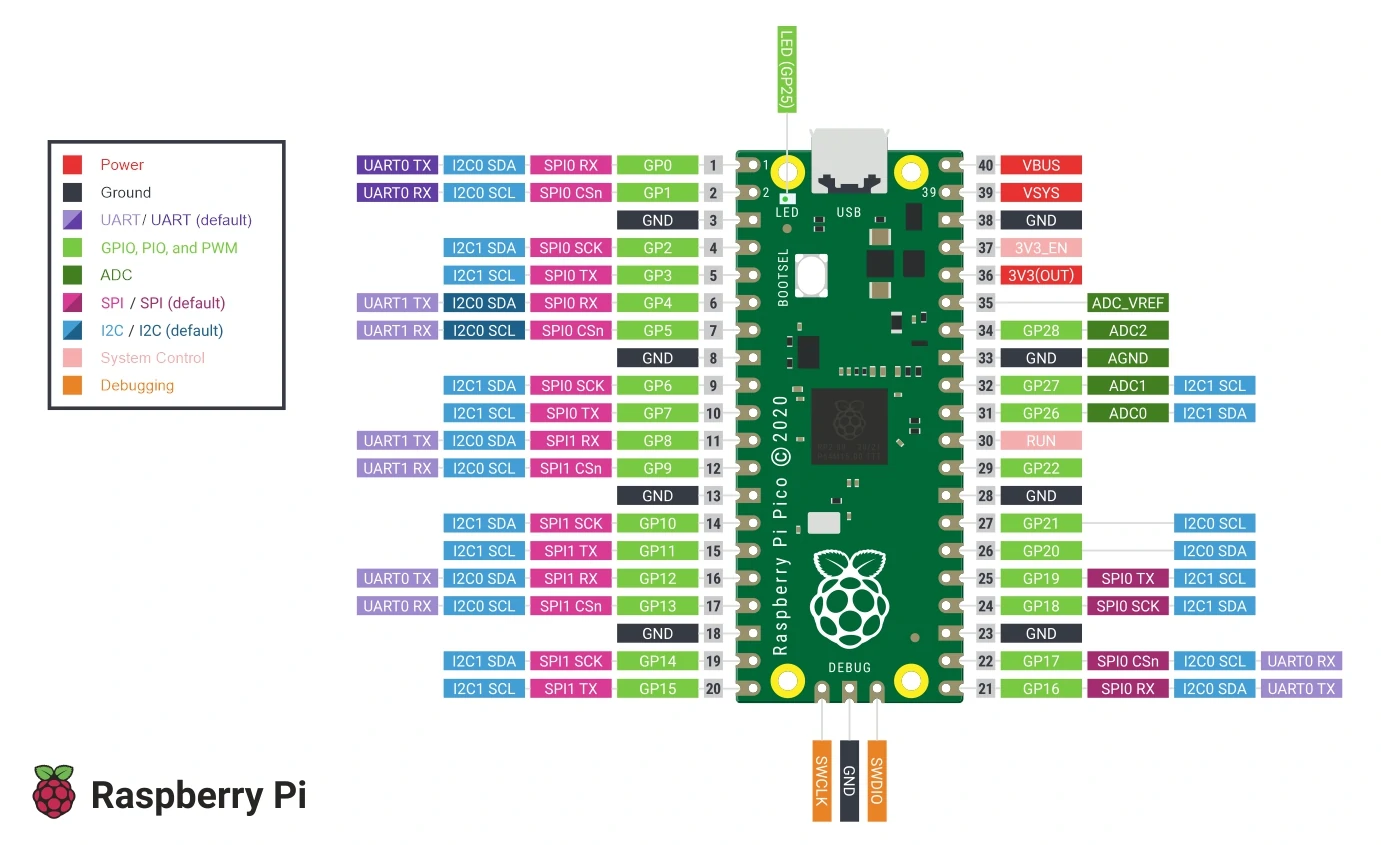
By looking at the pinout, you will notice that a few GPIO pins are missing from the Pi Pico board. The following GPIO pins are used onboard for different purposes-
- GPIO23 goes to the PS pin of the voltage regulator to adjust it between PFM and PWM mode.
- GPIO24 is the center of a 5k6/10k voltage divider off the VBUS from USB, on the USB side of a diode, so it detects if USB is supplying voltage
- GPIO 25 is the onboard LED.
- GPIO29/ADC3 is another voltage divider to measure VSYS, but with an extra FET in place, so the divider can’t leak into the ADC and 3.3V rail when the 3.3V rail is off.
Requirement – Installing Arduino IDE
Before getting started with this tutorial, you will require Arduino IDE installed on your computer.
If you have already installed the latest Arduino IDE, then skip this step.
Else you can follow our easy-to-follow guide on:
❑ Getting Familiar With Arduino IDE
Installing Pi Pico Board Package In Arduino IDE
As of now, Pi Pico has both unofficial and official support for the Arduino environment.
We prefer unofficial support as it provides more options while programming. And special thanks to Earle Philhower for providing Pi Pico support in Arduino IDE.
We will explore both of the options in this guide.
We will first install the unofficial package.
Follow these simple steps-
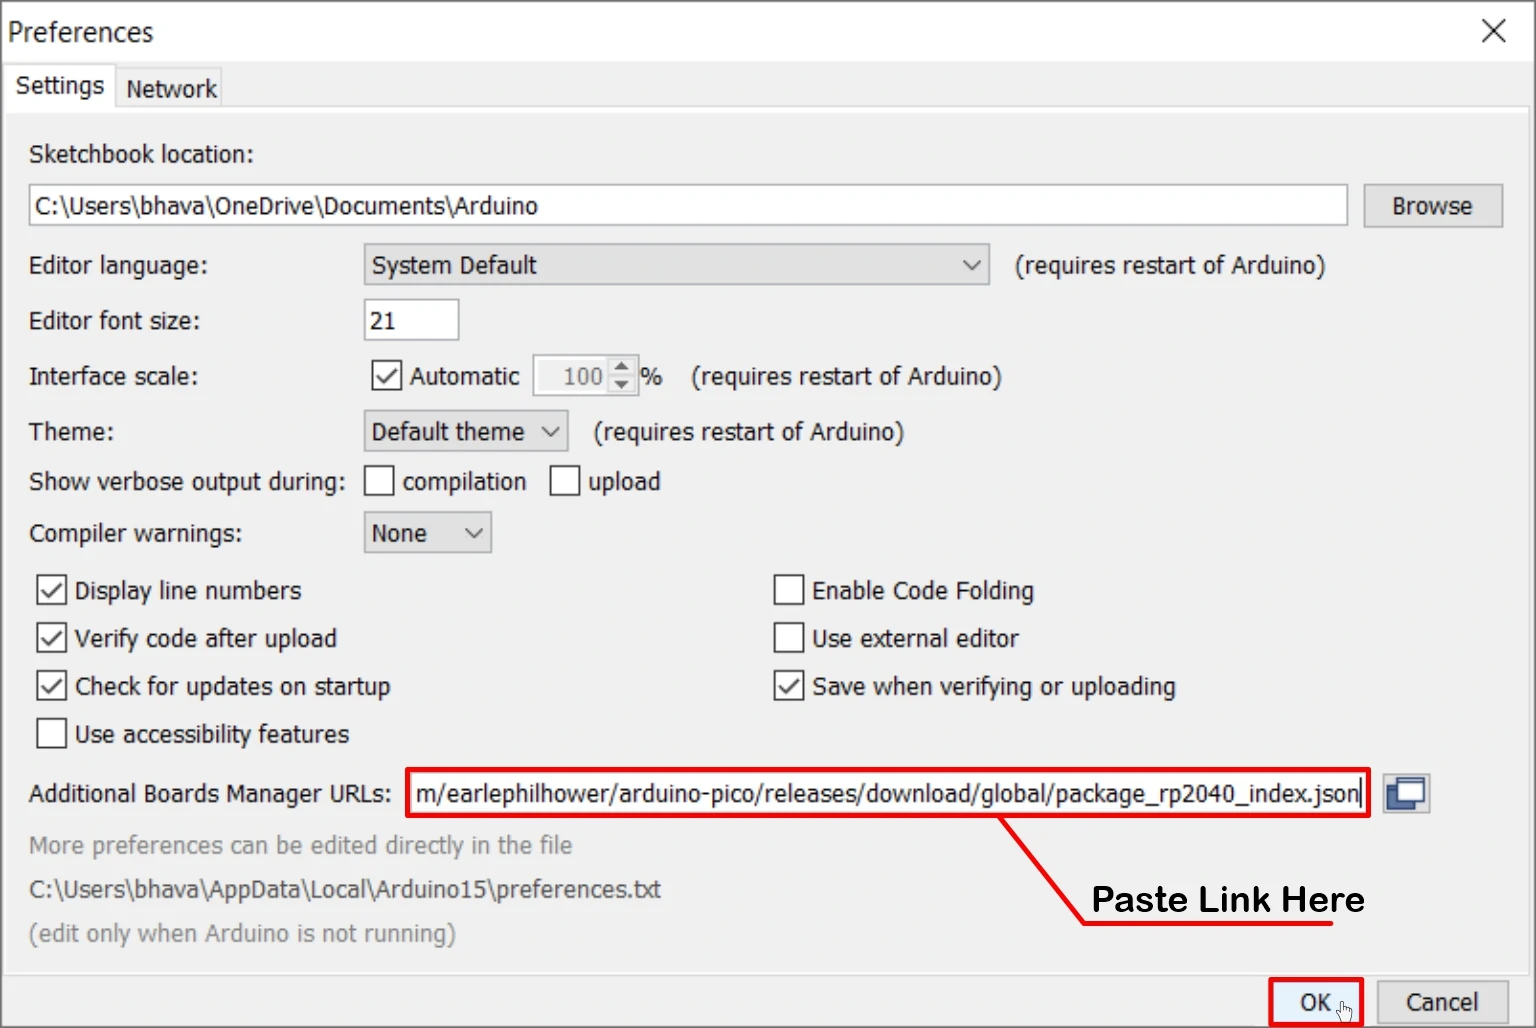
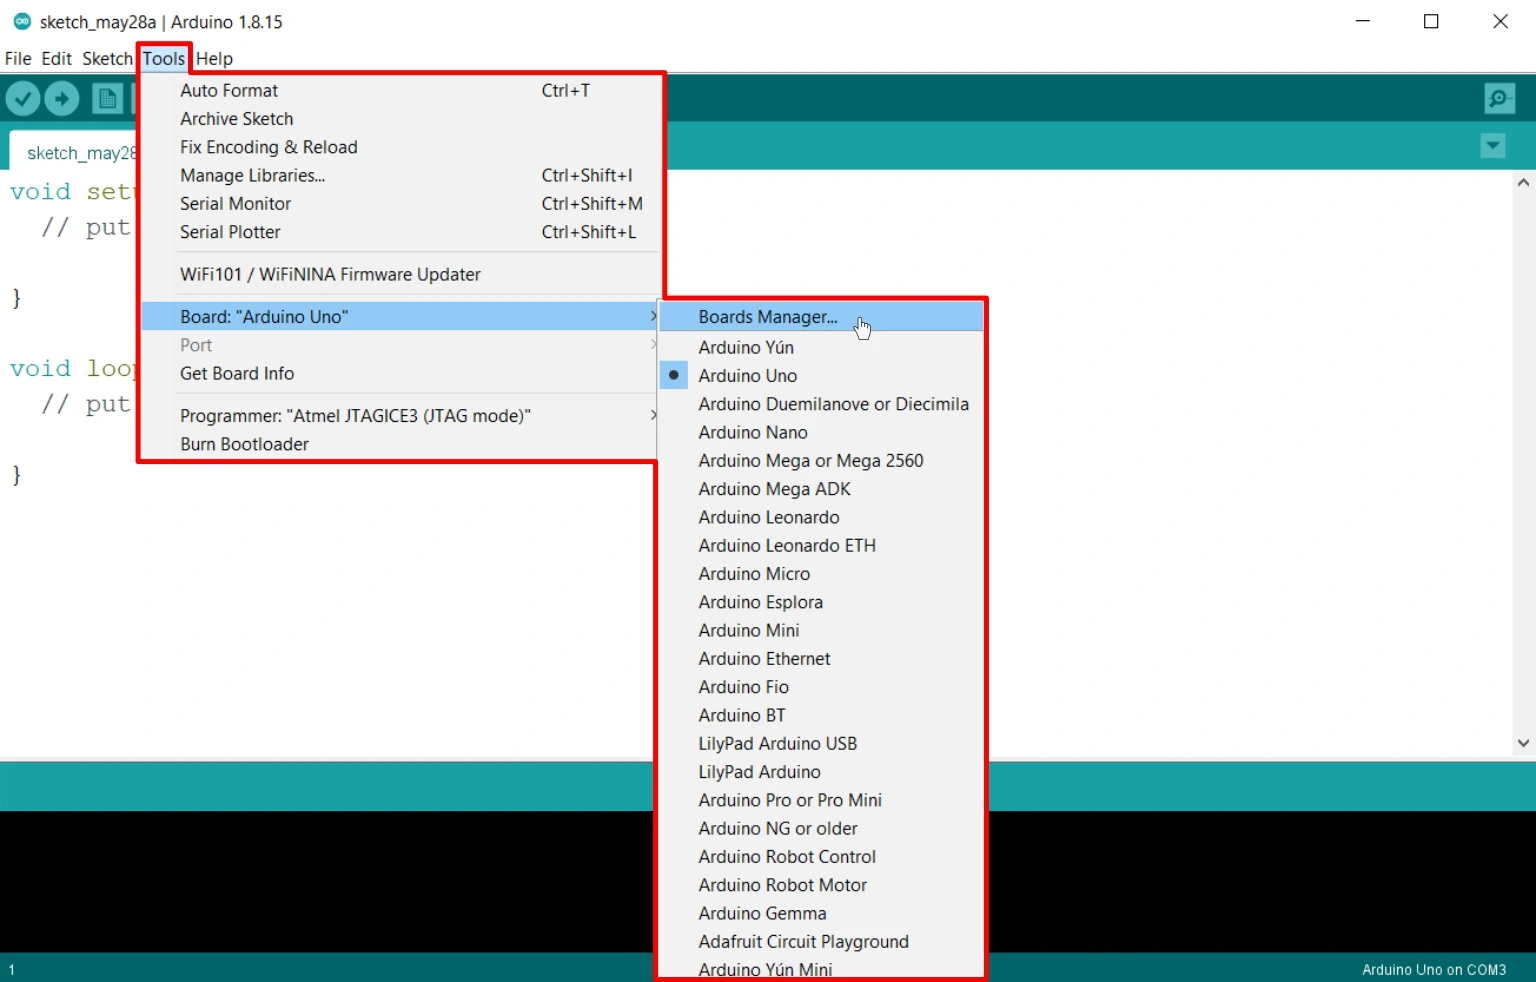
- Open Arduino IDE. Now go to File → Preferences.

- Copy-paste the below URL in the Additional Boards Manager URLs:
https://github.com/earlephilhower/arduino-pico/releases/download/global/package_rp2040_index.json
Then hit the OK button to save the settings.
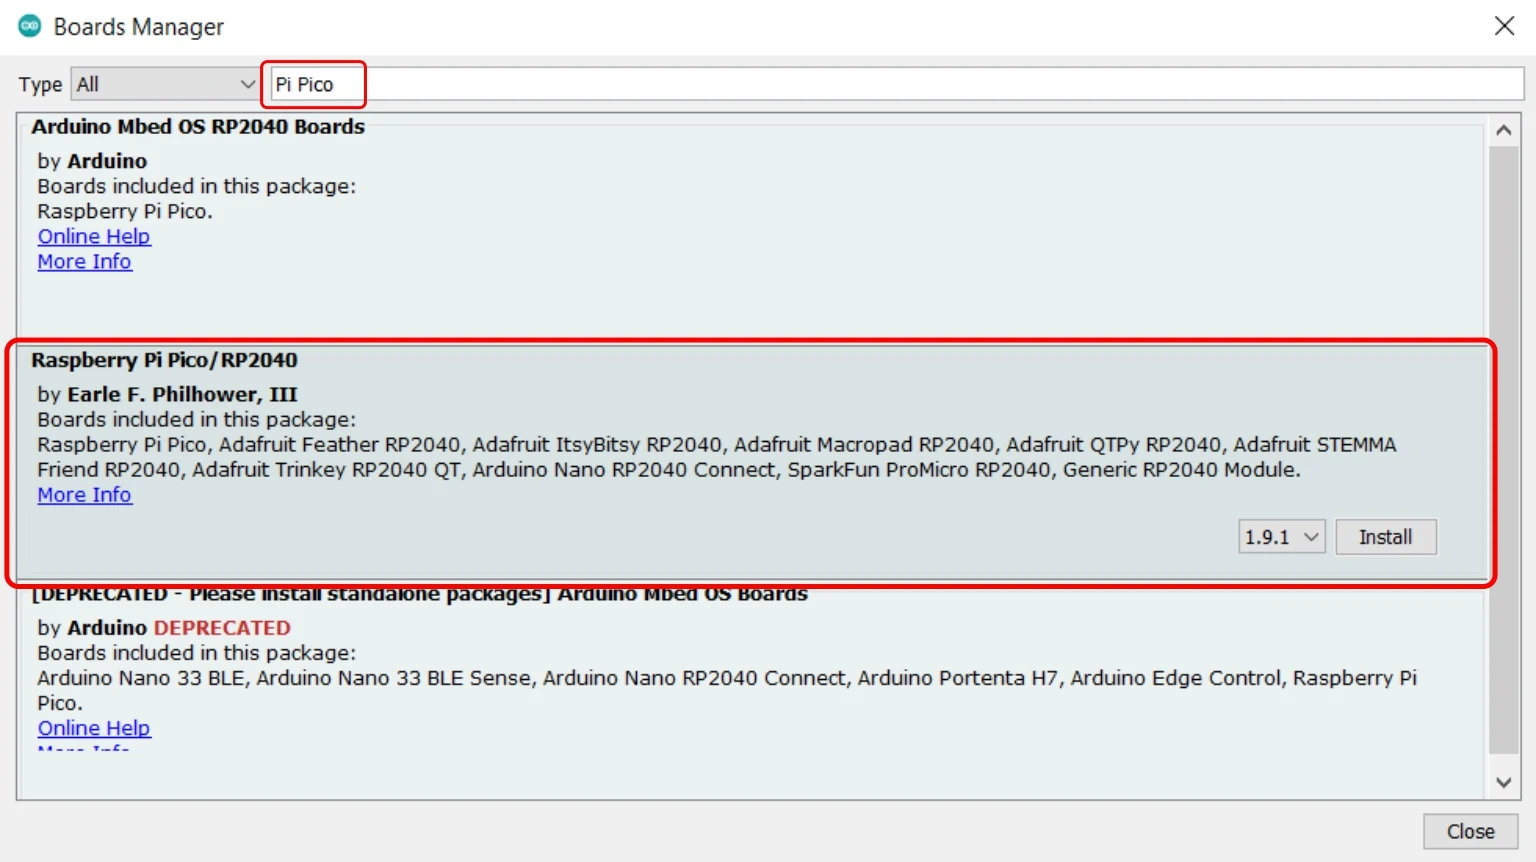
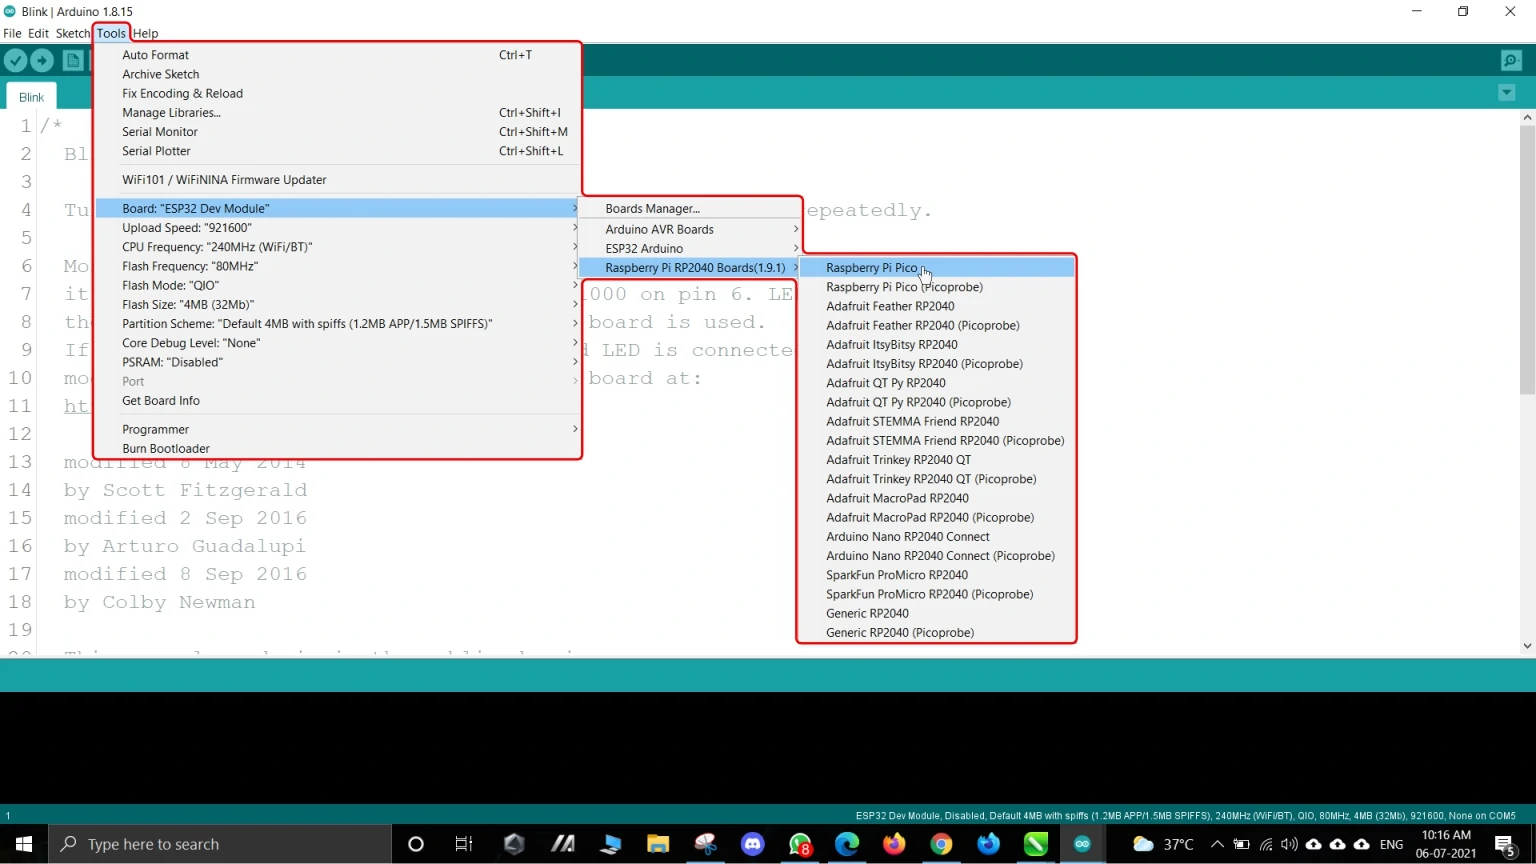
- Opening the board manager. Go to Tools → Board → Boards Manager. It will open a new board manager window, and it will load all contents from the added URLs in step 2. Wait till this process completes.

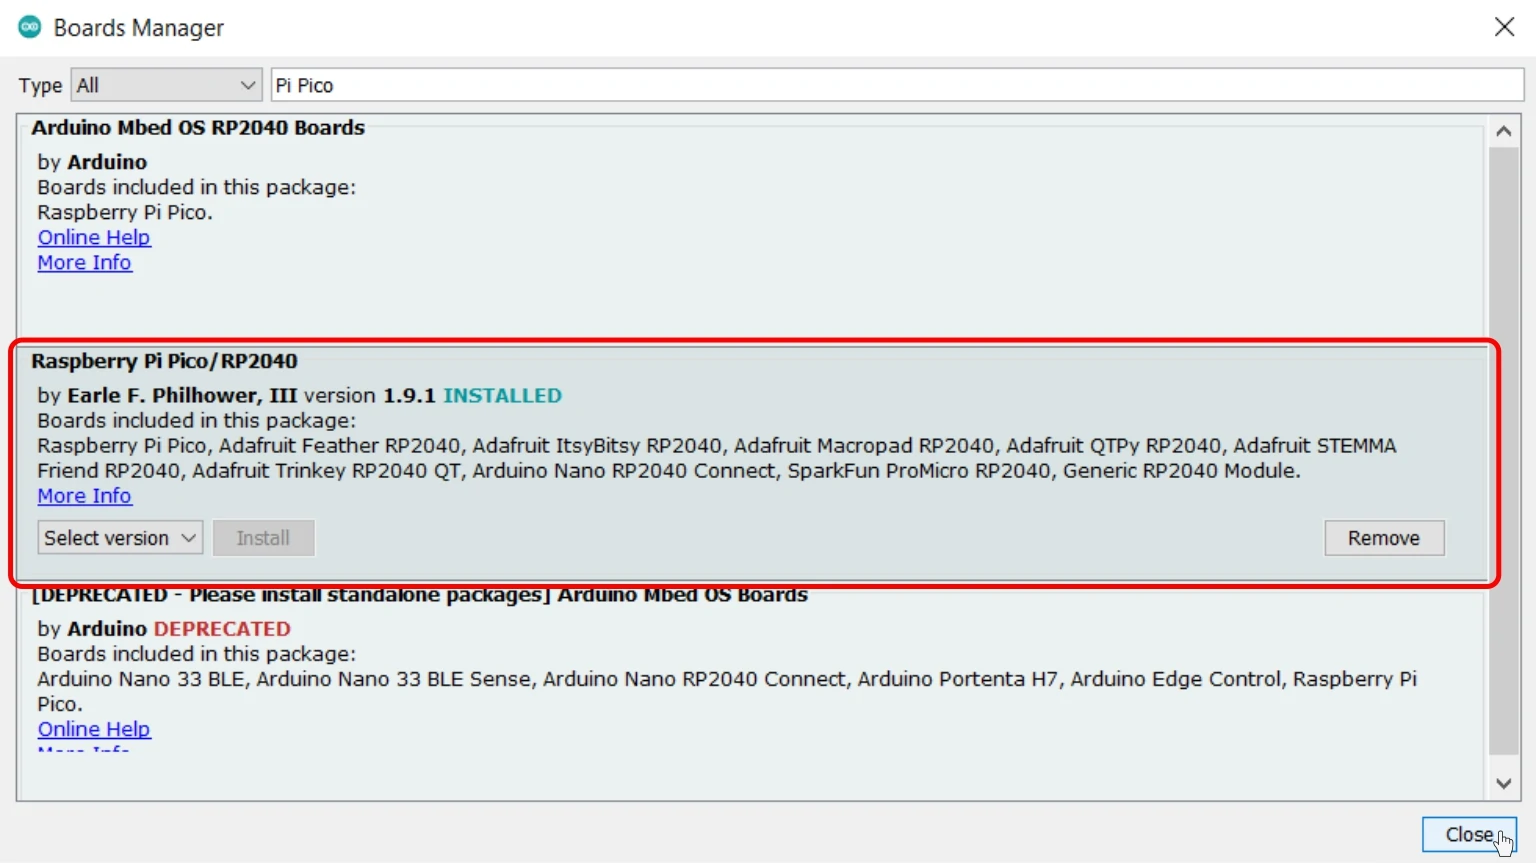
- Search for Pi Pico in the search bar. You will see Raspberry Pi Pico/RP2040 by Earle F. Philhower; select it.
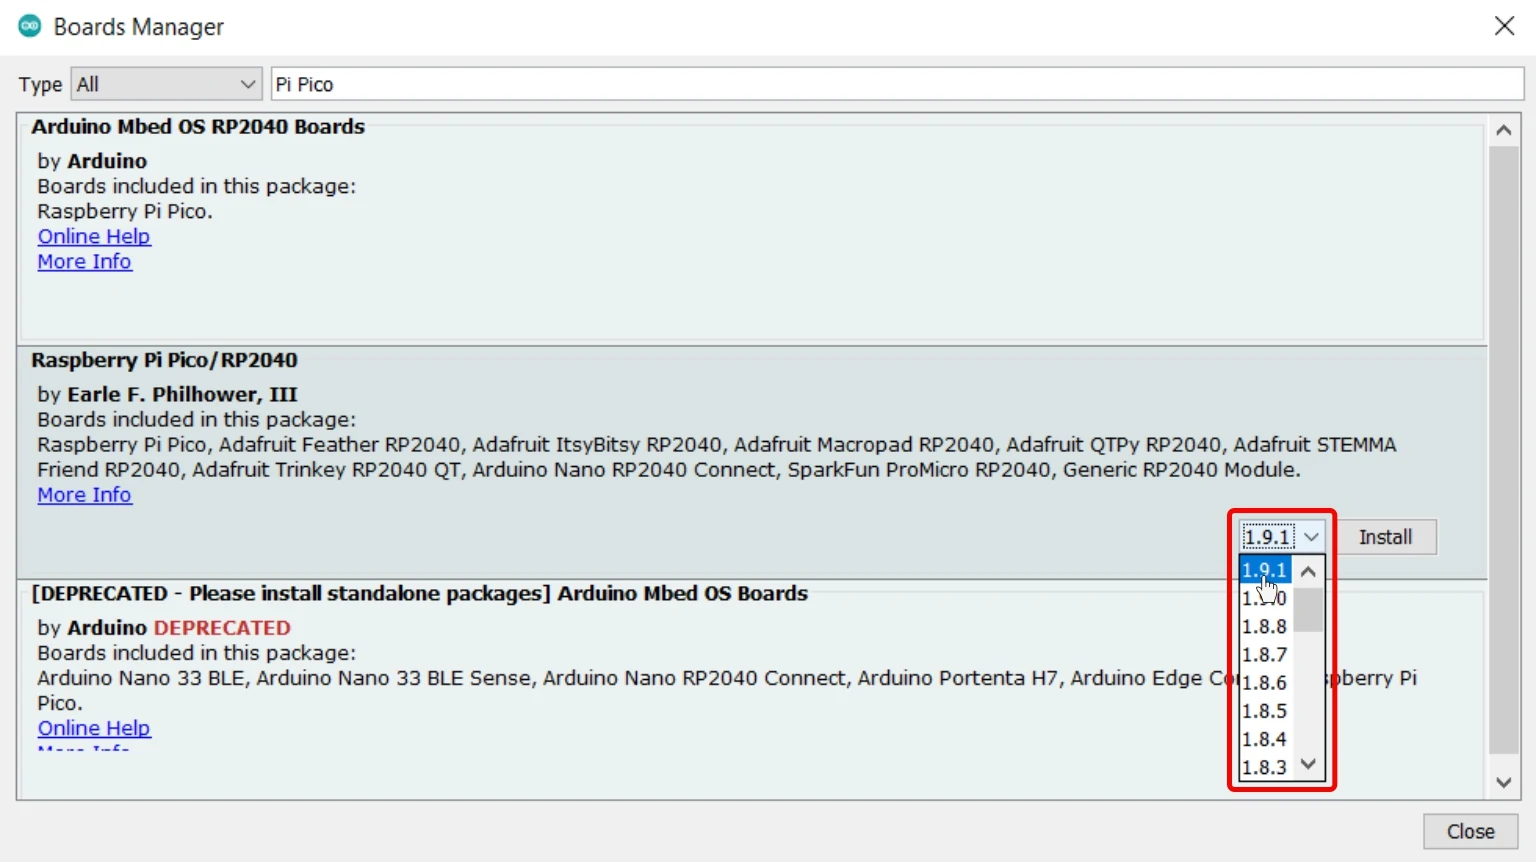
Select the appropriate version number from the right bottom corner. We recommend installing the latest version.
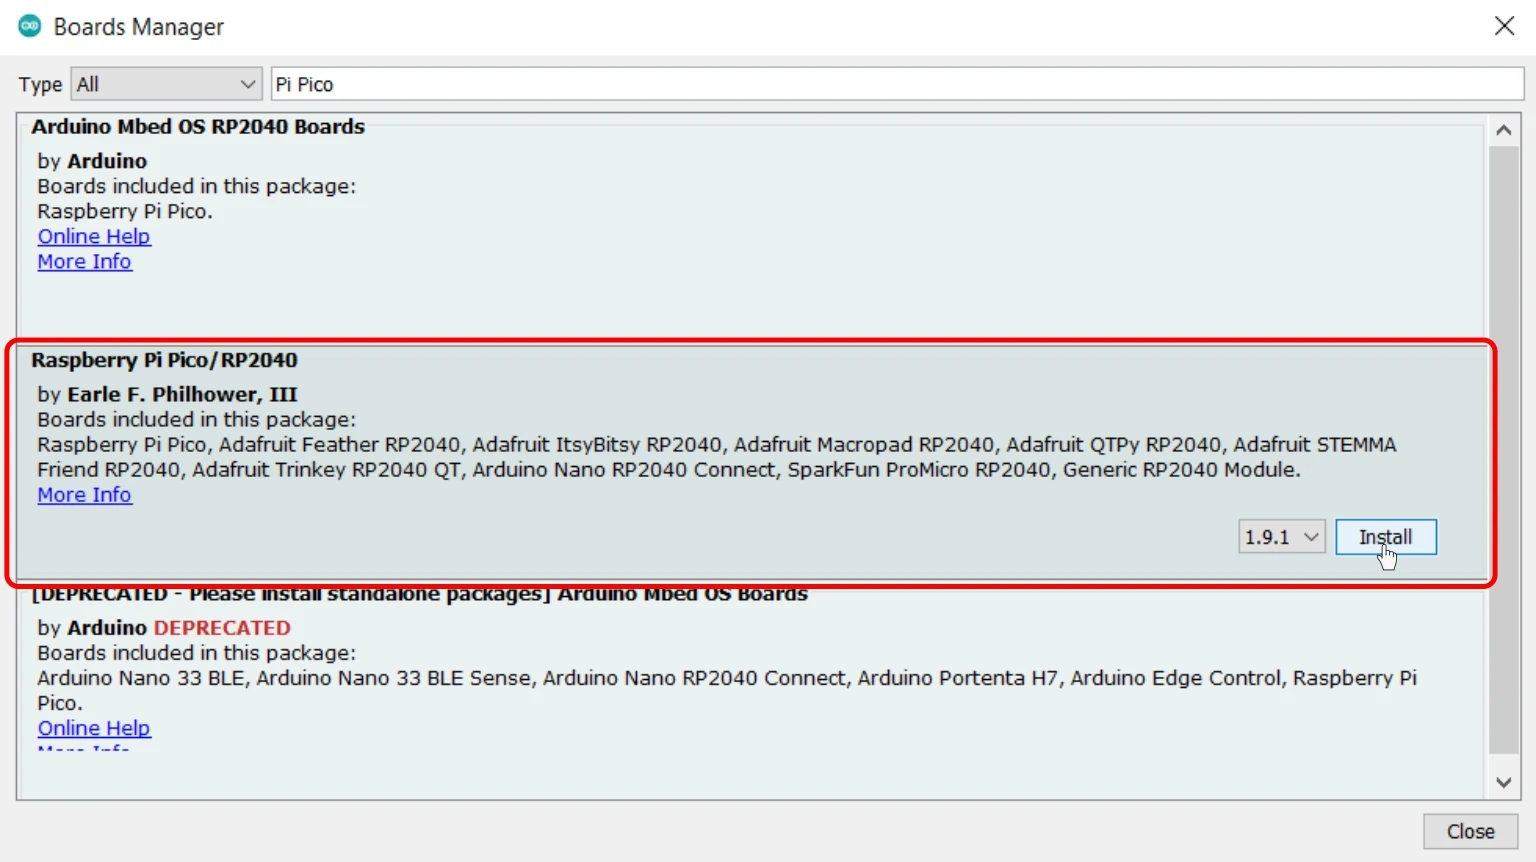
 Hit the Install button and wait.

- That’s all; we have installed unofficial support of Pi Pico. And you can now skip step 6 if you do not want to install the official support of Pi Pico.
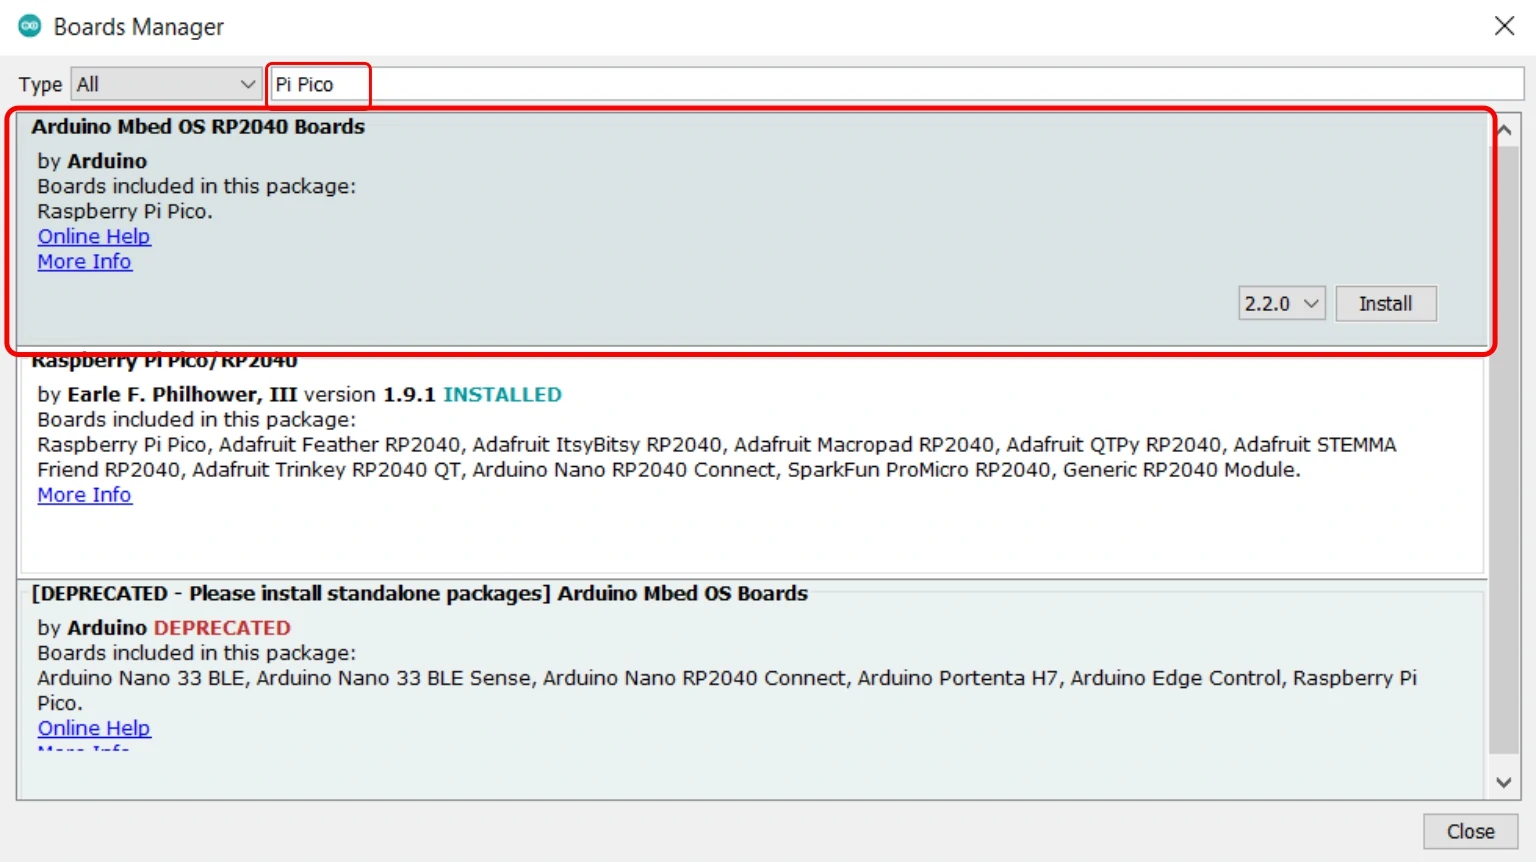
- For Official suppoer navigate to the same board manager Pi Pico search. You will see Arduino Mbed os RP2040 boards by Arduino; select it. Hit the Install button and wait.
- Once it starts installing, it will check for required drivers, and you will need to allow/install all the popup that occurs in the process.


- You can also confirm installation by going to Tools → Boards. You will see Raspberry Pi RP2040 Boards for the unofficial version and Arduino Mbed OS RP2040 Boards for the official version.
Note: If you don’t see ESP32 boards added, then try restarting your Arduino IDE.


Preparing Pi Pico Board
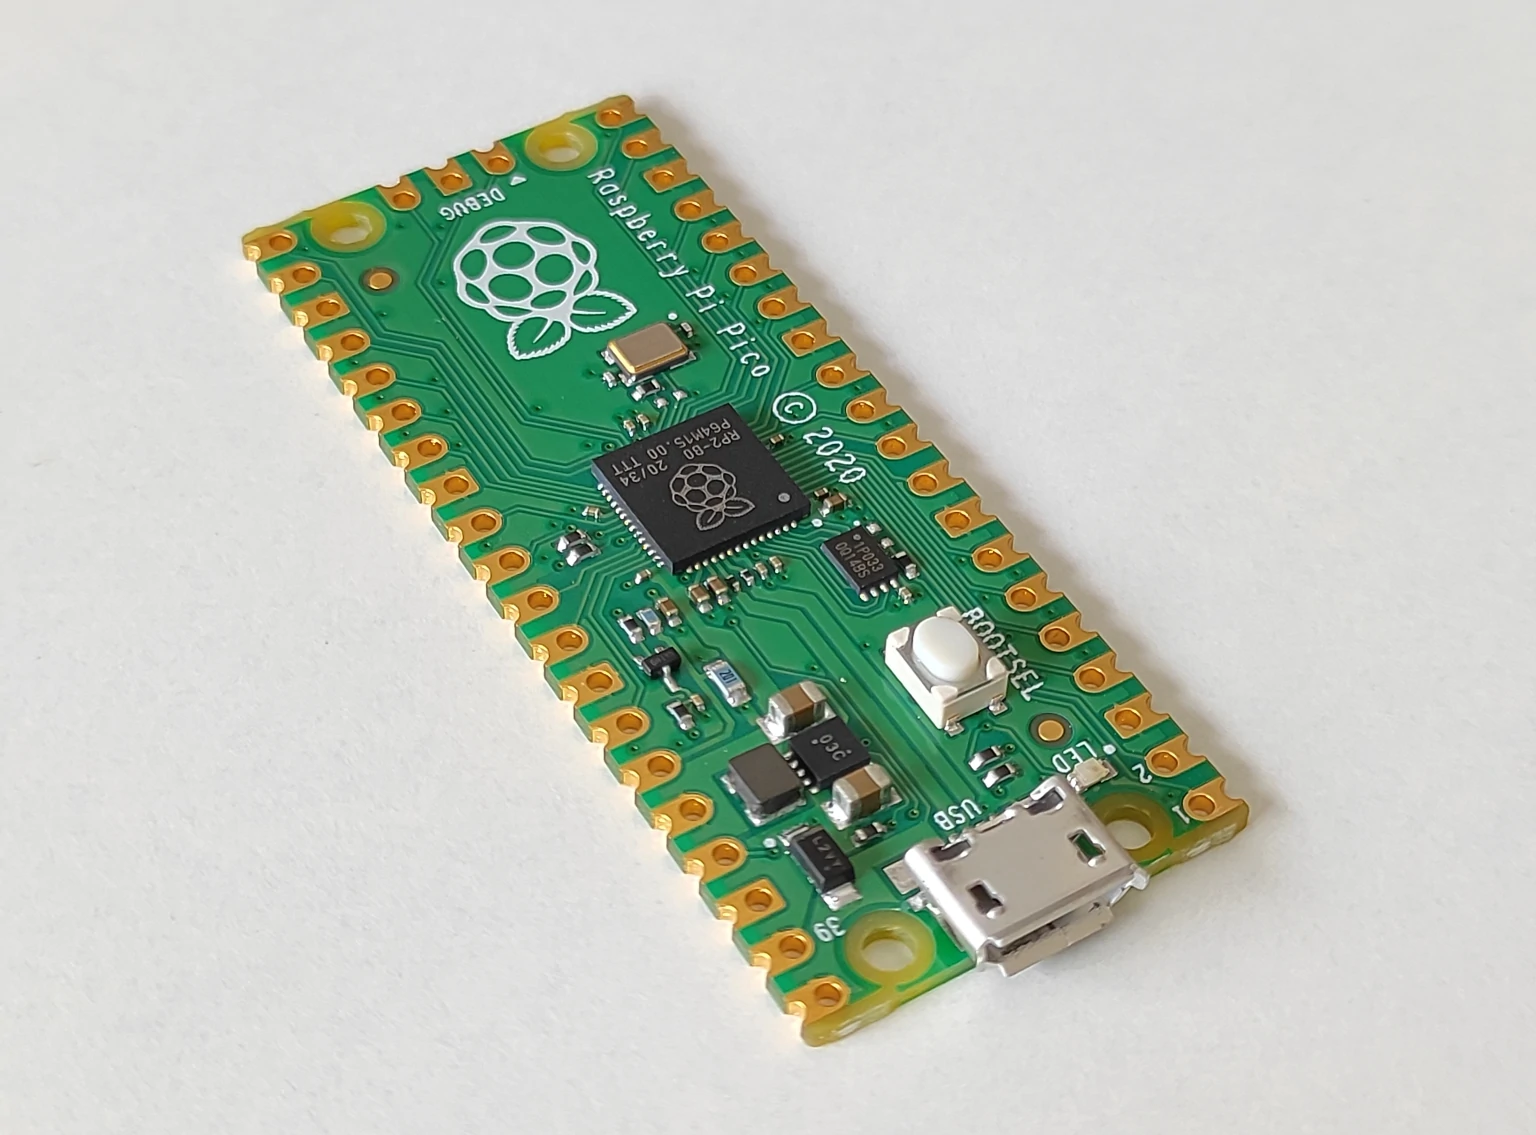
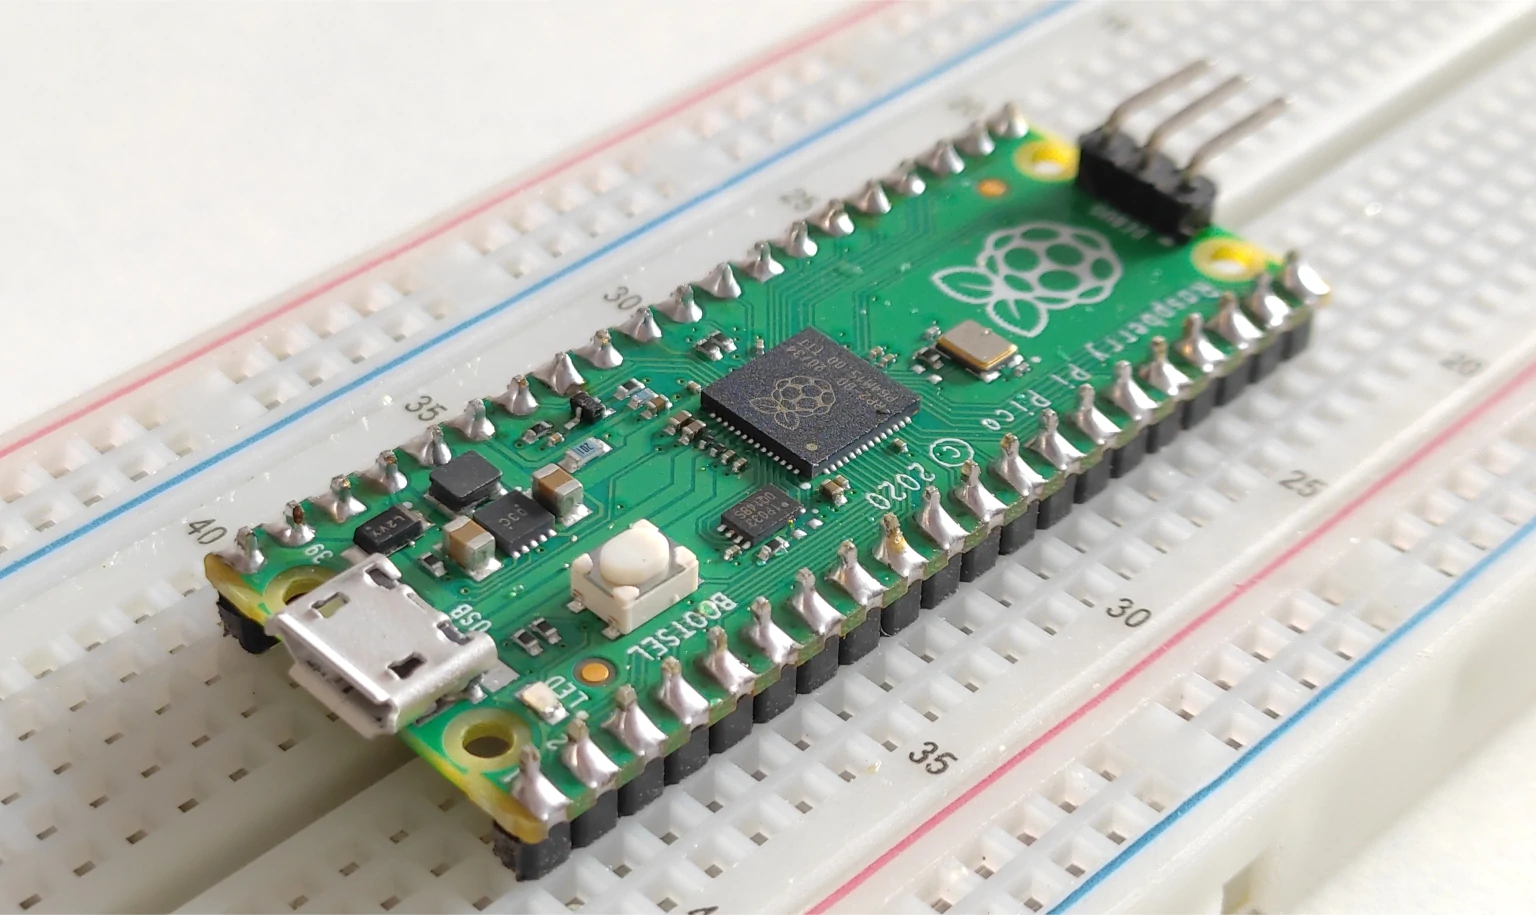
Pi Pico boards come in two forms, one with a male header soldered and another without headers.
We prefer soldering ourselves as it gives little more joy to solder a brand new board.
You can follow these simple steps if you have ordered a board without male headers.
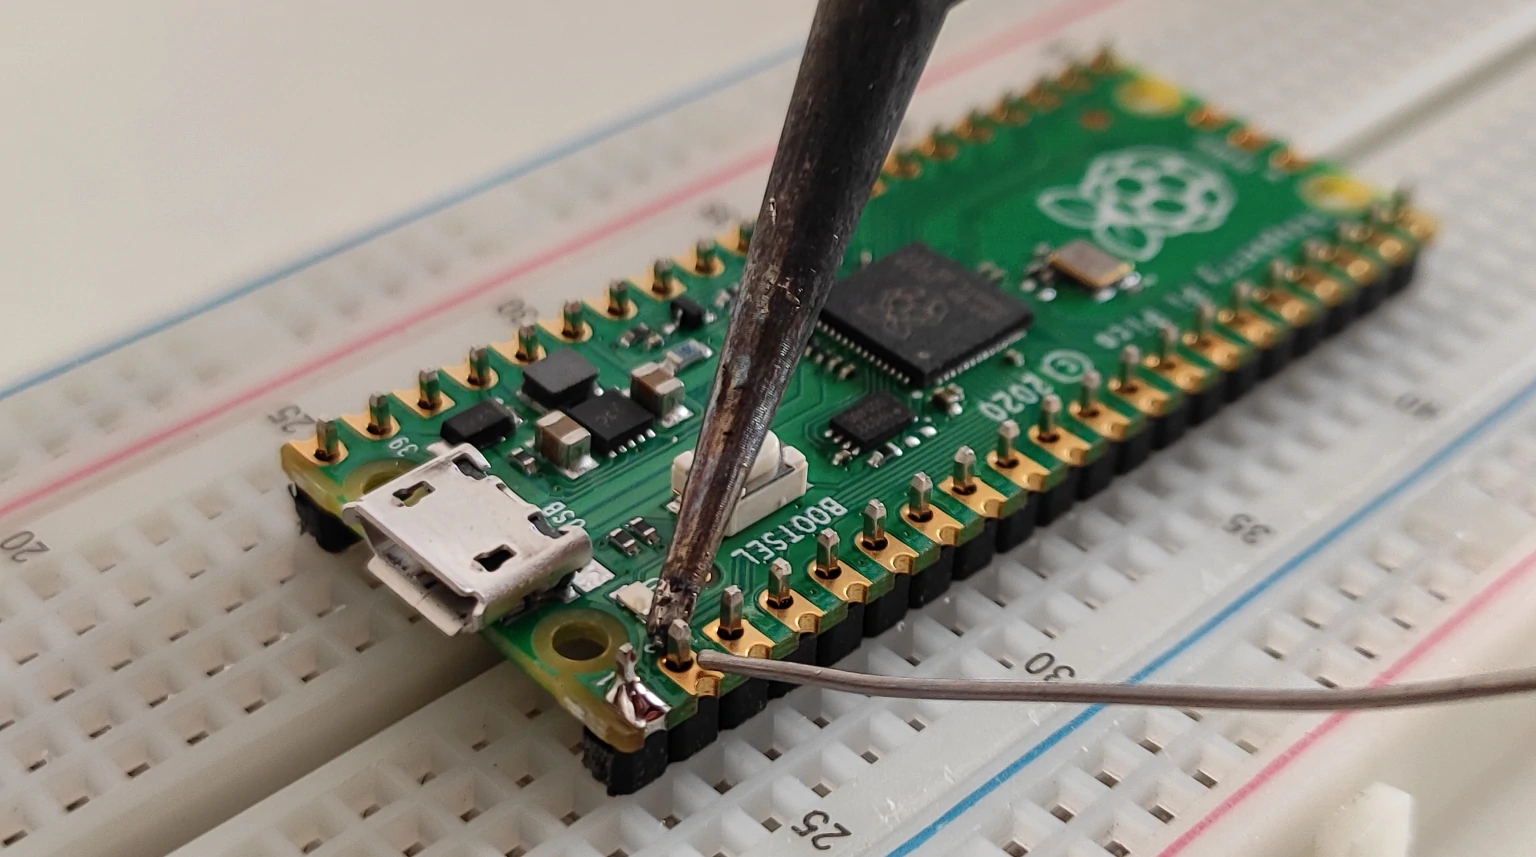
Cut the equal numbers of male headers and insert them into the breadboard. And now place your Pi Pico board above the male header pins

And start soldering pin by pin. If you are new to soldering, then take a deep breath to make yourself calm and comfortable so that your hand does not shake.
Now make contact to pins with your soldering iron tip. And with another hand, start adding solder wire to the pad and make initial contact with the soldering iron tip so that it can start melting.
Once soldering is done your Pi Pico board will look like this.
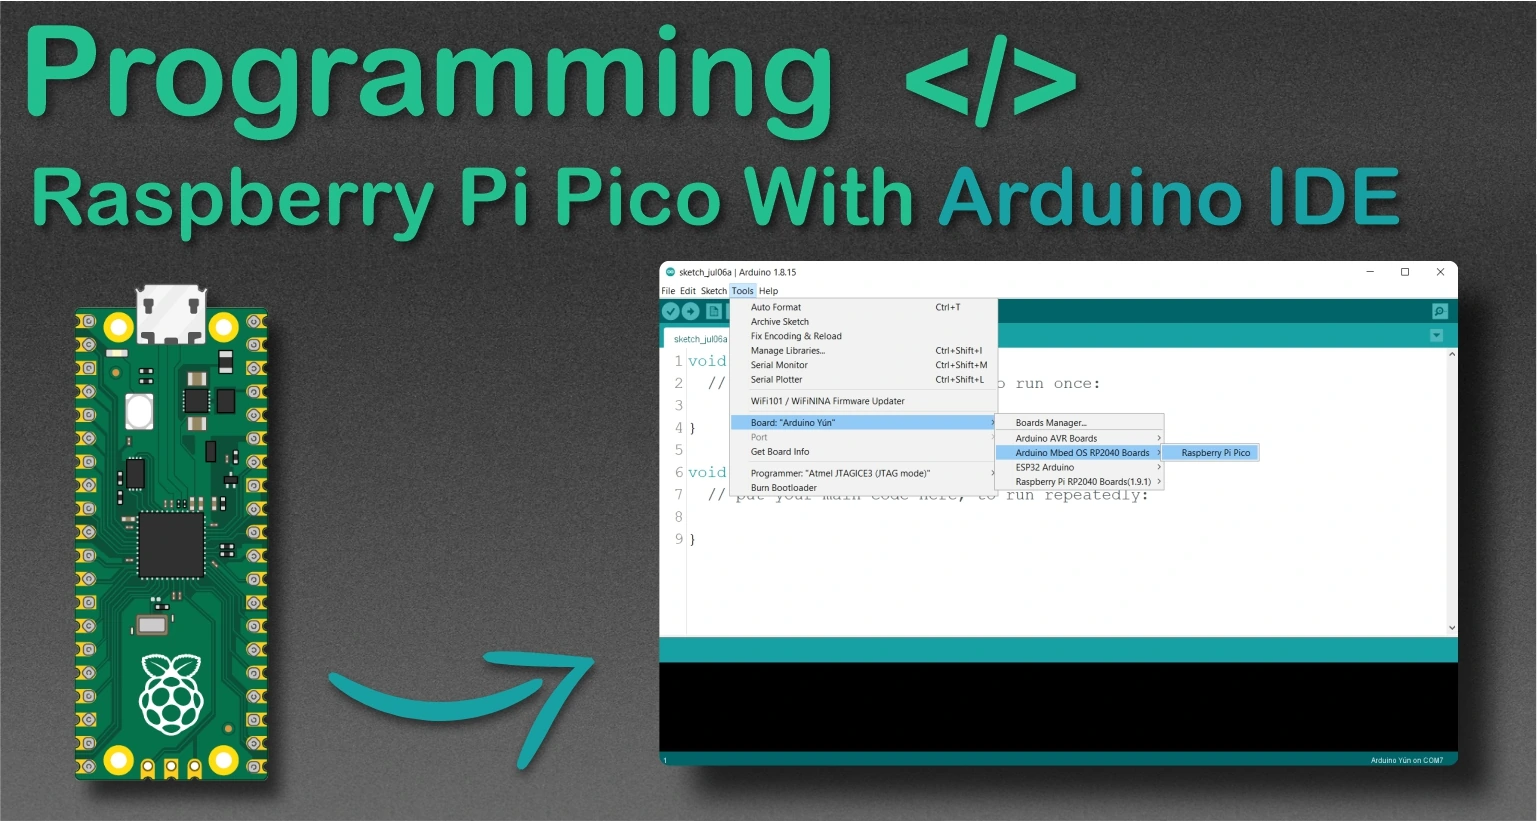
Programming Pi Pico using Arduino IDE
In this tutorial, we will upload the basic blink example code to the Pi Pico board using Arduino IDE.
Note: For the first time when you will use the Pi Pico board, you will need to press and hold the boot button while inserting the USB connector.
After connecting the Pi Pico board, follow the simple steps to upload the code using Arduino IDE.
- Selecting proper board. Go to Tools → Board →Raspberry Pi RP2040 Boards → Raspberry Pi Pico.

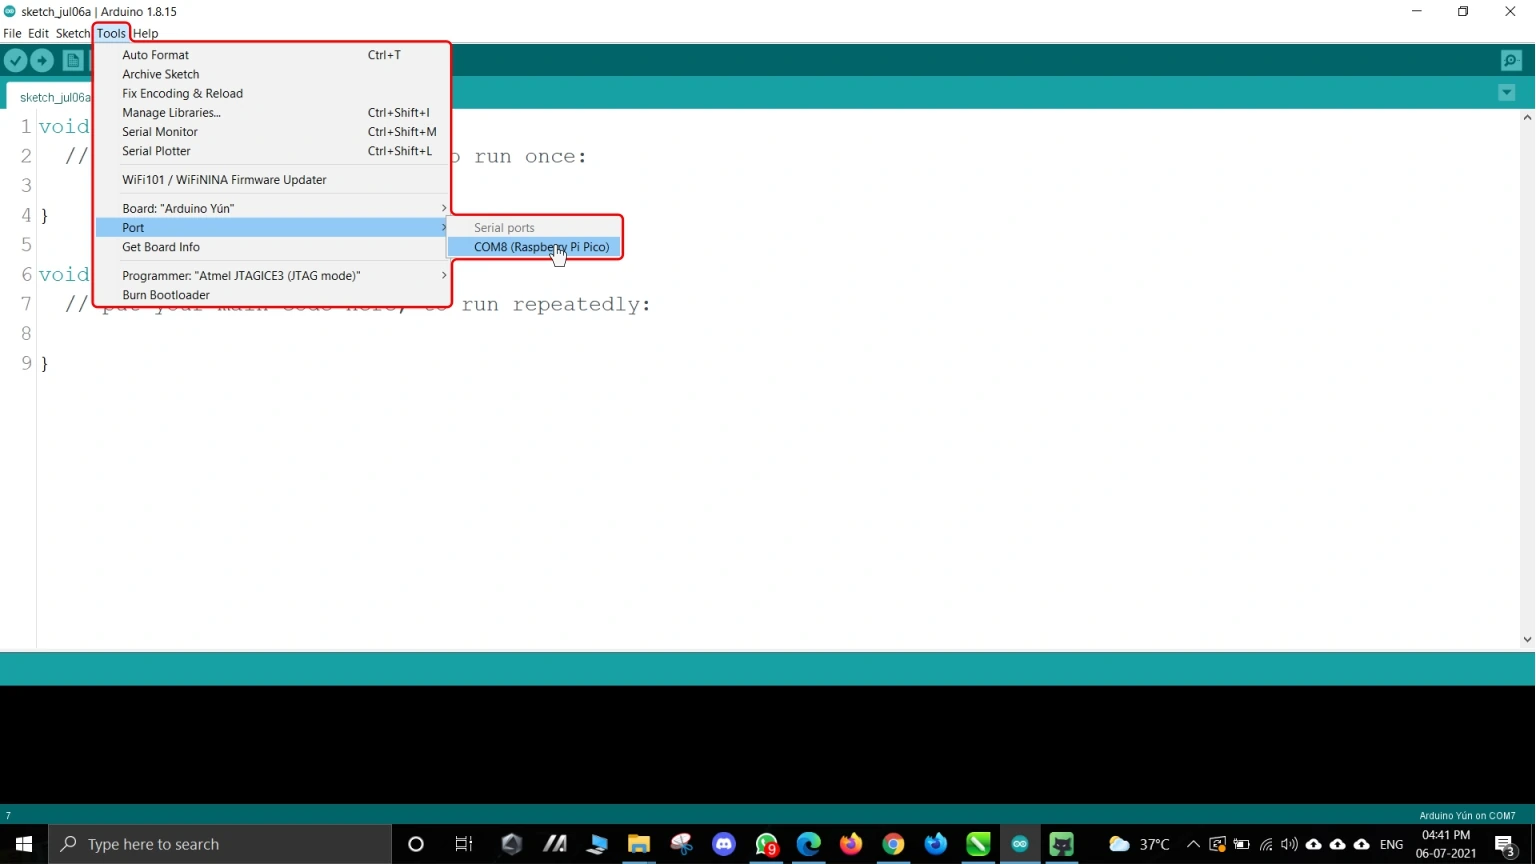
- Selecting appropriate COM port. Go to Tools → Port → COM8(Raspberry Pi Pico).
Note: You need to skip step2 as it will not show com port when you will program Pi Pico for the first time. But it will be programmed perfectly.
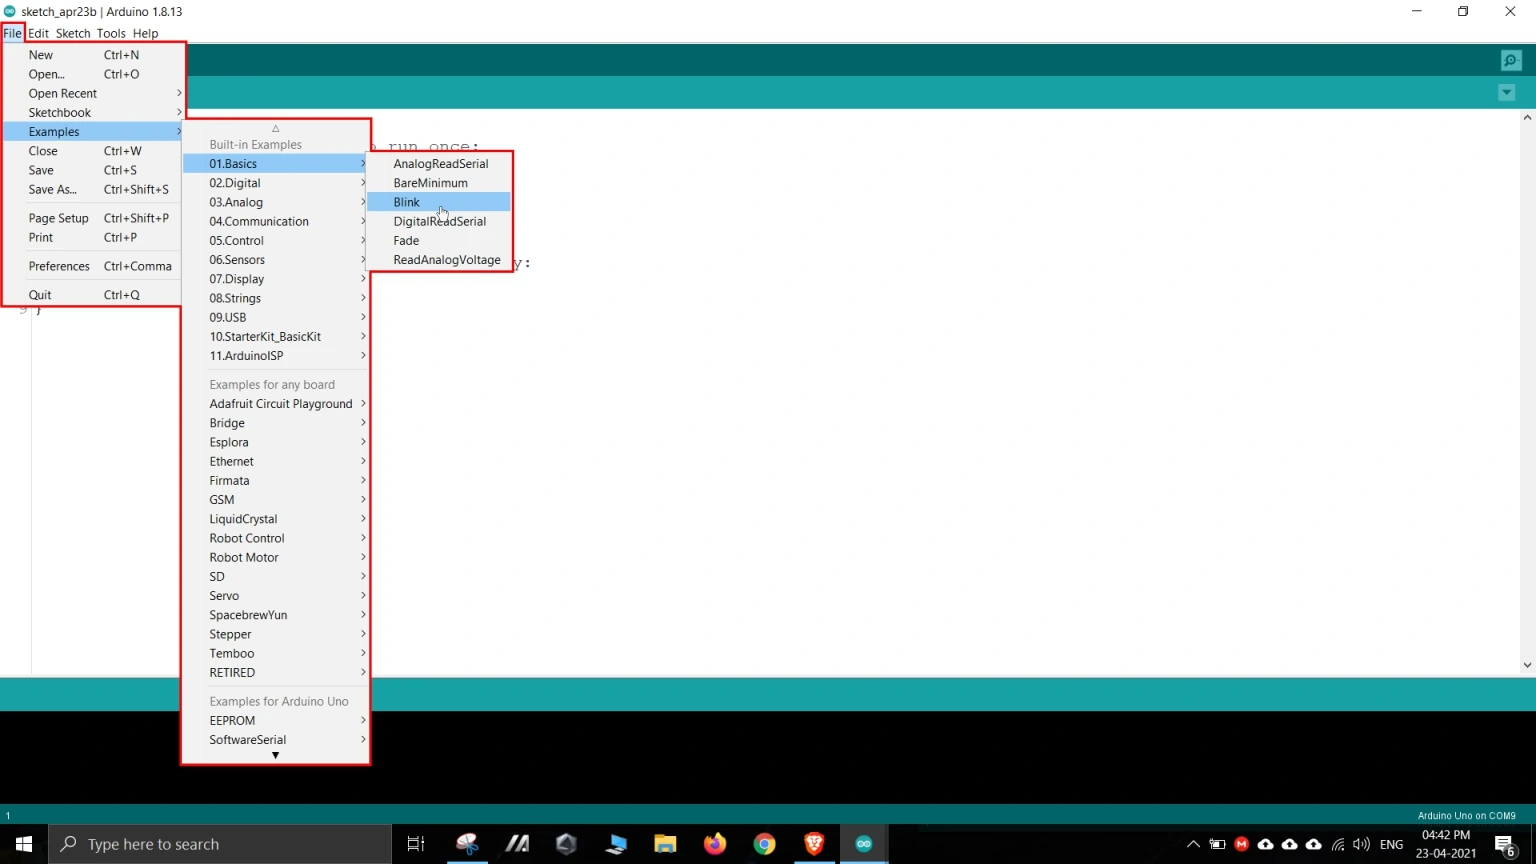
- Opening the example. Go to File → Examples → Basics → Blink.
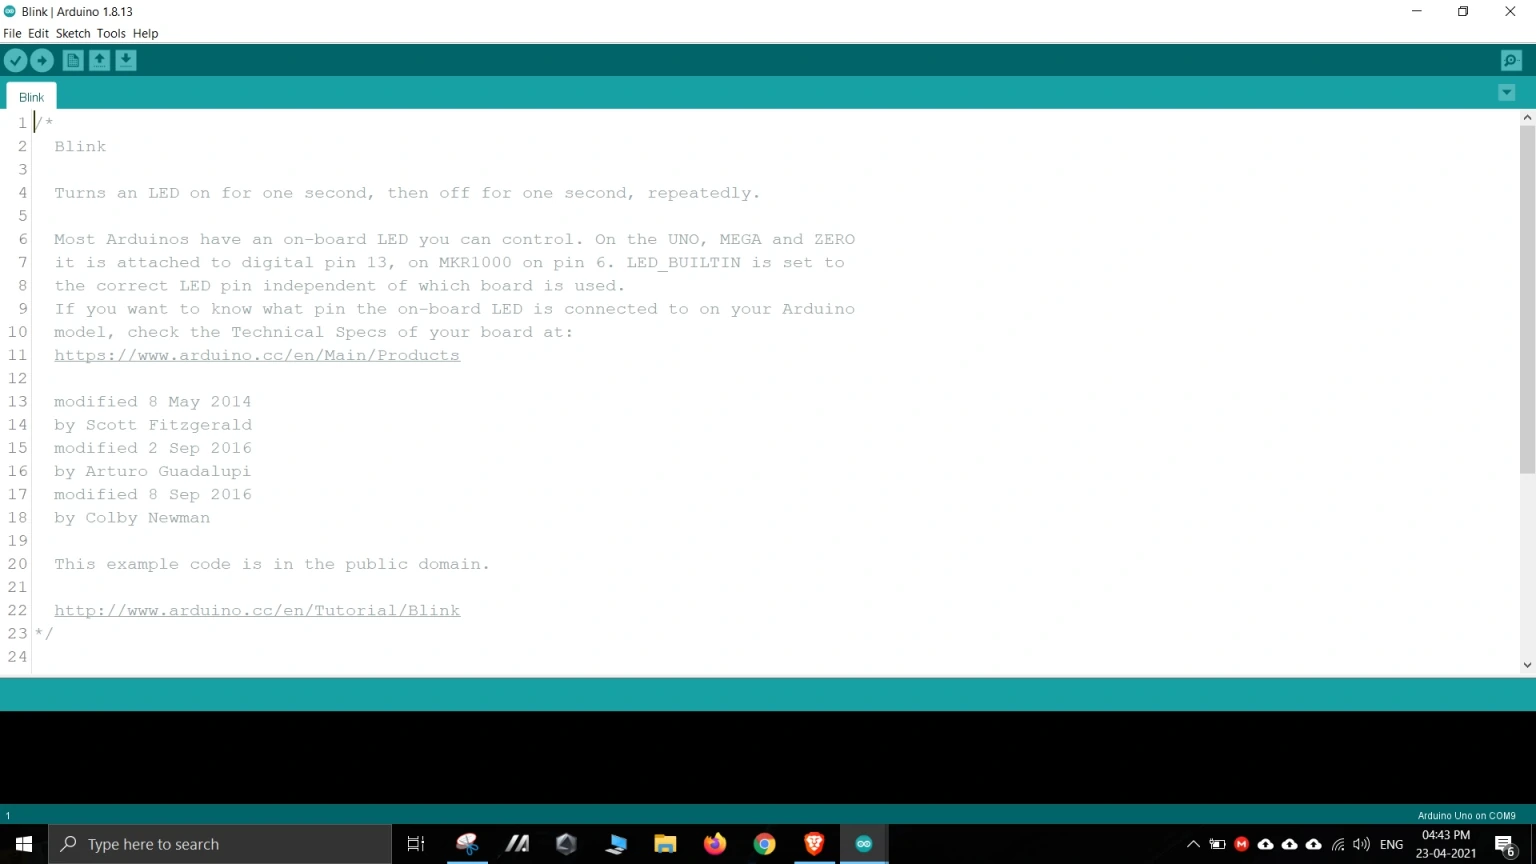
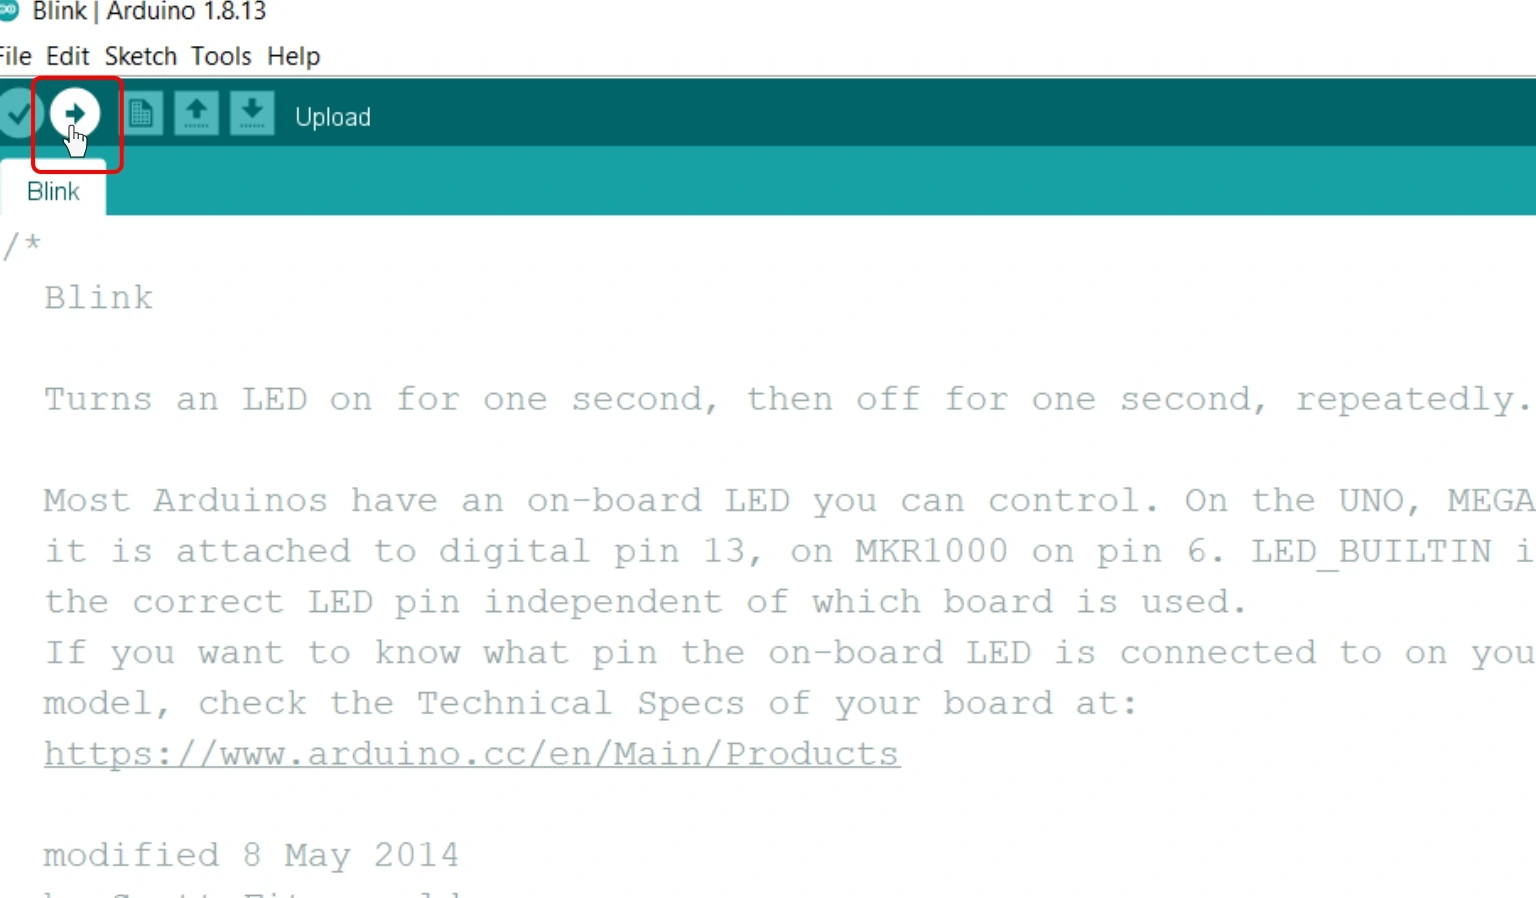
A new Arduino project window will be opened named Blink.Press the upload button in Arduino IDE for uploading the example code in your Pi Pico board.

- If all goes as per plan, you will see a Done uploading message.
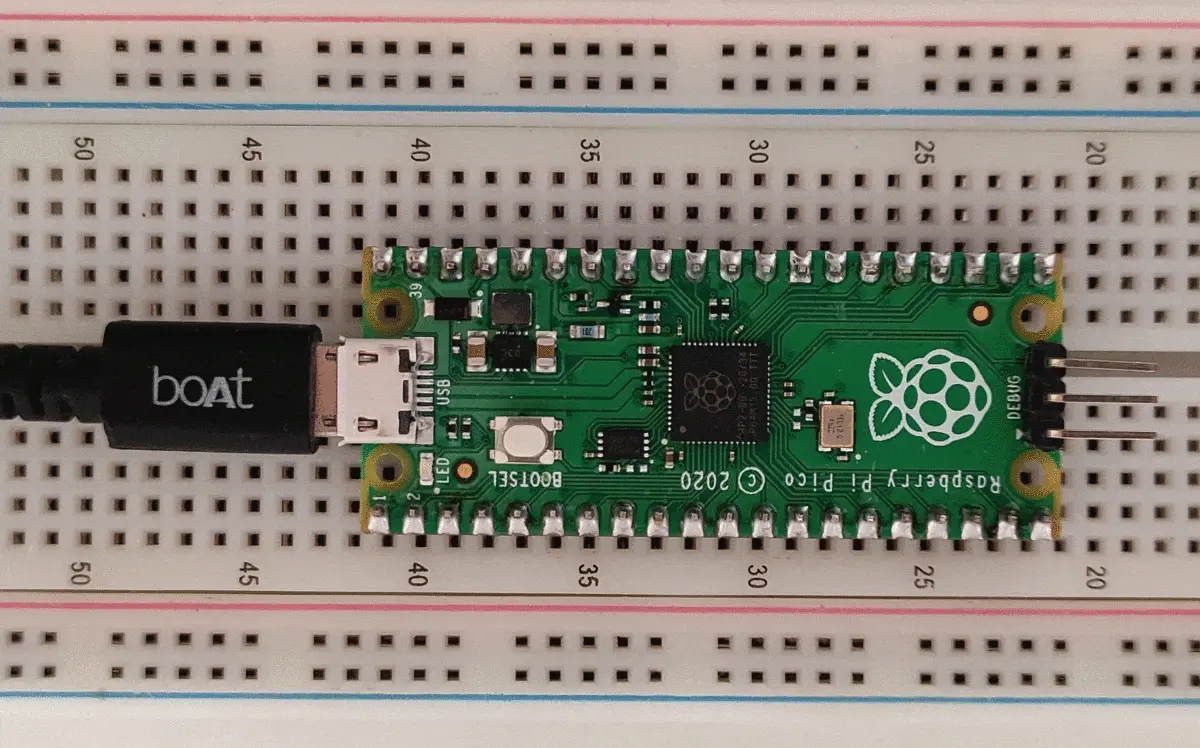
And after uploading, you will see the onboard LED of Pi Pico will be blinking at the rate of 1 second.


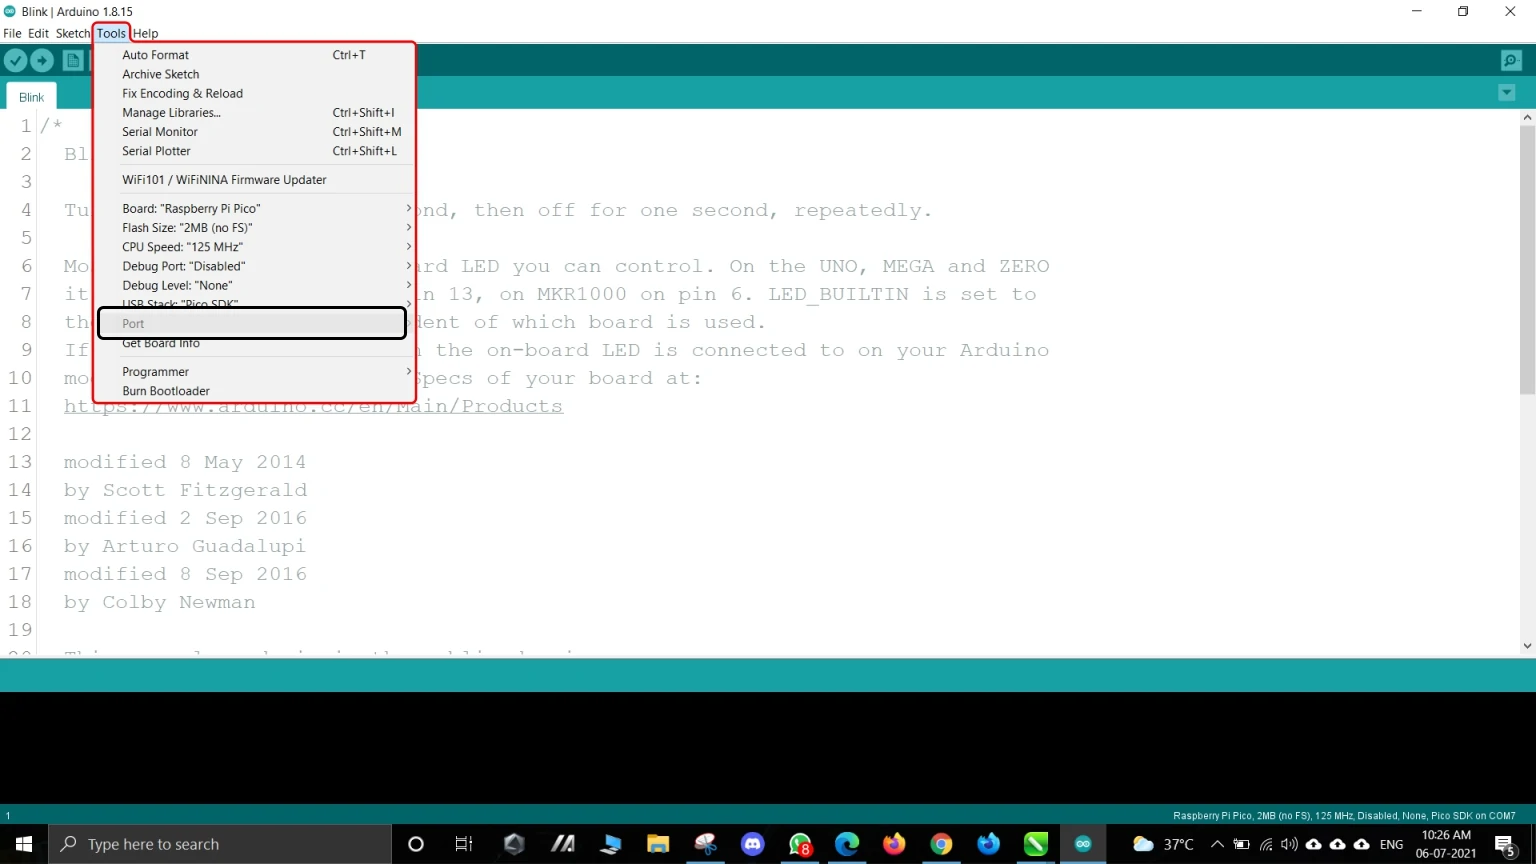

As we see that this unofficial version gives few more options that we can play with, like flash size, debug level, CPU speed, debug port, and USB stack.
For this tutorial, we had used all default options. We will be using them in future projects.
Official Support
For using the official Arduino support, only one step will be different from the board selection.
Go to Tools → Board →Arduino Mbed OS RP2040 Boards → Raspberry Pi Pico.

The rest process will be the same. Additionally, you will notice fewer configuration options in the official support than in the unofficial version.
You can try both supports based on your project requirements.
Once you have programmed your Pi Pico board, it will start showing the serial port in Arduino IDE.
Wrapping Up
We have learned to program the new Pi Pico board using an Arduino IDE. After all, trying the new Pi Pico board will open the doors to try out new things. The RP2040 provides lots of features with a small form factor and affordable rates.
Let us know what you all think about this new board in the comment section.